
How to Clean Cork Flooring: What to Use, Avoid & Maintain
To clean cork flooring, first remove loose dirt with a soft-bristle broom, microfiber dust mop, or vacuum without a beater bar. Then damp-mop the surface with a well-wrung microfiber mop and a small amount of mild, pH-neutral cleaner suitable for the floor’s finish. Do not flood the floor or allow water to sit, as excess moisture can seep into seams and affect cork flooring over time.
For spills, blot them as soon as possible instead of rubbing them across the surface. Stubborn marks can usually be treated with a soft cloth and an appropriate floor cleaner rather than abrasive pads or harsh chemicals. Also avoid steam mops unless the flooring manufacturer specifically permits them. This guide by Floor Land explains the safest ways to clean cork flooring, remove common stains, and keep the surface looking well maintained without damaging its finish.
Find Out How Your Cork Is Sealed
This is the step most people skip. It is also the step that saves floors. Cork comes with three common finishes, and each one handles water differently.
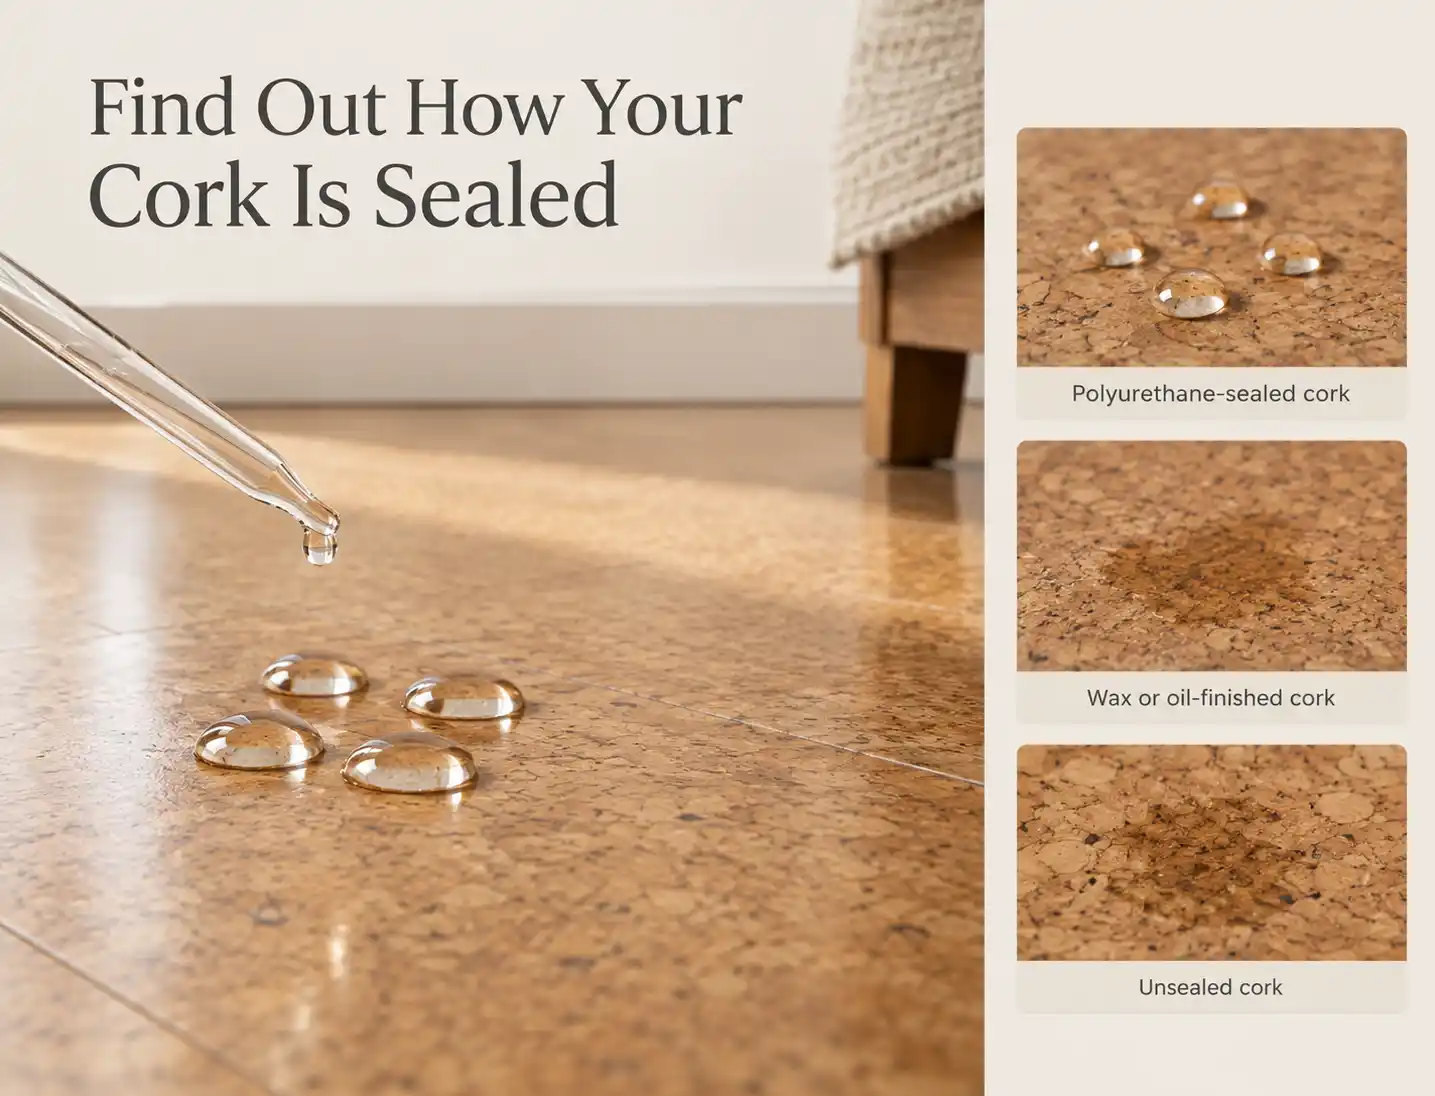
- Polyurethane-sealed cork. The most common type sold today. A thin clear layer sits on top of the cork. Water beads up on the surface.
- Wax or oil-finished cork. Common on older floors. The surface looks matte and feels soft to the touch.
- Unsealed cork. Rare in homes. Very porous and very thirsty. It needs a sealer before any wet cleaning.
The Water Drop Test
Perform the water drop test to determine whether cork flooring is sealed.
- Pick a hidden spot such as a closet floor or a corner behind a door.
- Drop three or four drops of water on the surface.
- Wait five minutes.
- Look closely at the drops.
- If the water still sits in beads, your floor is sealed with polyurethane. Methods 1 through 6 are safe for you.
- If the water soaked in and left a dark spot, your floor is waxed, oiled, or unsealed. Stick to Method 1 and Method 7.
Quick tip: Wipe the test spot dry as soon as you finish. Do not let the water sit longer than five minutes.
Supplies You Will Need
Below are the tools and materials you will need to clean cork floors.
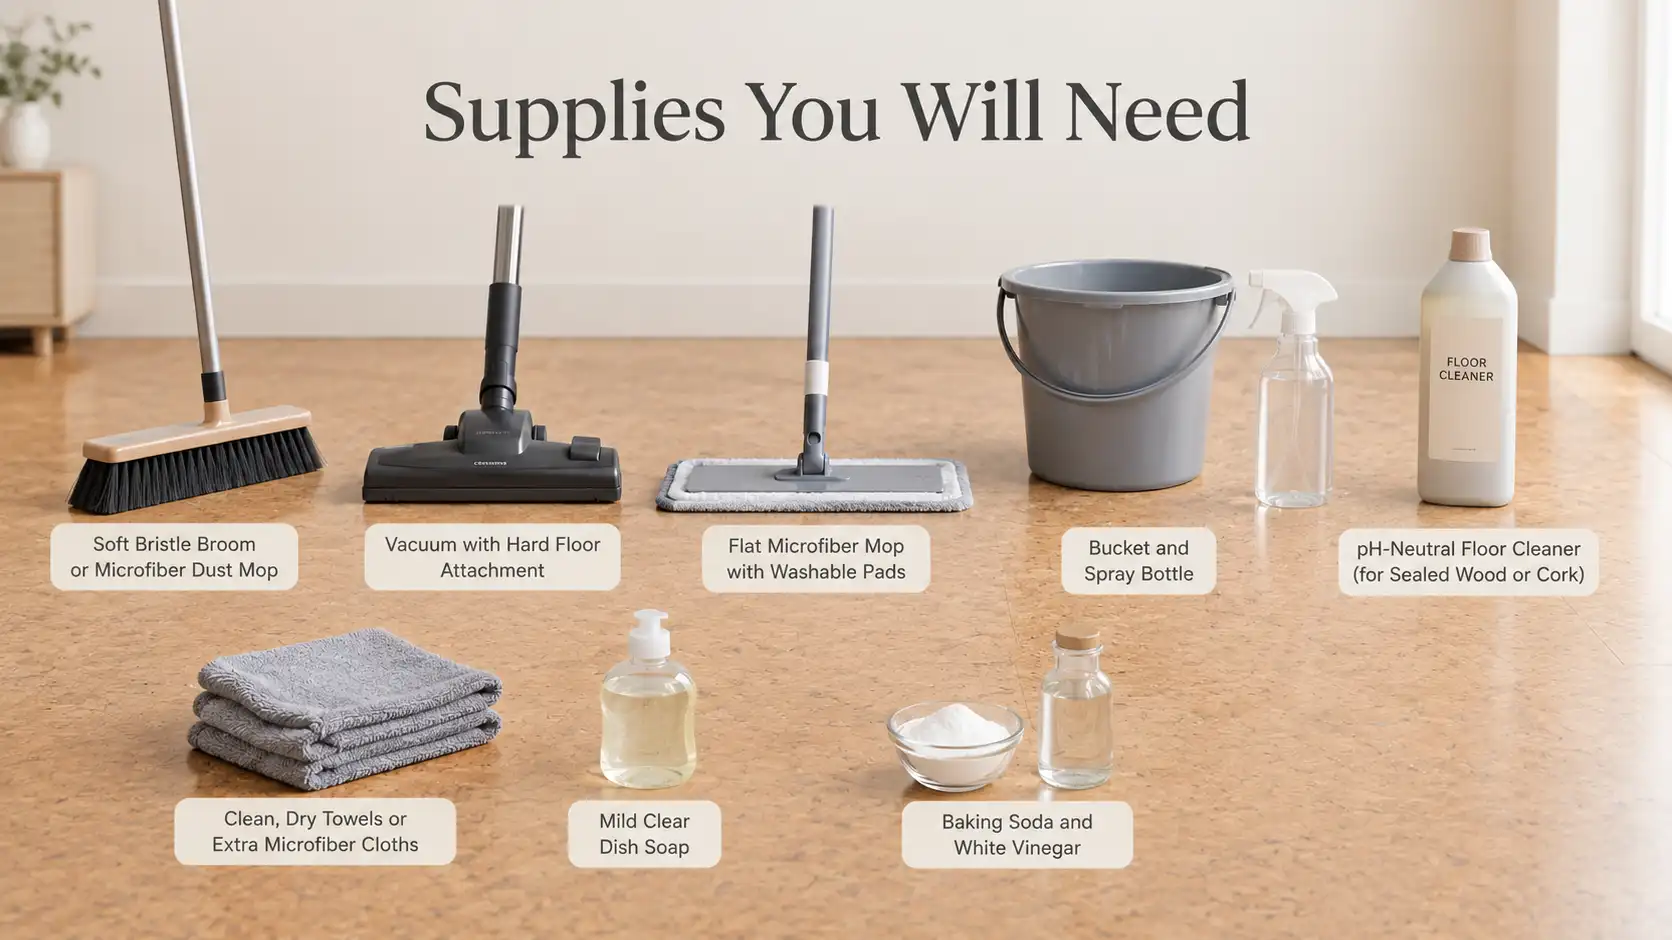
- A soft bristle broom or a microfiber dust mop
- A vacuum with a hard floor attachment and a beater bar you can switch off
- A flat microfiber mop with two or three washable pads
- A bucket and a spray bottle
- A pH-neutral floor cleaner made for sealed wood or cork
- Clean, dry towels or extra microfiber cloths
- Mild clear dish soap
- Baking soda and white vinegar for tough spots
Skip this: Leave the string mop, the sponge mop, and the steam mop in the closet. All three put far too much water on cork.
Method 1: Daily Dry Cleaning
Grit is cork’s number one enemy. Sand and small stones act like sandpaper under your shoes. Every step grinds them into the finish and dulls the surface. Dry cleaning takes two minutes and prevents most long-term damage. Here is how to clean your cork flooring daily.
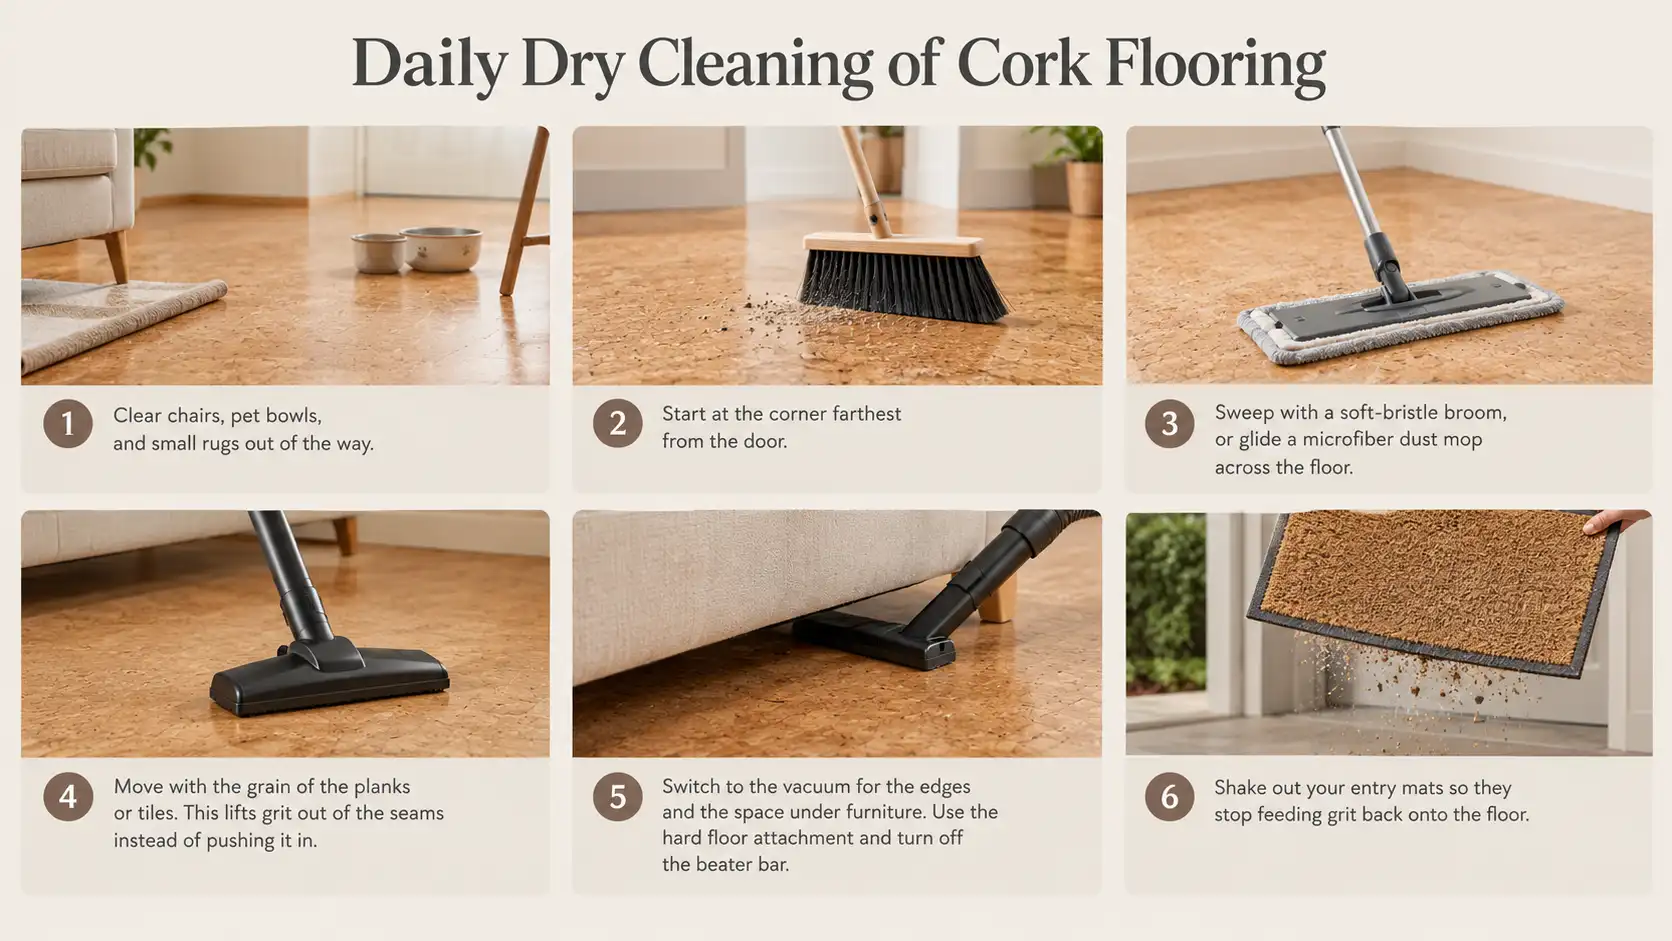
- Clear chairs, pet bowls, and small rugs out of the way.
- Start at the corner farthest from the door so you never walk back over swept areas.
- Sweep with a soft-bristle broom, or glide a microfiber dust mop across the floor.
- Move with the grain of the planks or tiles. This lifts grit out of the seams instead of pushing it in.
- Switch to the vacuum for the edges and the space under furniture. Use the hard floor attachment and turn off the beater bar.
- Shake out your entry mats so they stop feeding grit back onto the floor.
You can use this method every day in kitchens, hallways, and entryways. Two or three times a week in bedrooms and quiet rooms.
Method 2: Weekly Damp Mop With a pH-Neutral Cleaner
This is your main routine clean for sealed cork. A pH-neutral cleaner lifts dirt without eating into the finish. The whole trick is moisture control. Your mop pad should be damp, never wet.
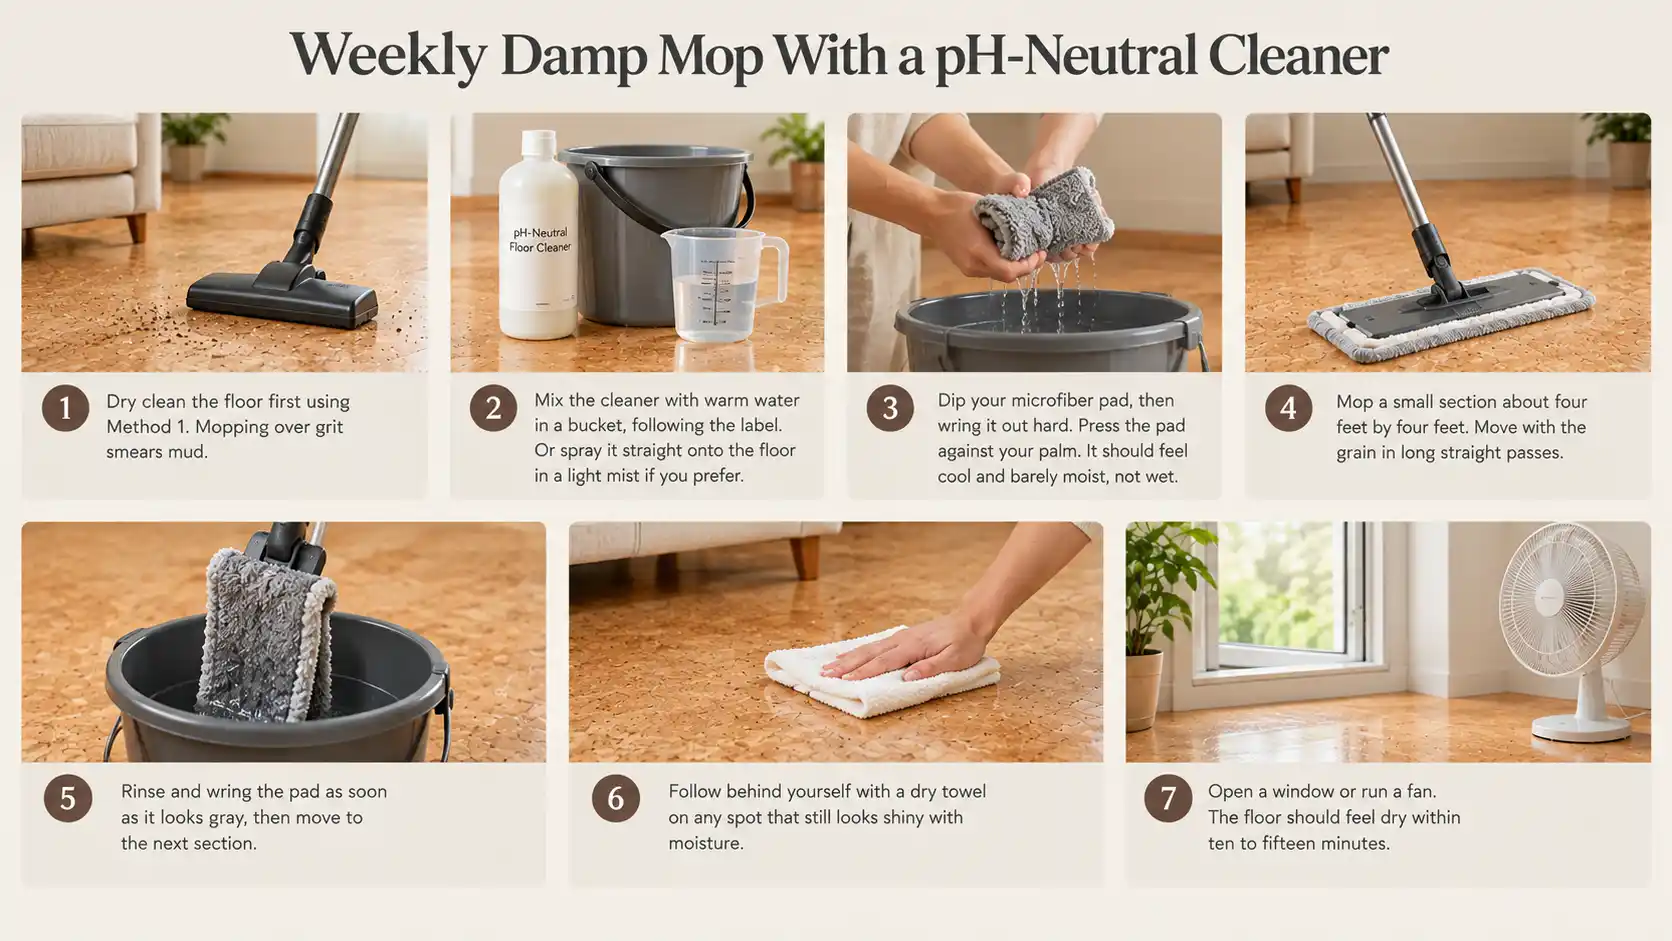
- Dry clean the floor first using Method 1. Mopping over grit just smears mud.
- Mix the cleaner with warm water in a bucket, following the label. Or spray it straight onto the floor in a light mist if you prefer.
- Dip your microfiber pad, then wring it out hard. Press the pad against your palm. It should feel cool and barely moist, not wet.
- Mop a small section about four feet by four feet. Move with the grain in long straight passes.
- Rinse and wring the pad as soon as it looks gray, then move to the next section.
- Follow behind yourself with a dry towel on any spot that still looks shiny with moisture.
- Open a window or run a fan. The floor should feel dry within ten to fifteen minutes.
Never do this: Never pour cleaner straight onto cork and never leave standing water. Liquid that reaches a seam will swell the core underneath.
Method 3: Dish Soap and Warm Water
This method is a budget-friendly way to keep your cork floor clean. It works well when you run out of floor cleaner, and it handles everyday kitchen film. The key is using far less soap than you think you need.
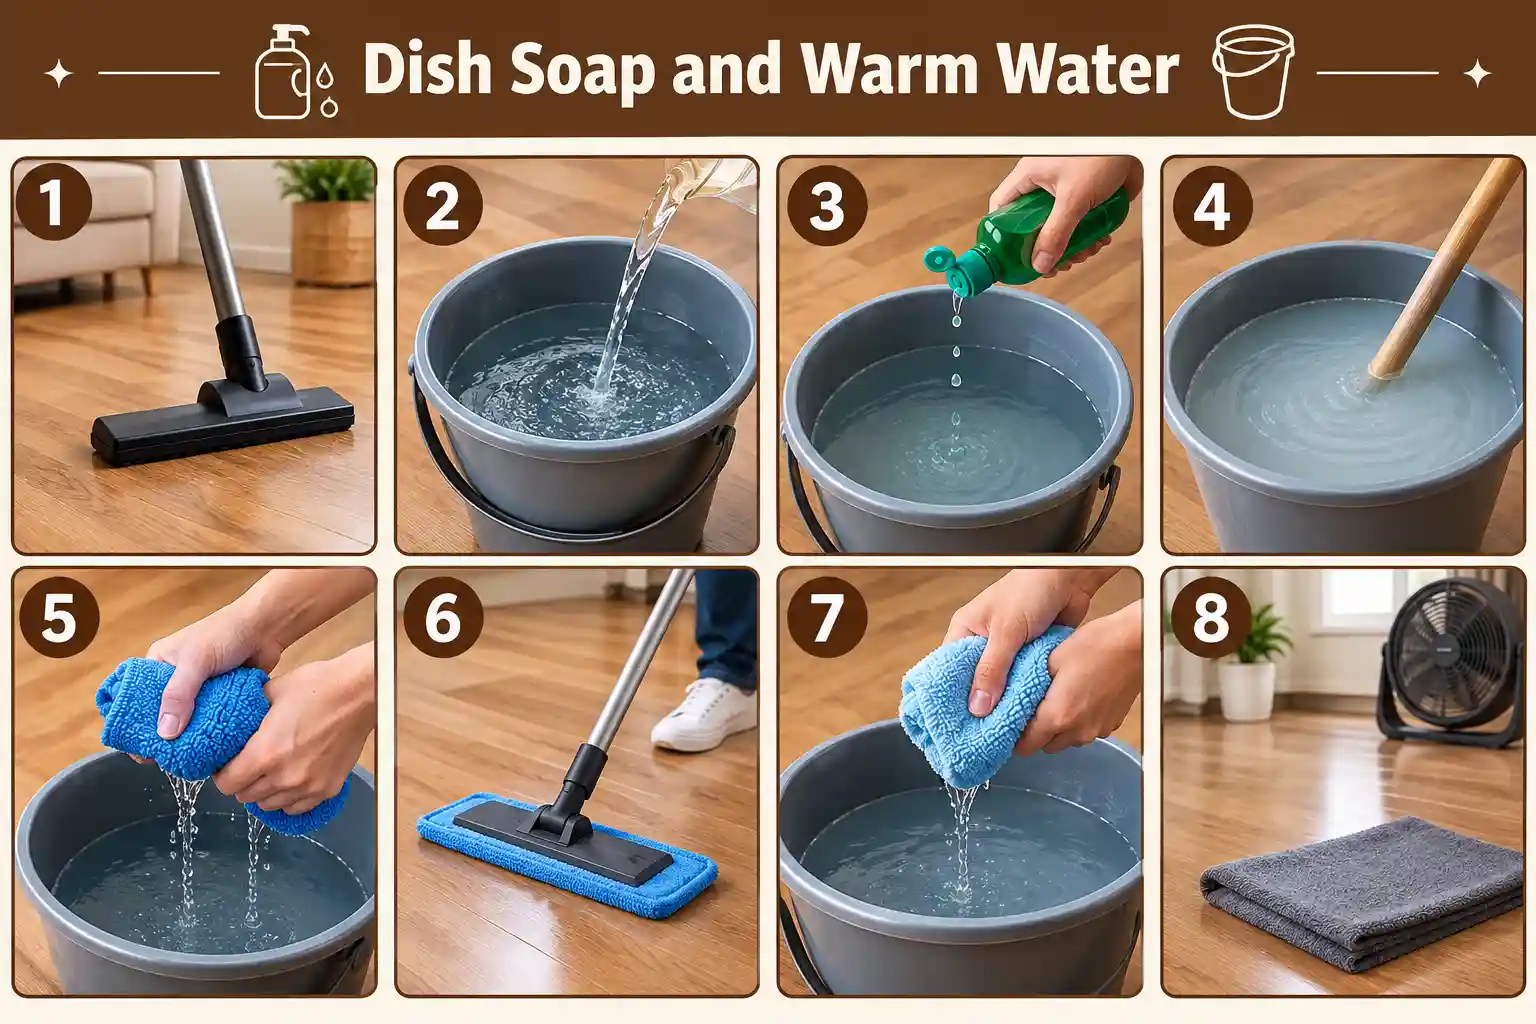
- Sweep or vacuum the floor.
- Fill a bucket with one gallon of warm water.
- Add three or four drops of clear, mild dish soap. Do not add more. Extra soap leaves a dull film that attracts dirt.
- Swish the water gently. You want a light cloudy mix, not a tub of suds.
- Dip your microfiber pad and wring it until it is nearly dry.
- Mop one small section at a time, moving with the grain.
- Go back over the floor with a second clean pad wrung out in plain water. This rinse pass removes leftover soap.
- Dry the floor with a towel or let a fan finish the job.
This method is safe for sealed polyurethane floors. Skip this method on waxed or oiled cork.
Method 4: Diluted White Vinegar for Grime and Odor
Vinegar cuts through greasy buildup and neutralizes smells. It is also acidic, so strong mixes will dull your finish over time. Dilute it heavily and treat it as an occasional clean, not a weekly habit. Here is how to clean cork floors vinegar:
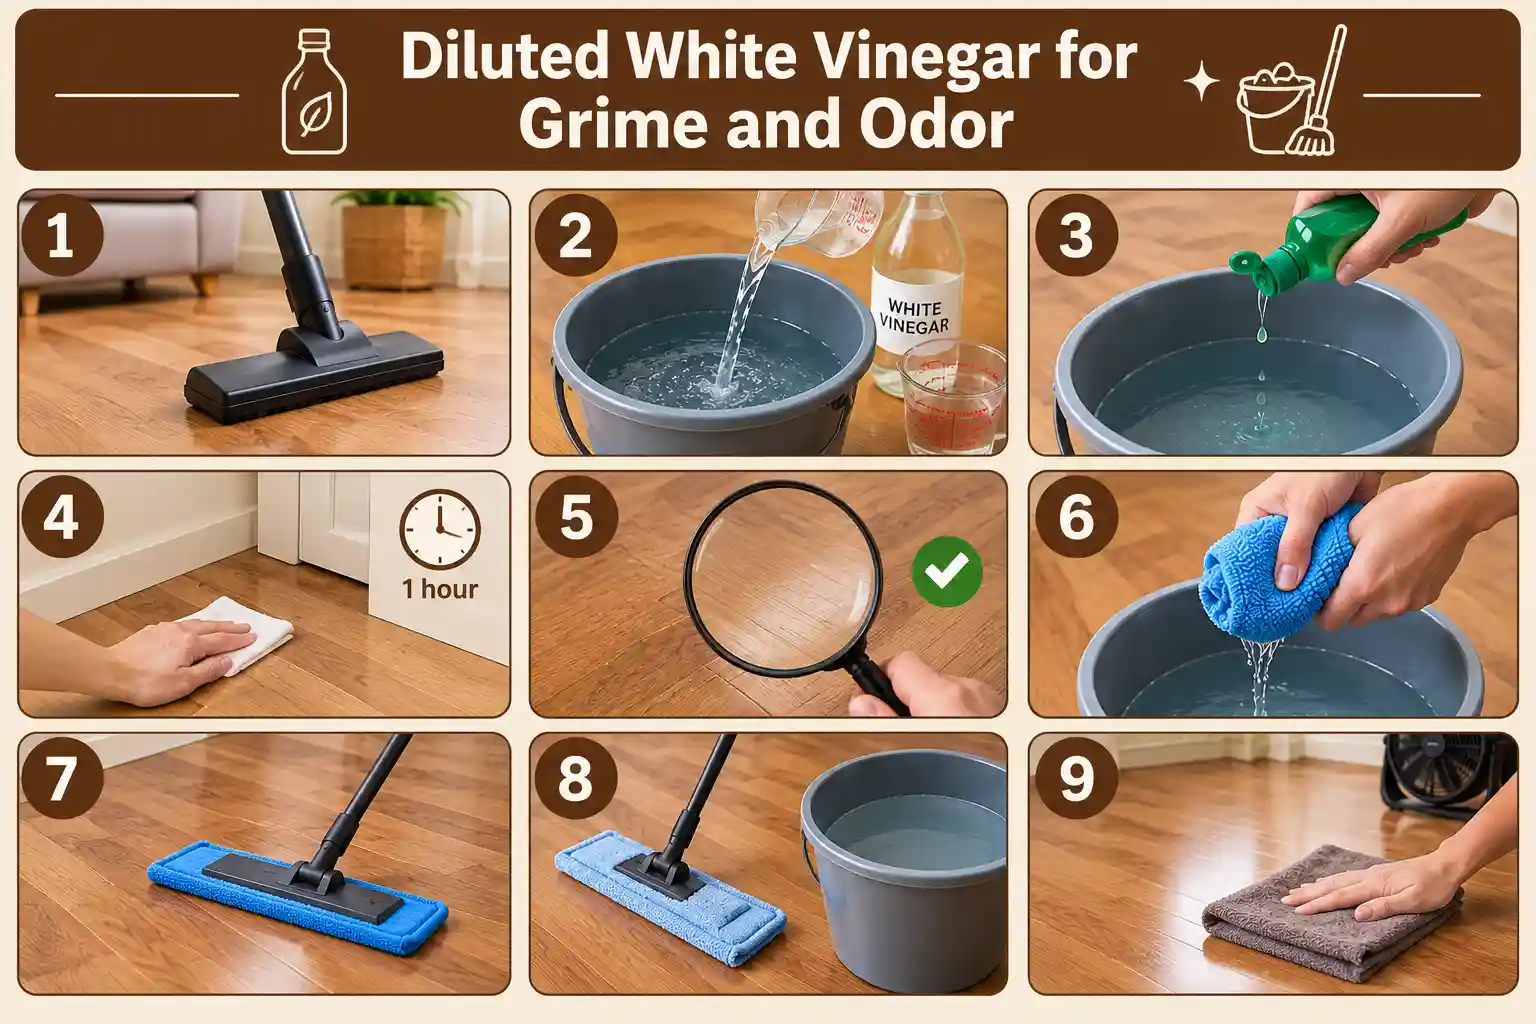
- Vacuum or sweep the floor first.
- Mix one quarter cup of white vinegar into one gallon of warm water.
- Add one drop of dish soap if the floor feels greasy.
- Test the mix in a hidden area such as a closet. Wipe a small patch and wait one hour.
- Check the test patch for any dull or cloudy spots. If you see one, stop and use Method 2 instead.
- If the test looks clean, dip your microfiber pad and wring it until it is barely damp.
- Mop in small sections with the grain.
- Go over the floor again with a pad wrung out in plain water.
- Dry with a towel right away.
How often: Once a month at most. Everyday cleaning belongs to Method 2.
Method 5: Spot Cleaning Stains, Scuffs, and Spills
Most cork damage starts as a small spill nobody wiped up. Cork, like wooden flooring, gives you a short window to act. Treat every spill as urgent, and you will rarely need a deep clean.
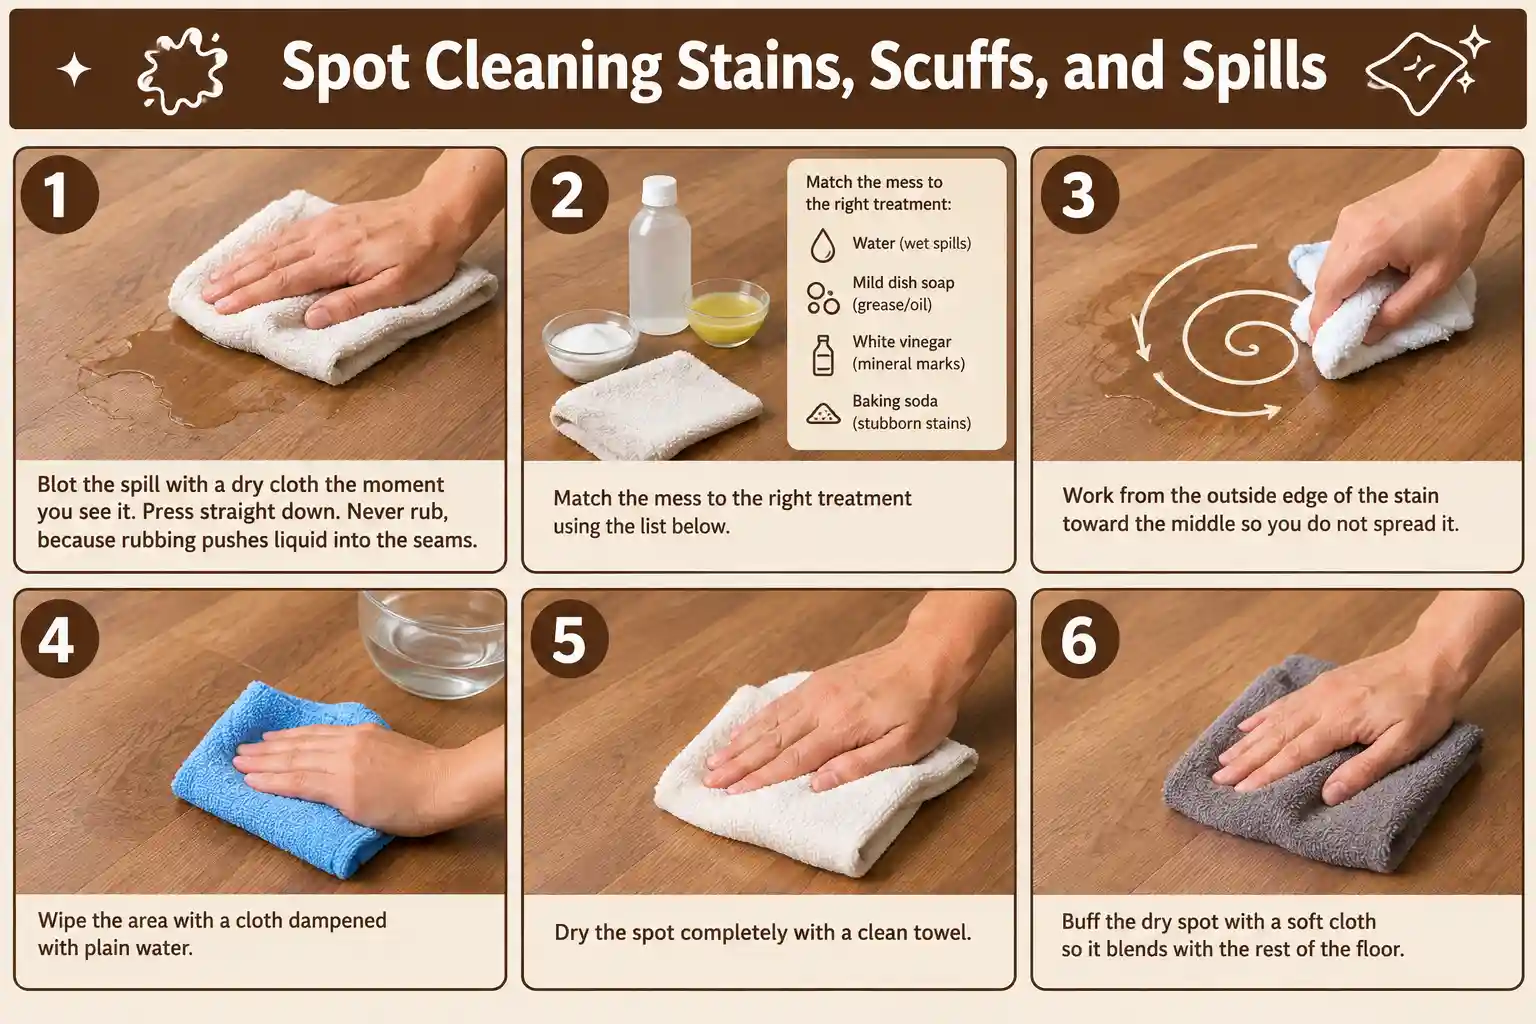
- Blot the spill with a dry cloth the moment you see it. Press straight down. Never rub, because rubbing pushes liquid into the seams.
- Match the mess to the right treatment using the list below.
- Work from the outside edge of the stain toward the middle so you do not spread it.
- Wipe the area with a cloth dampened with plain water.
- Dry the spot completely with a clean towel.
- Buff the dry spot with a soft cloth so it blends with the rest of the floor.
What to Use on Each Stain
| Stain | What to Use |
|---|---|
| Shoe scuffs & heel marks | Tennis ball or white pencil eraser |
| Grease & cooking oil | Warm water + 1 drop of dish soap |
| Pet accidents | Enzyme cleaner safe for sealed floors |
| Ink & marker | Small amount of rubbing alcohol |
| Wine, juice & coffee | Warm water + mild soap |
| Gum & sticky candy | Ice in a plastic bag + plastic scraper |
| Mud | Dry completely, vacuum, then damp-wipe. |
Method 6: Baking Soda Paste for Stubborn Marks
Some stains survive spot cleaning. Baking soda lifts them without harsh chemicals. It is mildly abrasive, though, so keep it to small areas and use a light touch.
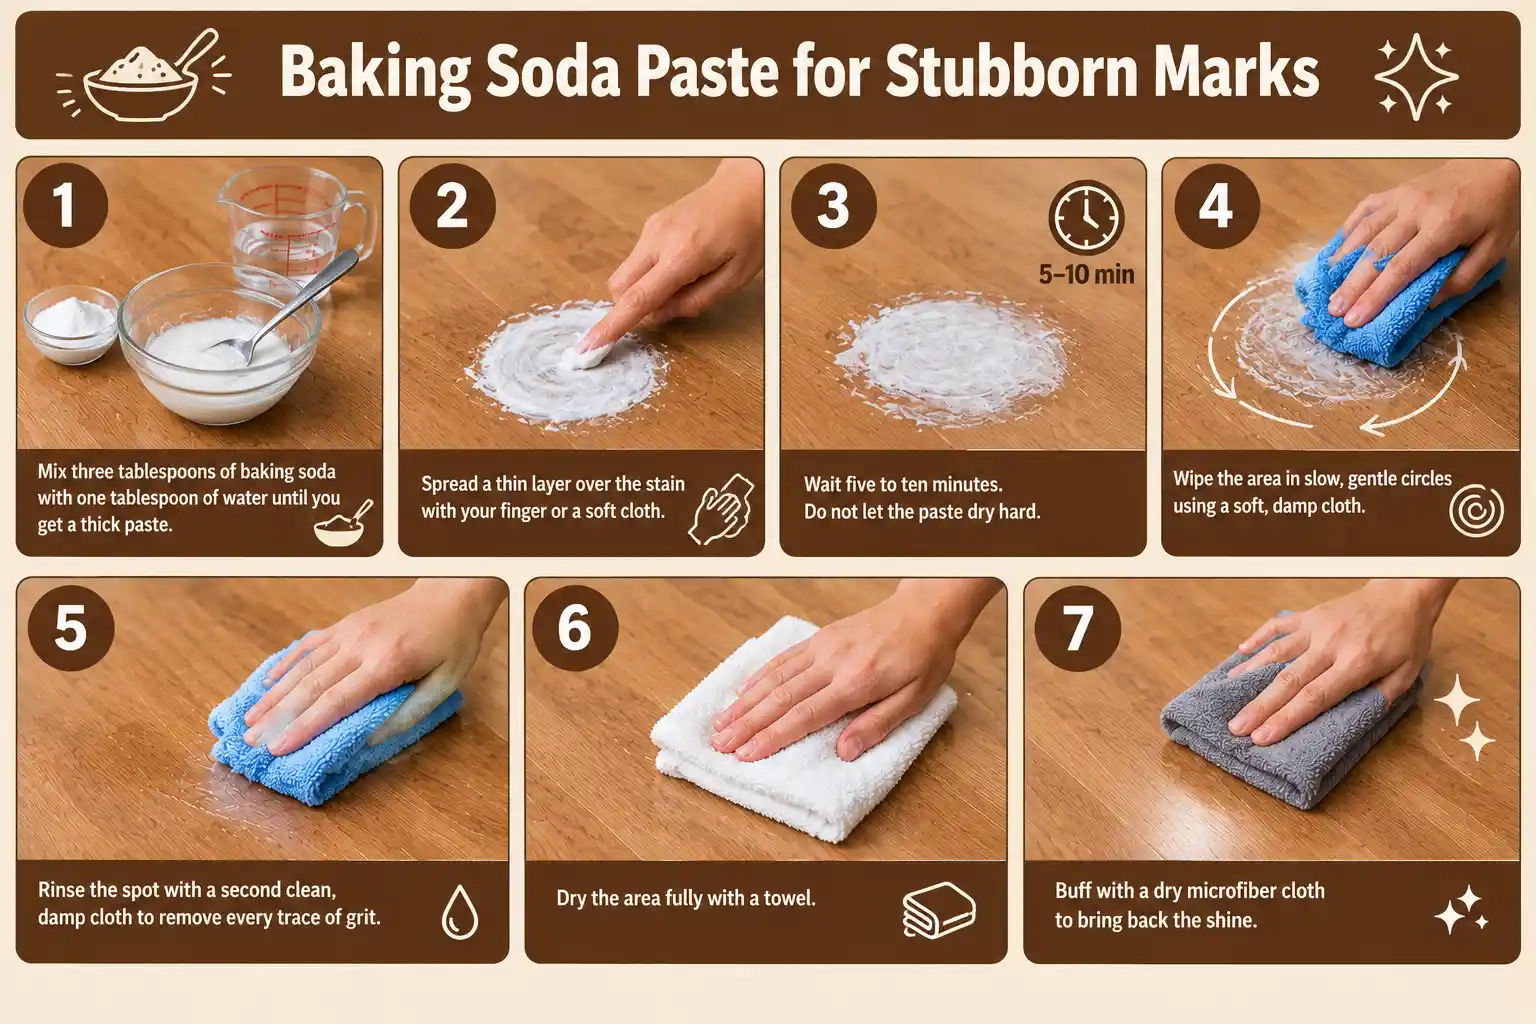
- Mix three tablespoons of baking soda with one tablespoon of water until you get a thick paste.
- Spread a thin layer over the stain with your finger or a soft cloth.
- Wait five to ten minutes. Do not let the paste dry hard.
- Wipe the area in slow, gentle circles using a soft, damp cloth.
- Rinse the spot with a second clean, damp cloth to remove every trace of grit.
- Dry the area fully with a towel.
- Buff with a dry microfiber cloth to bring back the shine.
Warning: Never use steel wool, scouring pads, or powdered cleansers on cork. They cut through the finish and leave permanent scratches.
Method 7: Cleaning Waxed, Oiled, or Unsealed Cork
These floors play by different rules. No plastic layer protects the cork, so water is a real risk. Keep everything as dry as you can and refresh the wax on a schedule.
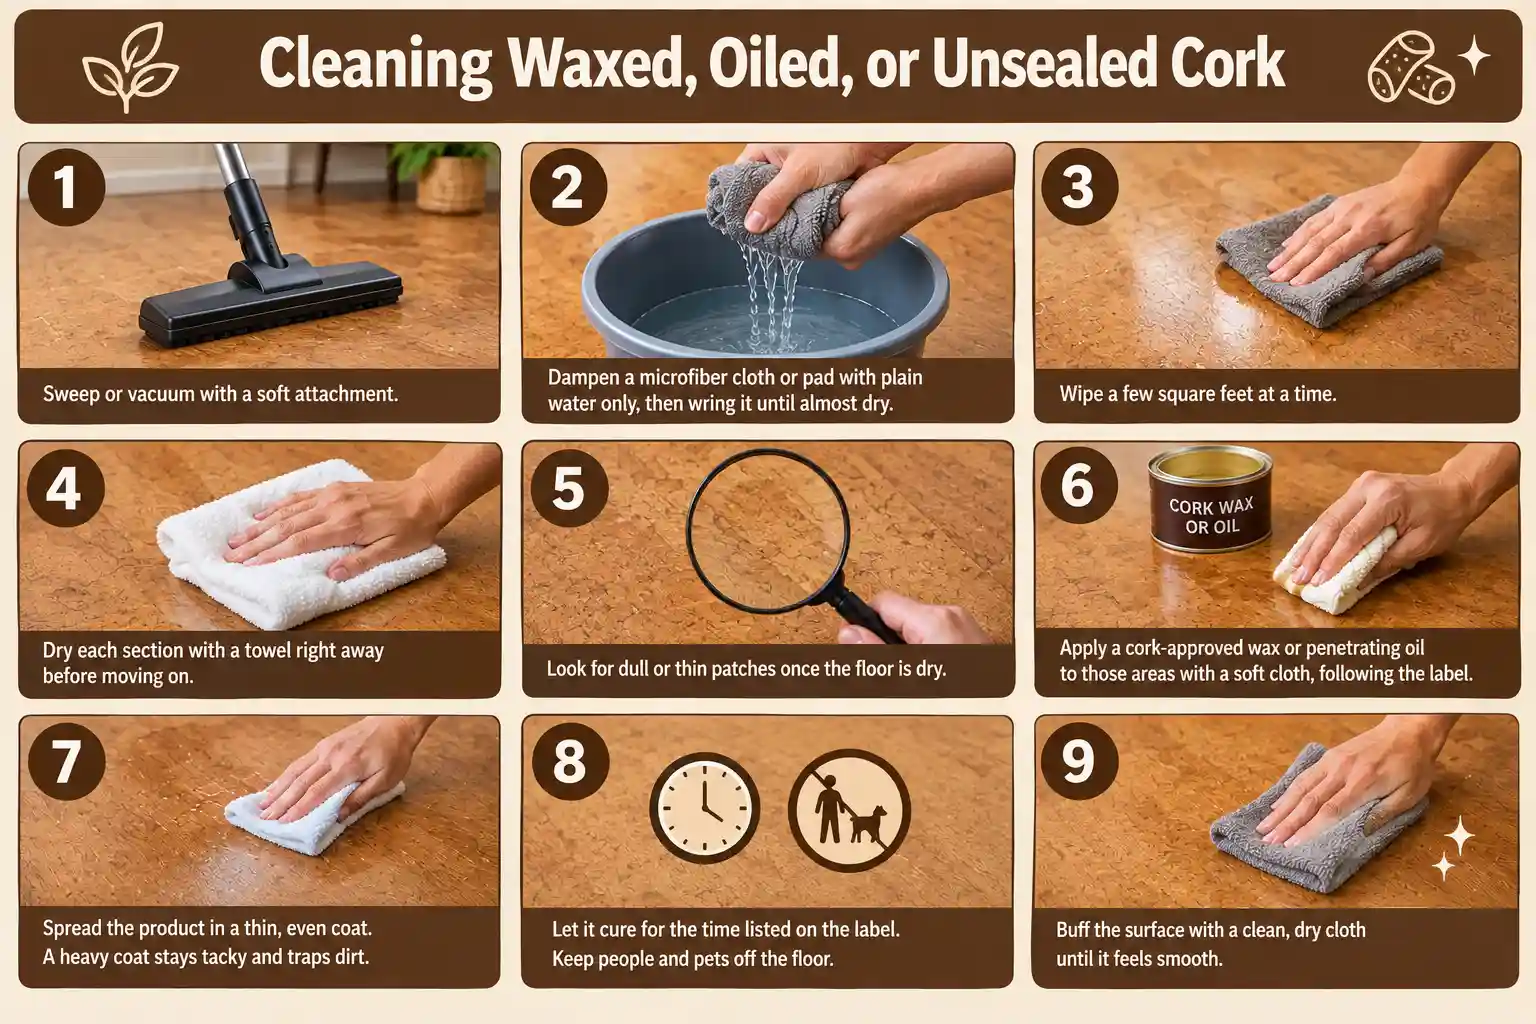
- Sweep or vacuum with a soft attachment.
- Dampen a microfiber cloth or pad with plain water only, then wring it until almost dry.
- Wipe a few square feet at a time.
- Dry each section with a towel right away before moving on.
- Look for dull or thin patches once the floor is dry.
- Apply a cork-approved wax or penetrating oil to those areas with a soft cloth, following the label.
- Spread the product in a thin, even coat. A heavy coat stays tacky and traps dirt.
- Let it cure for the time listed on the label. Keep people and pets off the floor.
- Buff the surface with a clean, dry cloth until it feels smooth.
How often: Re-wax once or twice a year in busy rooms. Once every two years is fine in low-traffic rooms.
How to Clean Cork Floors Naturally?
You can clean cork flooring with simple household ingredients, but natural does not automatically mean safe. The type and condition of the floor finish matter more than whether a product comes from the kitchen cupboard.
For a properly sealed cork floor, these are the gentler options:
- Warm water: Best for light dust, footprints, and everyday surface dirt. Use a microfiber mop wrung out almost dry.
- Mild dish soap: Add only a few drops to a bucket of warm water when you need extra cleaning power for greasy marks. Follow with a clean, barely damp mop to remove residue.
- Diluted white vinegar: Some cork-floor manufacturers permit a weak vinegar solution for occasional cleaning, while others advise against acidic cleaners. Check your flooring manufacturer’s instructions before using it.
Be careful with popular natural cleaning hacks:
- Lemon juice: Its acidity can affect certain floor finishes and offers no real advantage over a suitable floor cleaner.
- Undiluted vinegar: Too acidic for routine cork-floor cleaning and may damage or dull some finishes.
- Baking soda: Its abrasive texture can scratch or wear the protective coating when rubbed across the surface.
- Essential oils: They can leave an oily residue that attracts dust and makes the floor harder to clean.
The safest natural approach is simple: remove dry dirt first, use minimal moisture, choose mild ingredients, and test any homemade solution in an inconspicuous area before treating the entire floor.
How to Clean Cork Floors in the Kitchen?
Kitchen cork floors deal with more than dust and footprints. Cooking grease, food spills, and moisture around the sink can gradually leave a sticky film or damage the finish if you don’t clean them properly.
Start by removing crumbs and loose dirt with a soft broom or vacuum. For greasy areas, use warm water with a small amount of mild dish soap. Work with a well-wrung microfiber mop rather than soaking the floor. If the surface still feels slippery or sticky, wipe it again with clean water to remove soap and grease residue.
A few kitchen habits also make a noticeable difference:
- Clean grease quickly: Fresh oil is easier to remove than an old greasy film that has built up over time.
- Protect the sink area: Use a breathable, non-rubber-backed mat where water commonly splashes.
- Check for hidden leaks: Regularly inspect the areas around the sink, dishwasher, refrigerator, and water connections.
- Keep wet items off the floor: Place a tray beneath dish racks and avoid leaving damp towels or cloths directly on cork.
- Dry spills immediately: Even sealed cork should not be left with standing water.
If your cork floor has a waxed, oiled, or unsealed finish, follow its specific care instructions before using soap or other cleaning solutions. Kitchen cleaning should remove grease without introducing enough moisture to affect the cork or the flooring core beneath it.
How to Deep Clean Cork Flooring
Deep cleaning cork flooring is more than an extra mop. The goal is to remove the dirt, cleaner residue, and buildup that regular cleaning may leave behind while checking the condition of the floor and its finish. For most homes, a thorough deep clean every six months is enough. High-traffic homes may need it every three months.
- Clear the floor first. Move custom furniture, rugs, and movable appliances to reach areas that normally stay covered. Dust and debris often collect around furniture legs and along rug edges.
- Clean joints and edges carefully. Vacuum along plank seams, corners, and the perimeter near the skirting. A crevice attachment helps pull out fine grit that a regular floor pass can miss.
- Work in small areas. Mop one section at a time using the cleaner recommended for your cork floor and the dilution stated on its label. Replace dirty water as it becomes cloudy, rather than spreading the collected soil to the next section.
- Remove cleaner residue. If the product instructions allow rinsing, make a clean-water pass after washing. A second light rinse may help when residue is noticeable, but avoid leaving excess moisture on the cork.
- Inspect the expansion gap. Floating cork floors need space around the walls to accommodate normal movement. Remove dirt and debris from this gap so the flooring can expand without pressure against the walls.
- Look for high-wear areas. Check doorways, kitchen zones, hallways, and other areas that become dull or dirty faster than the rest of the floor. These spots can tell you when the protective finish may need maintenance or recoating.
Deep cleaning does not mean using a stronger chemical. Better results come from removing buildup thoroughly, controlling moisture, and checking the floor for early signs of wear while you clean.
Cork Tiles vs. Planks: Cleaning Differences
| Flooring Type | Water Risk | Best Cleaning | Main Caution |
|---|---|---|---|
| Cork Tiles | Medium | Damp microfiber mop | Keep water out of seams |
| Cork Laminate / Planks | High | Minimal-moisture damp mop | Never let water pool |
| Sealed Cork Board | Medium | Dry clean + light damp mop | Check the finish first |
| Unsealed Cork Board | Very high | Dry cleaning only | Water can cause swelling |
| Cork Veneer | Depends on finish | Follow product instructions | Avoid aggressive sanding |
What You Should Never Use on Cork Floors
Below is the list of materials that you should never use on cork flooring.
- Steam mops. Heat plus moisture force water into the seams, causing swelling and lifting.
- Ammonia-based cleaners. They break down the sealer.
- Bleach. It discolors cork and weakens the finish.
- Undiluted vinegar. Too acidic for any floor finish.
- Abrasive powders, steel wool, and scrub pads.
- Oil soaps on polyurethane floors. They leave a cloudy film that builds up over time.
- Wet string mops and soaking sponge mops.
- Vacuums with a spinning beater bar, which can scuff and dent the surface.
Simple Cork Floor Care Schedule
Keep this rhythm and your floor will look new for years.
| How Often | What to Do |
|---|---|
| Daily | Sweep or dust mop kitchens, hallways, and entryways |
| Weekly | Damp mop with a pH-neutral cleaner |
| As it happens | Blot spills right away and spot clean stains |
| Monthly | Check for scratches, gaps, and worn patches |
| Every 6 to 12 months | Re-wax or re-oil if your floor has a wax finish |
| Every 3 to 7 years | Recoat or reseal polyurethane floors |
Habits That Keep Cork Looking New
If you want to keep your cork flooring new and in pristine condition, then follow the below-mentioned tips:
- Stick felt pads under every chair, table, and sofa leg. Check them twice a year and replace worn pads.
- Place a mat outside and inside each door. Most grit never reaches the floor this way.
- Ask guests to slip off shoes. Stiletto heels dent cork faster than anything else.
- Hold indoor humidity between 35 and 55 percent. Dry air shrinks cork, and damp air swells it.
- Close blinds during peak sun hours. Direct sunlight fades cork over the years.
- Move area rugs a few inches every few months so the floor ages at an even tone.
- Trim your pet’s nails. Long nails leave a web of fine scratches.
- Lift furniture instead of dragging it. Use a slider or a blanket for heavy pieces.
Ideal Humidity and Temperature for Cork Flooring
Cork responds to changes in indoor moisture and temperature, so keeping the room conditions consistent helps prevent movement and gaps. Aim for a relative humidity level of around 35% to 65% and an indoor temperature of approximately 18°C to 28°C (65°F to 82°F).
A small hygrometer can help you monitor humidity throughout the year. If the air becomes excessively dry, cork can contract, and small gaps may appear between tiles or planks. Excess humidity can have the opposite effect, causing the material to expand and potentially put pressure on joints or edges.
Use a humidifier during particularly dry periods and a dehumidifier when indoor humidity stays high. Avoid sudden changes where possible, as maintaining reasonably stable conditions is more useful than repeatedly moving from very dry to very humid environments.
For the most accurate limits, always check the flooring manufacturer’s care and installation instructions, as acceptable conditions can vary by cork product and finish.
When It Is Time to Reseal the Cork Flooring
Cleaning only works while the finish is intact. Watch for these signs that the sealer has worn thin.
- Water no longer beads and soaks in instead
- Traffic paths look dull while the edges of the room still shine
- Stains set in fast even when you wipe them quickly
- The surface feels rough or chalky under your hand
A light recoat usually fixes all of this. Clean the floor, let it dry fully, scuff sand if the product calls for it, then roll on a water-based polyurethane made for cork. Two thin coats beat one thick coat every time.
Final Words
Cleaning cork flooring comes down to three habits. Keep grit off the surface, keep water to a minimum, and keep your cleaners gentle. Do that, and your floor will stay soft, quiet, and good-looking for twenty years or more.
Start with the water drop test today. Once you know your finish, pick your method from the list above and build it into your weekly routine. Your floor will thank you.
Frequently Asked Questions
No. Steam drives hot moisture into the seams and under the planks. Cork swells, edges lift, and the damage is usually permanent. Use a damp microfiber mop instead.
Once a week is right for most homes. Busy kitchens may need it twice a week. Mopping more often than that adds water without adding much cleanliness.
Nine times out of ten, it is soap residue. Go back over the floor with a microfiber pad wrung out in plain warm water, then dry it. If the dullness stays, your finish is worn, and the floor needs a recoat.
Oil soaps leave a film on polyurethane-sealed cork, so skip them. Dry Swiffer pads are fine for daily dust. The wet spray version puts down more liquid than cork should hold, so use a microfiber mop instead.
That is water damage. Find the leak or the moisture source and fix it first. Dry the area with a fan and a dehumidifier for several days. Minor bubbling sometimes flattens back out. Planks that stay raised need replacing.
Yes, as long as you switch to the hard floor setting and turn off the rotating brush. A spinning beater bar can scuff the finish and dent soft cork.


