
How to Remove Wallpaper Glue: Soak, Scrape & Sand
The easiest way to remove wallpaper glue is to wet it with a commercial or homemade cleaner (a mixture of water and vinegar). Let the glue soak for 10 to 15 minutes until it becomes soft. Now gently scrub it with a scrubby sponge. Scrape off the remaining glue residue with a plastic scraper. Finalize the process by gently sanding the wall to get a clean and level surface.
Before removing the glue from the wall, you must know its types and have all the tools required for this process in place. In this comprehensive guide by Floor Land, you will learn how to remove wallpaper glue easily, as well as the mistakes that you must avoid. So, read it carefully to remove wallpaper glue easily for your next renovation project.
How to Identify Your Wall Type?
To completely remove wallpaper glue from the walls, you must know which wall you are working on and what type of glue it is.
Check Your Wall Material
To check the wall materials, first turn off the power at the breaker. Now unscrew the outlet cover to check the cut end of the wall.
If it is Drywall, it shows a grey or brown paper face over a chalky white core. It measures about half an inch thick. Drywall soaks up water fast and tears easily when wet. So, for removing the wallpaper glue from this wall type, keep your solution damp, never soaking.
Plaster walls look solid grey or white all the way through. It often sits over wood lath strips. This wall material handles moisture much better. You can soak it longer without worry.
Expert Tip: Tap the wall with your knuckle. Drywall sounds hollow between studs. Plaster sounds dense and solid.
Find Out If The Wall Was Primed
Priming the wall is one of the most crucial steps before installing wallpaper.
If someone primed or sealed the wall before installing the paper, the glue sits on top of a barrier. It is released in sheets with light scrubbing. Removing glue from a primed wall is quick and easy.
Wallpaper glue soaks into the paper face if the wall was not primed before fixing the wallpaper. It bonds with the fibers. Now the glue and the drywall skin act as one layer. You must work slowly and accept some patching later.
To check whether the wall is primed, you must conduct a test. Wet a small patch of the wall and rub it. If the wall is primed, glue rolls off in soft strings. For an unprimed, bare wall, the glue lifts grey paper fuzz.
Identify the Adhesive Type
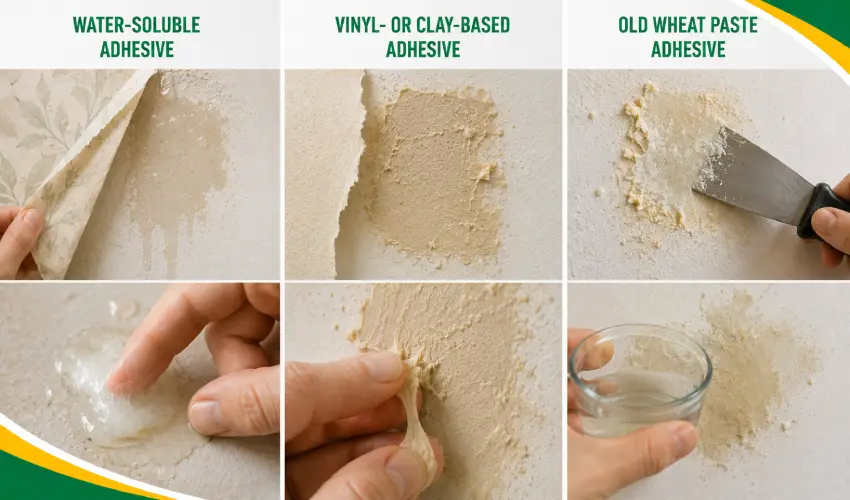
There are multiple types of wallpaper, and each may require a different type of adhesive. If you know which type of glue you are removing, it helps you use the right products and techniques.
If the water-soluble adhesive is used, it turns slimy within a minute of wetting. It feels slippery under your fingers. This type of adhesive is very easy to remove.
Vinyl- or clay-based adhesive resists water at first. It looks tan or beige and feels rubbery. It needs a stronger solution, more soak time, or a steamer for removal.
Generally, homes built before the 1970s use old wheat paste for wallpaper installation. To check it, wet the wall and sniff. It gives off a faint sour, bready smell. Good news here. Wheat paste dissolves in plain hot water faster than anything else.
Materials and Tools Required for the Process
For removing the wallpaper and glue, you will need some materials and tools. Check the list of these tools and materials below. Make sure all of them are in place before starting the process.
| Category | Materials / Tools | Purpose |
| DIY Solution | Vinegar, warm water, dish soap, baking soda, fabric softener | Loosen wallpaper and soften adhesive |
| Cleaning Tools | Sponge, scraper, spray bottle, 2 buckets | Apply solution, scrub, scrape, and rinse |
| Protection | Drop cloths, plastic sheeting, painter’s tape, gloves, safety glasses | Protect surfaces and yourself |
| Repair & Finishing | Towels, step ladder, sanding sponge, spackle, flexible knife | Clean, smooth, and repair the wall |
| Optional Products | Wallpaper stripper, enzyme adhesive remover, steamer | Handle stubborn wallpaper or adhesive |
Best Solution for Removing Wallpaper Glues
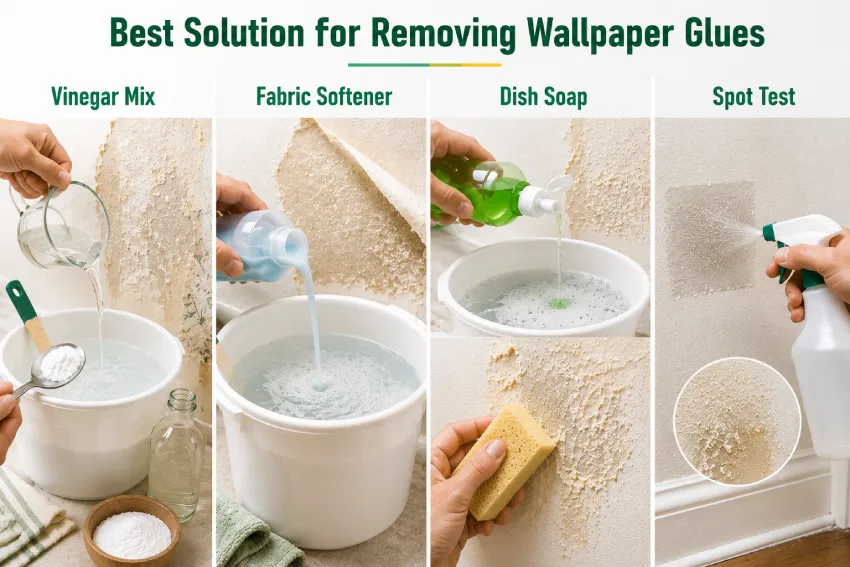
You can make your own glue cleaner from the materials that are present in your home. Below, I have mentioned the top 3 types of solutions along with the recipe that you can use for this purpose.
1. Mixture of White Vinegar and Hot Water
Take a bucket and mix hot water and vinegar in it. Now add two tablespoons of baking soda per gallon. The vinegar in the solution breaks down the paste, and baking soda adds mild grit that helps lift residue.
2. Fabric Softener Mix
Mix one part liquid fabric softener to three parts hot water. The softener coats the glue and keeps it slick longer. It also cuts the vinegar smell if that bothers you.
3. Dish Soap Mix
Add a few squirts of dish soap to a gallon of hot water. Stir the mixture until it turns slightly sudsy.
Before choosing any solution for removing the wallpaper, you must test it by applying it to a hidden spot. It can be behind the door, low on a wall, or sometimes inside the closet. Pour the cleaning solution into the spray bottle and spray it over the inconspicuous spot. Wait for at least 5 to 10 minutes, then scrub it very lightly.
Now observe the changes carefully. If the glue softens and the wall stays firm. The glue cleaning solution is working fine in this case. If the wall surface turns spongy or the grey paper starts to fuzz, you need to cut off the soaking time.
8-Step Process to Remove the Wallpaper Glue
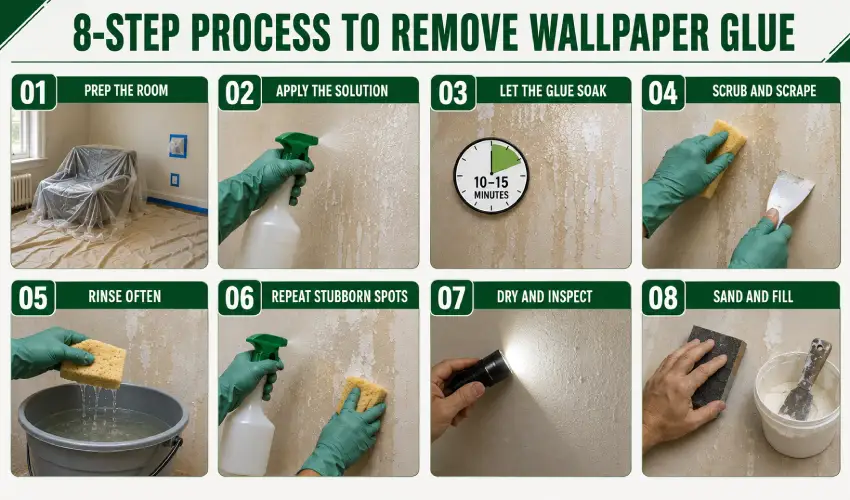
Below is the step-by-step guide for removing the glue from the wall. Follow each step very carefully for the best results.
1. Prep The Room
The very first step is to prepare the room before removing the wallpaper glue. Move furniture out or push it to the center and cover it. Lay drop cloths along the base of every wall and tape them down. After that, cover outlets, switches, and vents with painter’s tape and plastic. Turn off the breaker for the room if you plan to work near outlets. Also, ensure you open a window to keep the room ventilated.
2. Apply the Solution to One Section
The best approach is to work in small areas. You can keep each section width at roughly four square feet. Spray until the glue looks wet and glossy. Do not flood the wall. If water runs down to the baseboard, it means you used too much. You can start at the top of the wall and move down. Gravity will carry drips onto glue you have not reached yet, which helps.
3. Let The Glue Soak
After applying the cleaning solution over the glue, wait 10 to 15 minutes. You need to keep the area damp the whole time. If it starts to dry, mist it again. If you are dealing with vinyl adhesive, you may need a second application and a longer wait. Keep the soaking time for this glue up to 20 minutes.
4. Scrub and Scrape
After giving your glue enough time to soak, gently scrub and scrape it. You can use the rough side of the sponge for scrubbing or the plastic scraper for scraping. For scrubbing, don’t apply harsh pressure and scrub in small circles. The glue will convert it into soft strings and a slippery film. Follow with your plastic putty knife. Hold it at a low angle, close to 30 degrees. Push gently. Let the softened glue do the work. If you have to force it, the glue is not ready. Spray again and wait. Never use a metal scraper for removing the glue; it will gouge the drywall in seconds.
5. Rinse Often
After thoroughly scrubbing and scraping, dunk your sponge in a bucket of clean water. If you use a glue-loaded sponge, then it just spreads more mess instead of cleaning. Dunk your sponge in the clean water bucket every minute or so. A glue-loaded sponge just spreads the mess around. Change your rinse water as soon as it turns cloudy. Wipe each finished section with a clean, damp sponge to pick up the last film.
6. Repeat on Stubborn Spots
In some cases, the stubborn spots hold on in some spaces. For such patches, you can spray more cleaning solution over them. Again wait for sometime. Scrub that area again with a sponge.
How to check your work: Run a dry hand across the wall. Any drag or tackiness means glue is still there. A clean wall feels smooth and slightly chalky. You can also mist a small area with water. Glue turns slick within seconds. Bare walls do not.
7. Dry and Inspect
Once the wall has no glue left, let it dry for 24 hours. If you want to speed up the drying process, you can turn on the fan and open all the windows. Then look at the wall in raking light. Hold a work light or phone flashlight flat against the surface and shine it sideways. Every ridge, glue streak, and dent will throw a shadow. Mark the problem spots with a pencil.
8. Sand and Fill
Sand the whole wall lightly with a 120 to 220 grit sponge. To avoid any flaws, you should apply light pressure. You want to knock down ridges, not cut into the wall. Fill any gouges or torn paper with a lightweight spackle. Let it dry, sand it flush, and wipe the dust away with a damp cloth. Your wall is now ready for primer.
Method Comparison
| Method | Best for | Difficulty | Rough cost |
| DIY solution | Water-soluble paste, small to medium rooms, tight budgets | Easy but slow | Under $10 |
| Steamer | Thick vinyl adhesive, layered glue, large rooms | Moderate, needs care on drywall | $30 to $50 to rent |
| Commercial stripper | Old, hardened, or unknown adhesive | Easy and fast | $15 to $30 |
| Dry sanding | Thin glue residue on plaster walls | Easy but very dusty | Under $15 |
Alternative Methods for Removing the Wallpaper
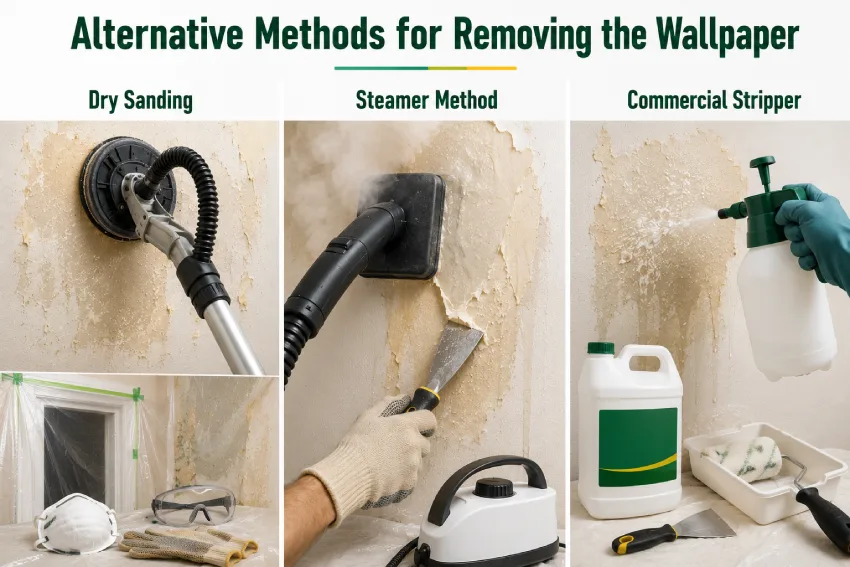
If none of the above methods work for your case, you can use the alternative method.
1. Dry Sanding
For this method, you can skip the water completely. Sand the glue off with a pole sander and 100 to 150 grit paper. This works well on plaster and on thin, brittle glue residue. It creates no moisture risk at all.
The trade-off is dust. Seal the doorway with plastic, wear a mask and goggles, and expect to clean for a while. Sanding also flattens texture, so it suits smooth walls better than textured ones.
2. Steamer Method
A wallpaper steamer softens glue with heat instead of chemicals. Hold the plate against the wall for 20 to 30 seconds, then scrape. Steamers handle thick vinyl adhesive and stacked layers that water cannot touch. They also skip the vinegar smell.
While using the steamer method, you must take care of a few things. Steam gets hot enough to burn, so wear gloves and keep your face back. And too much steam on drywall will soften the paper face. Keep the plate moving and never park it in one spot.
3. Commercial Wallpaper Stripper
These products contain enzymes or surfactants that break glue bonds fast. Spray or roll them on, wait the time listed on the label, and scrape.
They are the fastest route for old glue of unknown type. They cost more, and they need good ventilation. Read the label and follow the dwell time exactly. Rinse the wall with clean water afterward, or leftover residue will interfere with your primer.
Common Mistakes to Avoid
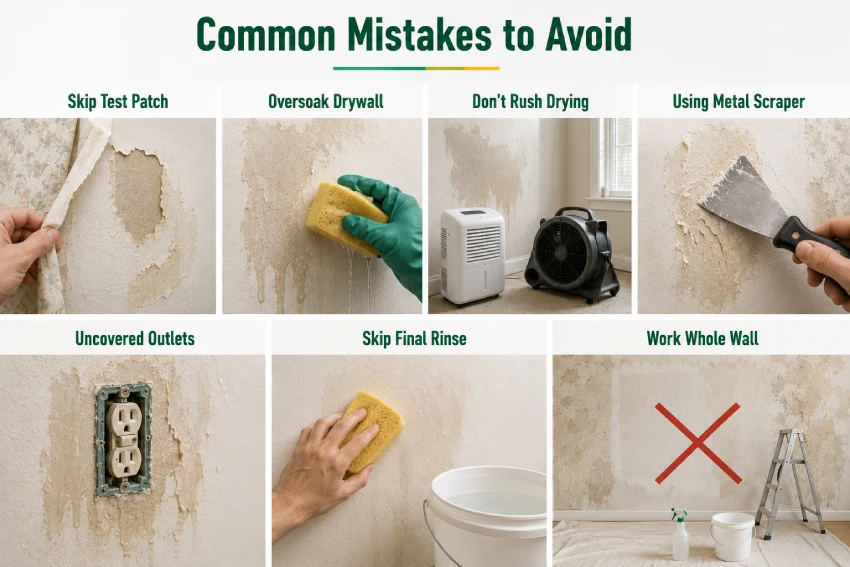
Wallpaper glue removal seems easy, but there are some minor points that can be the reason for a major pitfall in the process. Take a look at them:
- Skipping the test patch is one of the most common mistakes. For instance, you might find out the hard way that your wall was never primed. By then, you have ruined a visible section.
- Oversoaking drywall is the second main issue. Standing water turns drywall paper to mush. Mist and repeat instead of drenching.
- If the glue is 95 percent gone, it still ruins a paint job. So a wall that feels dry on the surface can hold moisture underneath. You can wait the full 24 hours.
- Using a metal scraper. Metal edges dig into drywall and leave dents you have to patch. Plastic flexes and slides.
- Leaving outlets uncovered. Wet walls plus live electricity is a real hazard. Tape them off and kill the breaker.
- Skipping the final rinse. Vinegar and soap leave a film. Primer struggles to bond to it. Wipe every wall with clean water at the end.
Safety Precautions That You Must Follow
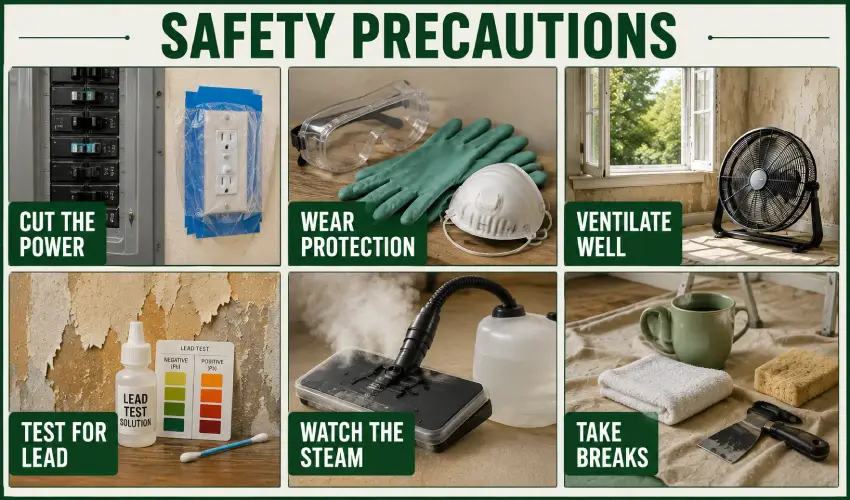
Removing wallpaper glue involves liquids, scrapers, and working near electrical outlets. So you must follow some precautions before starting the work.
- Cut the power. Switch off the breaker for the room before you spray near outlets or switches. Tape plastic over each one.
- Wear gloves and eye protection. Solutions drip when you work overhead. Vinegar stings, and commercial strippers can burn skin and eyes.
- Ventilate the space. Open windows and run a fan. This matters most with commercial products and with steamers, which raise humidity fast.
- Watch for lead paint. Homes built before 1978 may have lead paint under the wallpaper. Do not dry sand those walls. Test the paint first or call a certified pro.
- Handle steamers with respect. The plate and the water inside reach scalding temperatures. Keep children and pets out of the room.
- Take breaks. Overhead scrubbing tires your shoulders and neck. A rushed, tired worker gouges walls.
Why Proper Wallpaper Glue Removal Matters
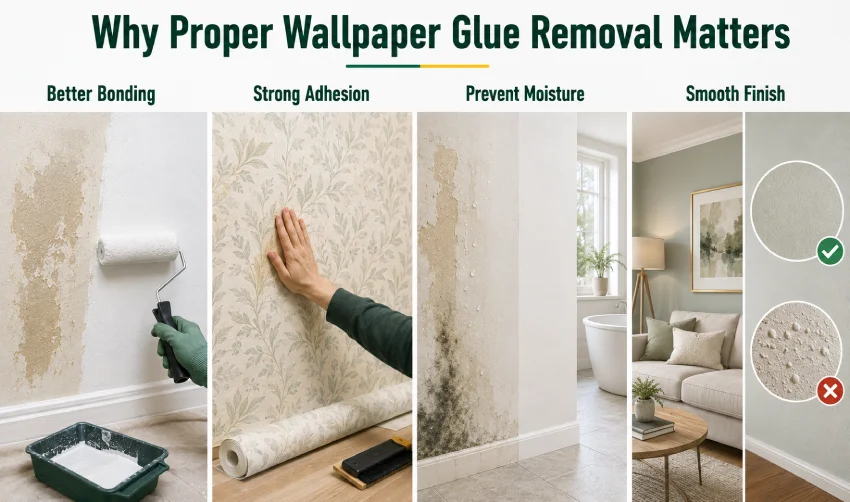
Removing the wallpaper glue is not just an optional step; it is most important when installing new wallpaper for the reasons mentioned.
- Primer and paint bond to a clean surface. Glue-free walls hold their finish for years instead of months.
- New wallpaper adhesive needs a stable surface. Fresh paste over old paste creates a weak double layer that peels at the seams.
- Trapped moisture under sealed glue can feed mould in humid rooms. Clean walls stay dry and healthy.
- Most potential buyers and inspectors notice bubbling paint and lumpy walls. Smooth, well-finished walls read as a well-maintained home.
Why You Can’t Just Paint Over Wallpaper Glue
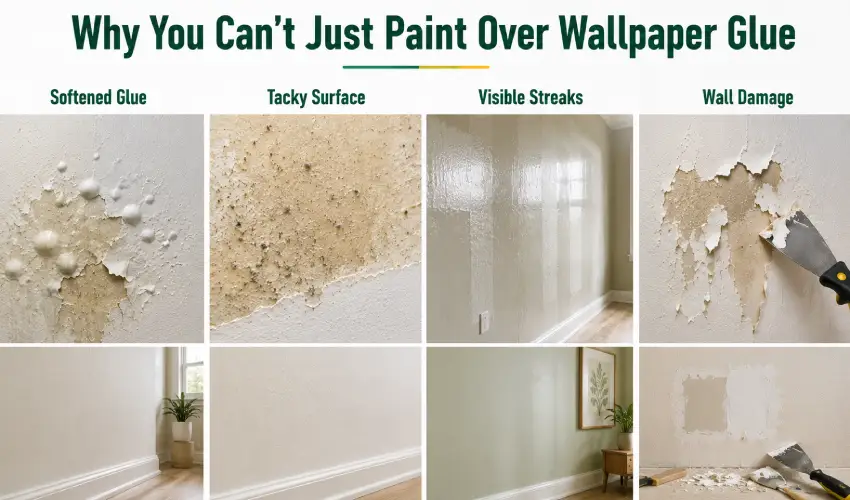
Most people think that painting over the old glue is a shortcut, but it is not true. If you paint over the wall with glue, then it will start to peel off in just a few weeks. Here is why it happens.
1. Water in The Paint Softens the Glue
Most wallpaper adhesives are water-based. They never fully cure. They only dry out. Roll a coat of latex paint over that dried glue, and the water in the paint soaks straight into it. The glue softens again. It swells, lifts, and pushes your fresh paint off the wall. You get bubbles within hours and peeling within days.
2. The Surface Stays Tacky Forever
Old glue holds a slight stickiness even after it dries. So the dust and grit stick to it. Your paint then sits on a dirty, uneven layer instead of a clean wall. The bond is weak from the start.
3. Streaks and Shine Show Through
Glue dries in uneven patches. Those patches soak up paint at different rates. You end up with glossy spots, dull spots, and visible ridges under the finish. Two extra coats will not hide them.
4. You Risk Real Wall Damage
Once paint starts peeling, it pulls glue with it. That glue often takes drywall paper along too. Now you are patching, skimming, and sanding a wall that only needed a wash.
Some people ask about oil-based primer as a fix. It does seal glue better than latex, since it carries no water. Even so, professional painters still call it a gamble. Primer locks the glue in place, but it cannot smooth the lumps or fix the texture. Remove the glue first. It costs you one afternoon and saves you a full repaint.
Final Thoughts
Removing wallpaper glue is slow, but it is not hard. You need patience, a plastic scraper, and a bucket of the right solution. Working in small sections is the smart move. Keep the wall damp, not soaked. Rinse often. Let everything dry fully before you pick up a paintbrush.
Most rooms take one full day for removal and another day for drying, sanding, and patching. Call a professional when you find torn drywall paper across large areas, crumbling or bulging plaster, or several layers of paper and glue stacked on top of each other. A pro can skim coat the walls and hand you a smooth surface faster than you can patch it yourself. For everything else, the method above will get your walls clean and paint-ready.
Frequently Asked Questions
Yes. Vinegar is mildly acidic, so it breaks down water-based wallpaper paste and loosens its grip on the wall. Mix it one-to-one with hot water for the best results. It works well on standard paste and older wheat paste. Heavy vinyl adhesive may need a steamer or a commercial stripper instead.
It is risky. An oil-based primer seals glue better than a latex one, but it cannot flatten the lumps and streaks left behind. Any glue that softens later will still push your paint off the wall. Removing the glue gives you a far more reliable result.
Plan on six to eight hours of active work for a standard 12 by 12 room. Add 24 hours of drying time, then another hour or two for sanding and patching. Stubborn vinyl adhesive or unprimed drywall can push the job into a second day.
A wallpaper steamer paired with a commercial stripper. Steam softens the top layer with heat. The stripper breaks the bond underneath. Together, they cut through hardened glue that plain water cannot touch.
Modern wallpaper adhesive is not toxic, and removing it with a vinegar solution needs no mask. Wear one anyway if you dry sand, since fine dust irritates the lungs. Homes built before 1978 need extra care because of possible lead paint underneath.
Yes, if you keep the wall damp instead of soaked, use a plastic scraper, and work in small sections. Damage happens when water sits too long or when a metal blade digs in. Test a hidden patch first to learn how your wall reacts.


