
How to Remodel Vanity: 11 Ideas for a Stylish Bathroom

To remodel a bathroom vanity, you either refresh the cabinet you already have or replace it entirely. A refresh means painting or staining the cabinet, changing the hardware, and upgrading the countertop, sink, faucet, mirror, and lighting. It usually costs between $100 and $1,500 and takes one to three weekends. A full replacement is the better choice when the cabinet box is swollen, moldy, or the wrong size for how you use the room.
The vanity is the busiest surface in most bathrooms. You use it several times a day, and it is often the first thing you see when you walk in. That is why updating it changes the look of the whole room more than almost any other single project, and for far less money than a full renovation.
This blog post by Floor Land covers 11 practical vanity remodel ideas, from a $40 hardware swap to a floating vanity with a new stone top. Each idea includes the budget, skill level, and time required, plus simple step-by-step instructions and the mistakes we see most often on real projects. You will also find a refresh-or-replace checklist, a countertop comparison, a cost table, and the right order to do the work.
Before You Start: Plan Your Vanity Remodel
Before starting your vanity remodel, measure your space, plumbing, and surrounding fixtures carefully. Knowing standard vanity dimensions helps you choose the right model and ensures a smooth, easy installation.
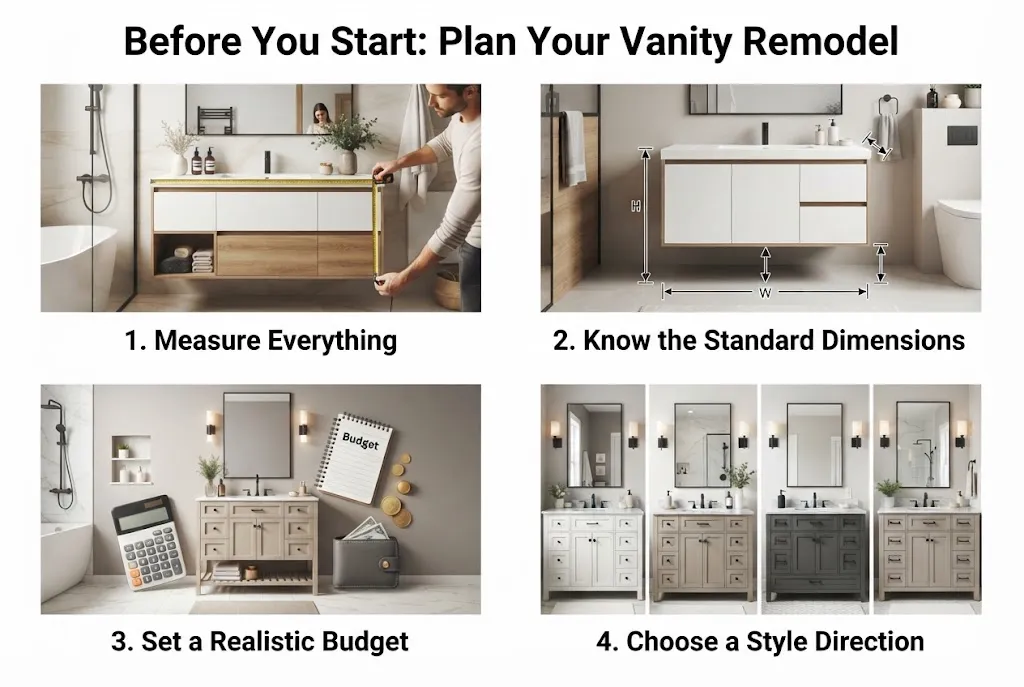
1. Measure Everything
Record the vanity’s width, depth, and height, and measure the space around it. Note the distance to the toilet, the shower, and the door swing. Measure where the water supply lines and drain exit the wall. If you plan to change the countertop or faucet, also measure the spacing of the existing faucet holes.
2. Know the Standard Dimensions
| Measurement | Typical range |
| Standard vanity height | 30 to 32 inches (older homes) |
| Comfort-height vanity | 34 to 36 inches (easier on the back for most adults) |
| Standard vanity depth | 18 to 21 inches (shallow options from about 16 inches) |
| Common single vanity widths | 24, 30, 36, 42 and 48 inches |
| Common double vanity widths | 60 and 72 inches |
| Clear space in front of the vanity | At least 21 inches is a widely used minimum; 30 inches feels comfortable |
Local building codes vary, so confirm clearances with your local authority or contractor if you are changing the layout.
3. Set a Realistic Budget
Decide your total budget first, then spend it where you will notice it most. For most people, that means the countertop and the faucet, because you touch and see them every day. Set aside 10 to 15 percent for surprises, such as a corroded shut-off valve or a damaged wall behind the old backsplash.
4. Choose a Style Direction
Choose one clear style so that your color, hardware, and fixture finishes work together. The table below shows combinations that look good together.
| Style | Cabinet color or finish | Hardware finish | Countertop |
| Modern minimal | Matte white, black or flat-panel walnut | Matte black or brushed nickel | White quartz or solid surface |
| Modern farmhouse | Soft white, sage or greige Shaker | Aged brass or oil-rubbed bronze | Marble-look quartz or butcher block |
| Coastal | Light blue, sea-glass green or whitewashed oak | Polished nickel or rope-detail pulls | White quartz or light granite |
| Japandi | Natural light oak or ash | Minimal black or wood pulls | Warm concrete or matte stone |
| Classic traditional | Navy, deep green or cherry stain | Polished chrome or unlacquered brass | Carrara marble or dark granite |
Basic Tools and Materials
- Tools: tape measure, screwdriver and drill, adjustable wrench, basin wrench (for faucets), utility knife, caulk gun, level, sanding block or orbital sander.
- Prep supplies: degreasing cleaner, 120- and 220-grit sandpaper, painter’s tape, drop cloths, tack cloth.
- Finish supplies: bonding primer, cabinet enamel or gel stain, a good synthetic brush and foam roller, silicone caulk made for kitchens and baths.
- Safety gear: safety glasses, gloves, a dust mask or respirator, and good ventilation.
11 Bathroom Vanity Remodel Ideas
Your vanity sets the tone for your entire bathroom experience. Instead of a costly full-room renovation, focusing on this centerpiece can dramatically improve your room’s design and utility. Here are 11 smart, high-impact bathroom vanity remodel ideas to inspire your next home improvement project.
1. Repaint the Cabinet with a Moisture-Resistant Finish
Paint is the fastest way to change the look of a dated vanity. Orange-toned oak and cherry can look fresh and modern in a single weekend. The secret is not the color. It is the preparation and the type of paint. Bathrooms are humid, and regular wall paint stays soft and sticky on cabinets that you touch every day.
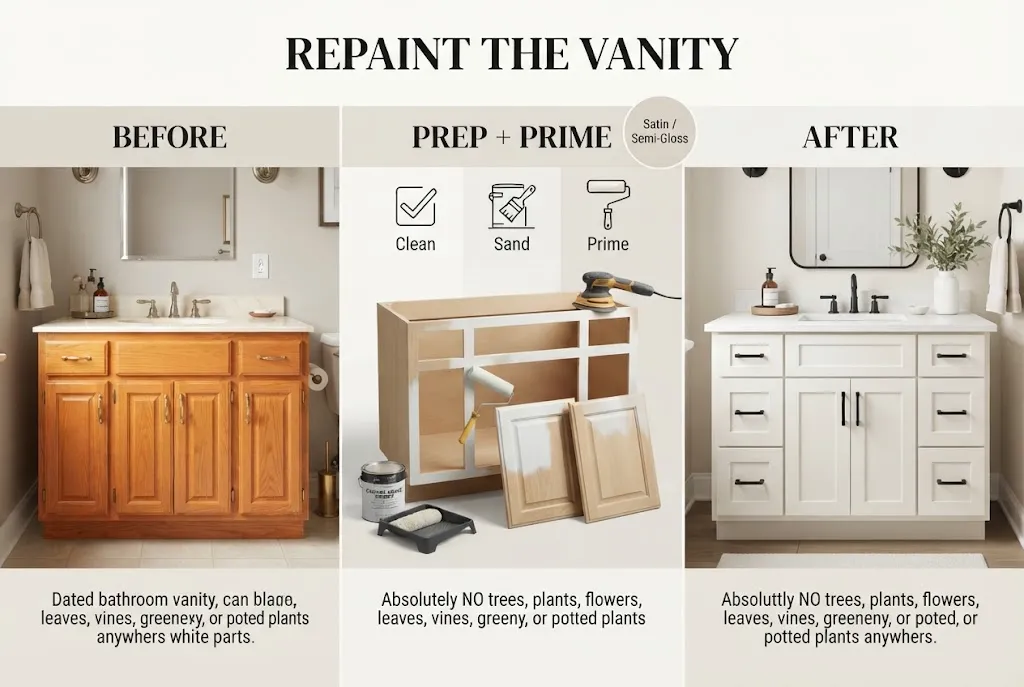
How to do it:
- Remove doors, drawers, and hardware. Label each one with painter’s tape so it goes back in the same place.
- Clean every surface with a degreaser. Soap, hairspray, and skin oils stop paint from bonding.
- Scuff-sand with 120-grit paper to dull the old finish, then wipe away all dust.
- Apply a bonding primer, especially over glossy or laminate finishes. Let it dry fully.
- Apply two thin coats of cabinet-grade enamel (a waterborne alkyd or urethane-modified acrylic works well). Sand lightly with 220-grit between coats.
- Let the paint cure before rehanging the doors. Most enamels are dry to the touch in hours but take one to three weeks to fully harden.
Pro Tip: Choose a satin or semi-gloss sheen. It wipes clean more easily than matte and hides small flaws better than high gloss. If you want more personality, paint only the vanity in a bold color and keep the walls neutral.
Common mistake: Skipping the primer on laminate or thermofoil. Paint will peel off these surfaces in strips. If the thermofoil is already lifting, paint services will not fix it. Replace the doors instead.
2. Darken or Refresh Wood with Gel Stain
Budget: $40 to $100 | Skill level: Beginner to intermediate | Time: 3 to 5 days
If you like the look of wood but not the color, gel stain lets you change it without stripping. The gel stain is thick, so it sits on top of the existing finish instead of soaking in. That makes it ideal for turning honey oak into espresso, walnut, or a deep grey-brown.
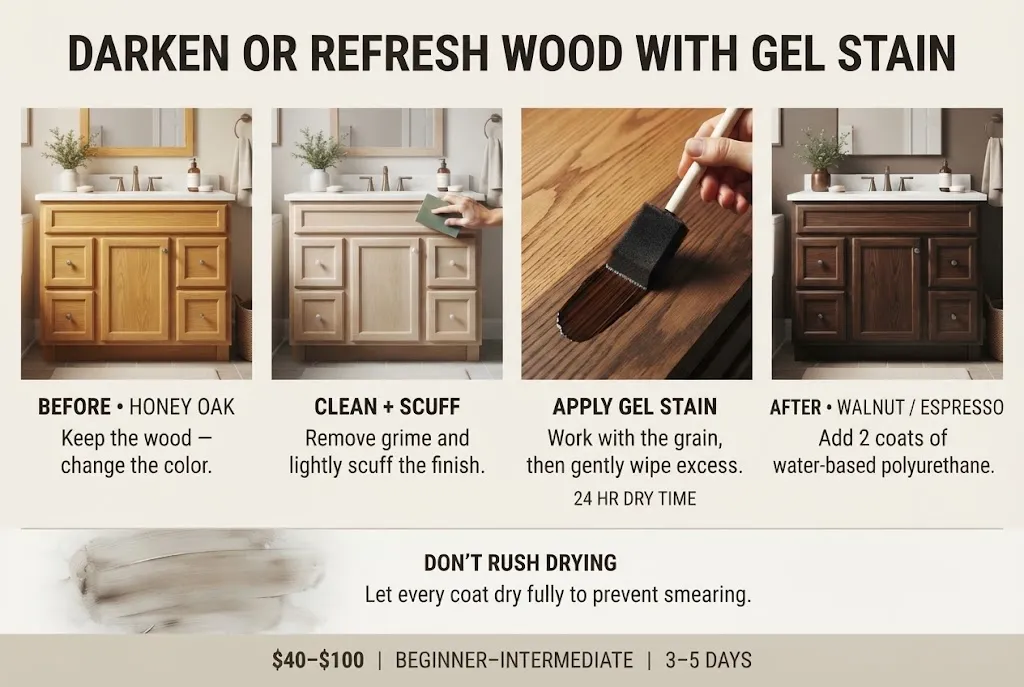
How to do it:
- Clean and degrease the cabinet, then lightly scuff the surface with a fine sanding pad.
- Apply a thin coat of gel stain with a foam brush or lint-free cloth, working in the direction of the grain.
- Wipe off the excess gently. Leave more on for a darker, more opaque look.
- Let each coat dry for at least 24 hours. Add a second or third coat until you reach the color you want.
- Seal with two coats of water-based polyurethane to protect it from splashes.
Common mistake: Rushing coats. Gel stain that has not dried properly will smear and stay tacky. Patience gives you an even, factory-like finish.
3. Swap the Hardware for Instant Style
Budget: $30 to $200 | Skill level: Beginner | Time: 1 to 2 hours
New knobs and pulls are the smallest change with the biggest visual return. Hardware works like jewelry for your vanity. It sets the style before anyone even notices the cabinet color.
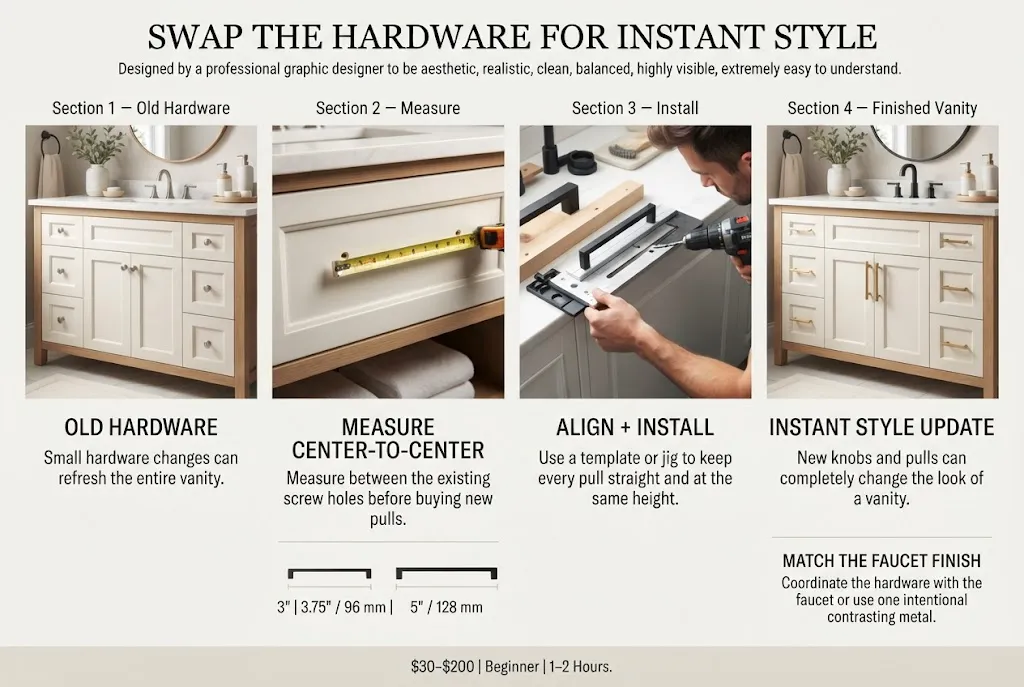
How to do it:
- Measure the “center-to-center” distance between the screw holes of your existing pulls. Common sizes are 3 inches, 3.75 inches (96 mm), and 5 inches (128 mm).
- Buy pulls with the same spacing if you want to reuse the holes. If you are changing size, buy a backplate to hide the old holes or fill them with wood filler before painting.
- Use a cabinet hardware jig or a simple cardboard template so every pull sits at the same height.
- Drill from the front with a slightly larger bit than the screw, holding a scrap block behind the door to prevent splintering.
Pro Tip
Match your hardware finish to the faucet, or use one contrasting metal on purpose. For example, brass pulls with a matte black faucet look planned. Three different metals usually look accidental.
4. Add Trim to Flat Doors for a Shaker Look
Budget: $40 to $120 | Skill level: Intermediate | Time: 1 to 2 days plus paint time
Flat “slab” doors are common on builder-grade vanities and can look plain. Adding a simple frame of thin trim turns them into Shaker-style doors, which suit almost every style from farmhouse to modern.
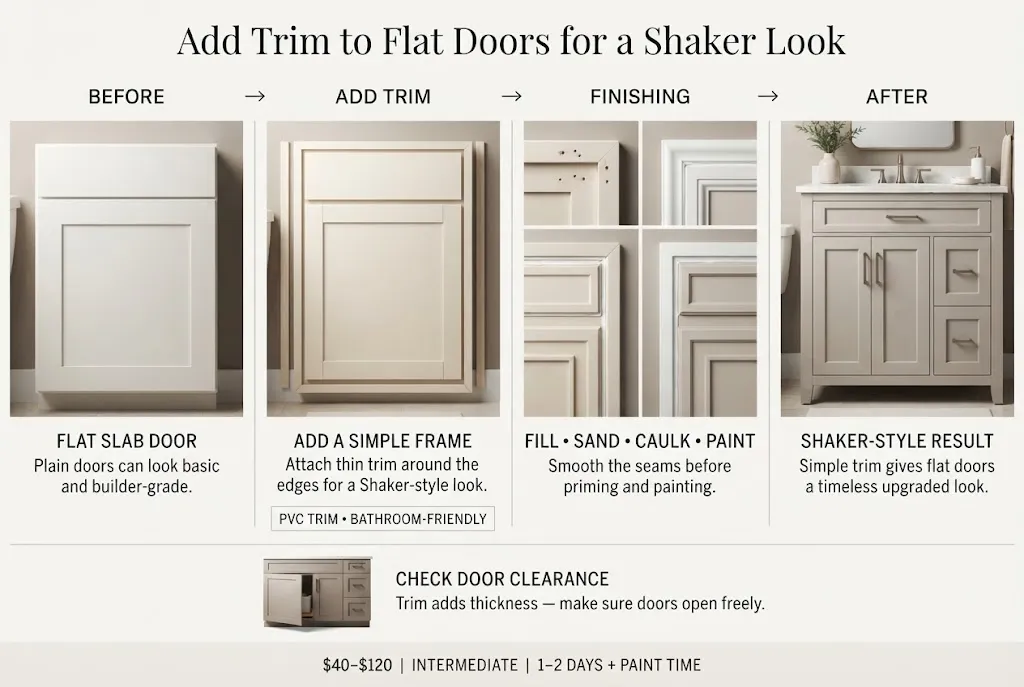
How to do it:
- Remove the doors and drawer fronts and lay them on a flat surface.
- Cut thin flat trim (around 1/4 inch thick and 2 to 2.5 inches wide) to fit the edges of each door. PVC trim is a smart choice in bathrooms because it will not swell.
- Attach the trim with construction adhesive and small brad nails.
- Fill nail holes and seams with wood filler, sand smooth, and caulk the inside edges.
- Prime and paint the whole door as described in Idea 1.
Common mistake: Adding trim to doors that barely clear each other. Trim adds thickness, so check that doors will still open without hitting the drawers or the wall.
5. Replace the Countertop and Add a Backsplash
Budget: $200 to $2,500+ | Skill level: Intermediate to pro | Time: 1 day to 2 weeks (including fabrication)
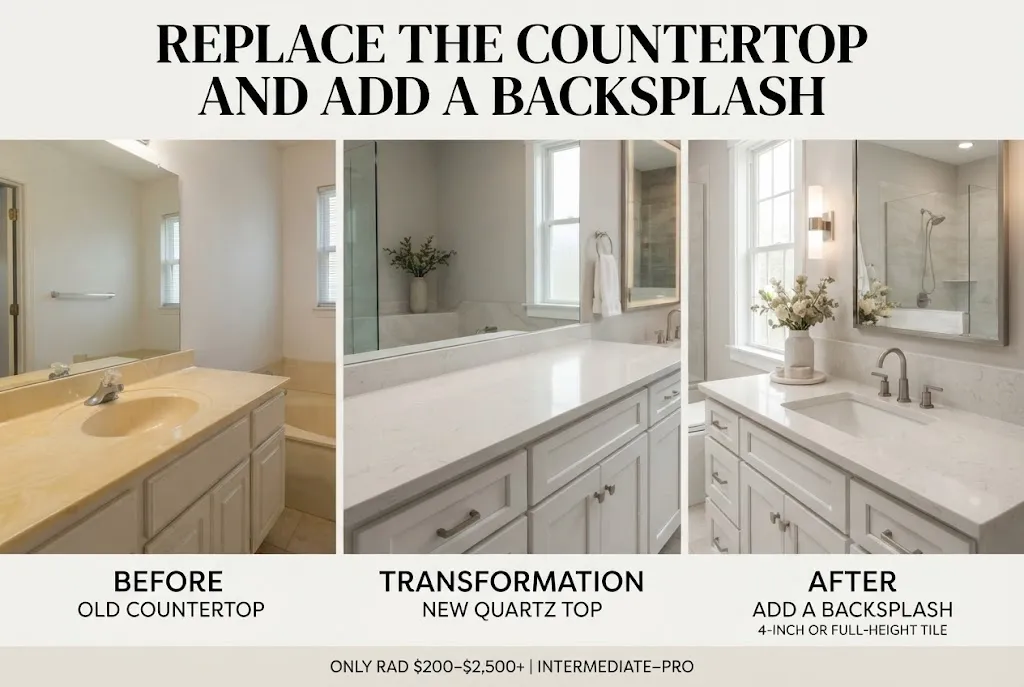
An old cultured marble or laminate top with a built-in sink can date an otherwise nice vanity. Replacing the top changes the look immediately and makes cleaning easier. Many home stores sell ready-made vanity tops with a sink already attached in standard sizes, which is a quick and affordable option. For custom sizes or a premium look, a fabricator can cut a stone top to your exact measurements.
| Material | Pros | Cons | Best for |
| Quartz | Non-porous, no sealing needed, stain resistant, many colors | Can discolor with strong heat or harsh chemicals | Busy family bathrooms |
| Granite | Very durable, natural and unique pattern | Needs occasional sealing | Classic and traditional looks |
| Marble | Elegant, timeless, cool to the touch | Etches and stains easily; needs regular sealing | Guest baths and powder rooms |
| Solid surface | Seamless integrated sinks, repairable scratches | Can scratch and may discolor with heat | Modern, low-maintenance designs |
| Laminate | Lowest cost, many patterns | Seams can swell if water gets in | Tight budgets and rentals |
| Concrete | Custom, industrial and handmade look | Heavy, can crack, needs sealing | Experienced DIYers |
| Sealed wood | Warm, natural texture | Needs a marine-grade finish and upkeep | Japandi and rustic styles |
Add a backsplash while the top is off. A 4-inch stone backsplash is standard, but running tile from the counter up to the mirror, or all the way to the ceiling, makes a small bathroom feel taller and more finished.
Safety Note
Cutting quartz, granite, or concrete produces fine silica dust that can seriously damage the lungs. Have a fabricator make the cuts with proper wet-cutting tools, and don’t cut stone indoors with a dry saw.
6. Upgrade the Sink and Faucet
Budget: $150 to $1,000 | Skill level: Intermediate | Time: Half a day to 1 day
A new faucet is one of the most noticeable upgrades you can make, and it often improves water flow. If you are also replacing the countertop, you can change the sink style too.
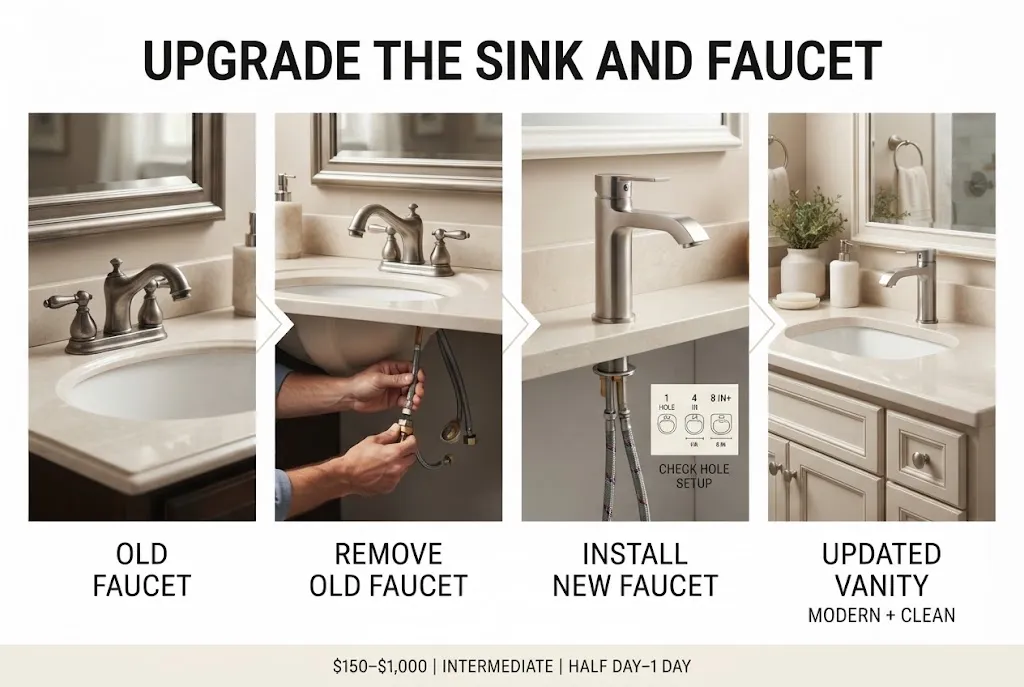
Know your faucet hole setup before you buy:
- Single-hole: one hole for a one-handle faucet. Clean and modern.
- Centerset (4-inch): three holes with handles 4 inches apart, often on a single base plate.
- Widespread (8-inch or more): three separate pieces, a spout and two handles, set 8 inches or more apart.
- Wall-mount: the faucet comes out of the wall, which needs new plumbing inside the wall.
If you are going from three holes to one, buy a faucet with a deck plate to cover the unused holes.
Sink styles to consider: undermount sinks sit below the counter and make wiping crumbs and water straight in very easy. Vessel sinks sit on top and make a statement, but they raise the rim height, so pair them with a lower vanity or a taller faucet. Integrated sinks are made from the same material as the counter, so there is no seam to collect grime.
How to replace a faucet:
- Turn off the water at the shut-off valves under the sink. Open the faucet to release pressure.
- Place a bucket under the pipes. Disconnect the supply lines and loosen the nuts holding the old faucet.
- Clean away old putty or caulk from the counter.
- Install the new faucet using the gasket or plumber’s putty recommended by the manufacturer. Connect new braided supply lines.
- Turn the water back on slowly and check every joint for drips for the next 24 hours.
Pro Tip
Replace old shut-off valves while the water is off anyway. Old valves often seize or leak after being turned for the first time in years. To save water, look for a faucet with a WaterSense label or a flow rate of 1.5 gallons per minute or less.
7. Add Legs or Bun Feet for a Furniture-Style Look
Budget: $60 to $250 | Skill level: Intermediate | Time: 1 to 2 days
Raising the vanity on legs or bun feet makes a standard cabinet look like a custom furniture piece. It also shows more floor, which makes a small bathroom feel bigger.
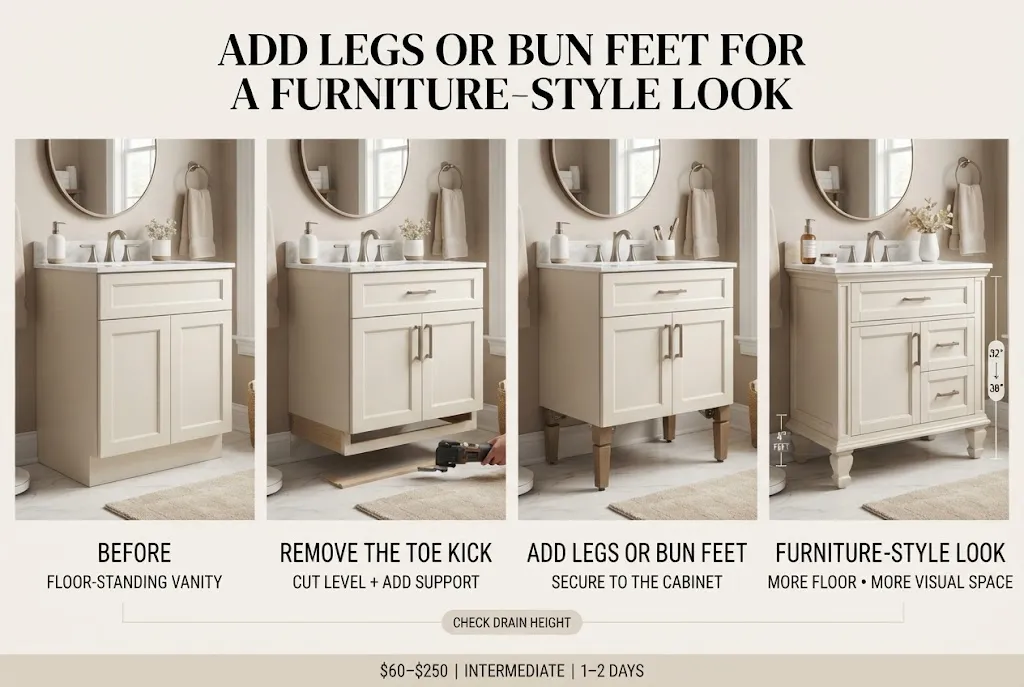
How to handle the toe kick (the recessed strip at the bottom that most guides never explain):
- Disconnect the plumbing and remove the vanity from the wall.
- Check how the toe kick is built. On many vanities, it is a separate board you can cut off with an oscillating tool. On others, the side panels run to the floor and need trimming.
- Cut the toe kick and side panels level, then add a horizontal support rail across the bottom to keep the cabinet rigid.
- Attach mounting plates for the legs or feet at the corners, screwed into solid wood.
- Paint or finish the vanity, reinstall it, and secure it to wall studs so it cannot tip forward.
Common mistake: Forgetting that legs change the height. Adding 4-inch feet to a 32-inch vanity creates a 36-inch vanity, which may be fine, but it also moves the drain position. Check your drain height before you cut.
8. Turn a Dresser or Console into a Vanity
Budget: $150 to $600 | Skill level: Intermediate to advanced | Time: 2 to 4 days
An old dresser, sideboard, or console table can become a one-of-a-kind vanity with real character. Look for solid wood pieces around 30 to 36 inches tall and no deeper than your space allows.
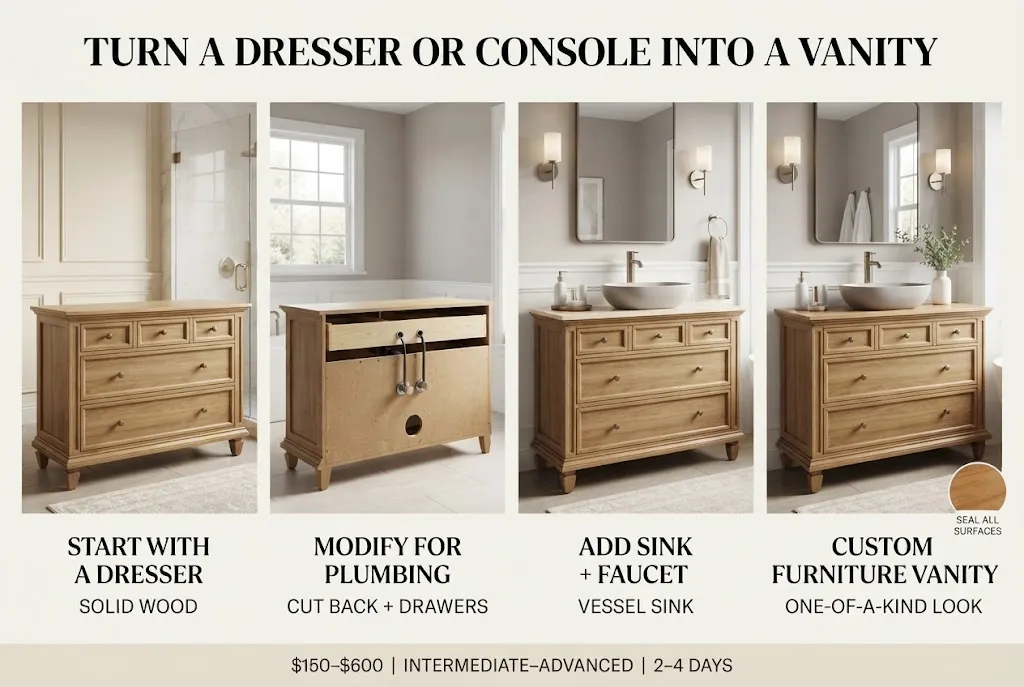
How to do it:
- Choose a solid wood piece. Veneer over particleboard will not survive bathroom humidity.
- Mark the plumbing positions and cut openings in the back panel for the supply lines and drain.
- Modify the top drawers to fit around the plumbing, or convert them into false fronts that do not open.
- Cut the top for a drop-in or undermount sink, or use a vessel sink to avoid a large cutout.
- Seal every surface, including the inside and cut edges, with a marine-grade or water-resistant polyurethane.
- Secure the piece to the wall and seal the joint between the sink and top with bathroom silicone.
9. Switch to a Floating (Wall-Mounted) Vanity
Budget: $400 to $2,000+ | Skill level: Advanced / pro recommended | Time: 1 to 3 days
A floating vanity is mounted to the wall with open space underneath. It gives a clean, modern look, makes floor cleaning easy, and lets you set the height exactly where you want it.
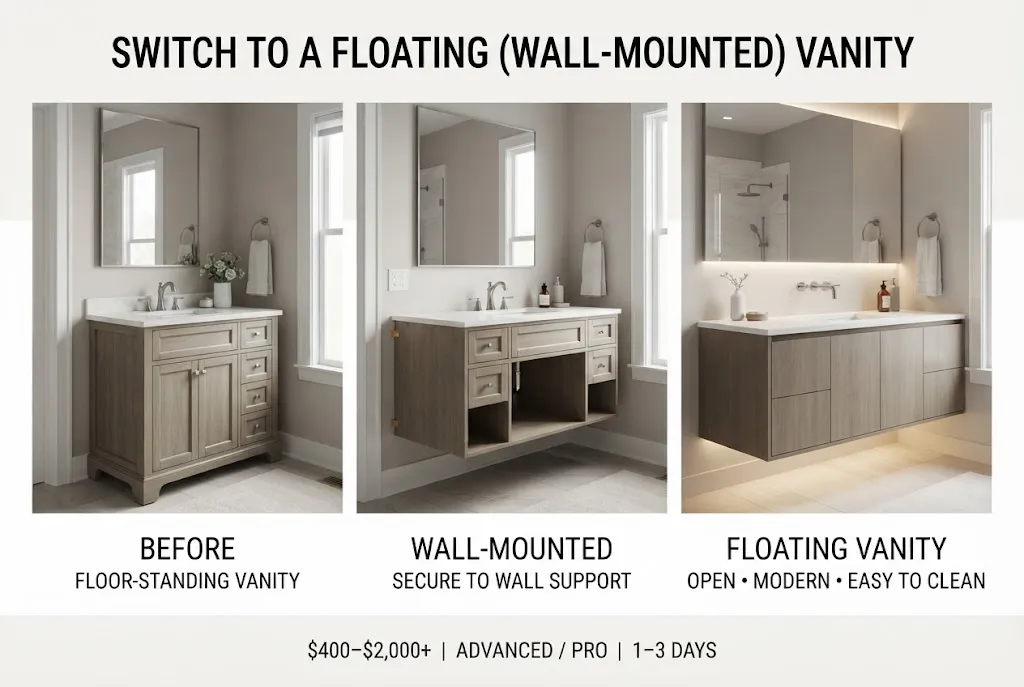
Key things to plan:
- Wall support: a floating vanity plus a stone top and water is heavy. It must be attached to studs or to solid blocking added inside the wall. In many cases, the wall needs to be opened to add this blocking.
- Plumbing: the pipes must fit inside the cabinet. Floor-mounted drains need to move into the wall, which is a job for a plumber.
- Flooring: removing a floor-standing vanity usually exposes bare subfloor or unmatched tile. Plan for new flooring or a patch.
- Lighting under the vanity: a low-level LED strip underneath works as a gentle night light and makes the vanity look like it is floating.
Budget alternative: if moving plumbing is not possible, pair your existing vanity with open floating shelves on the wall beside it for towels and baskets. You get the light, open look without any construction.
10. Upgrade the Mirror and Vanity Lighting
Budget: $100 to $800 | Skill level: Beginner (mirror) to pro (wiring) | Time: A few hours to 1 day
Lighting and the mirror are part of the vanity, even though most vanity remodel guides leave them out. A single light bar above the mirror casts shadows under the eyes and chin, which is not ideal for shaving or makeup.
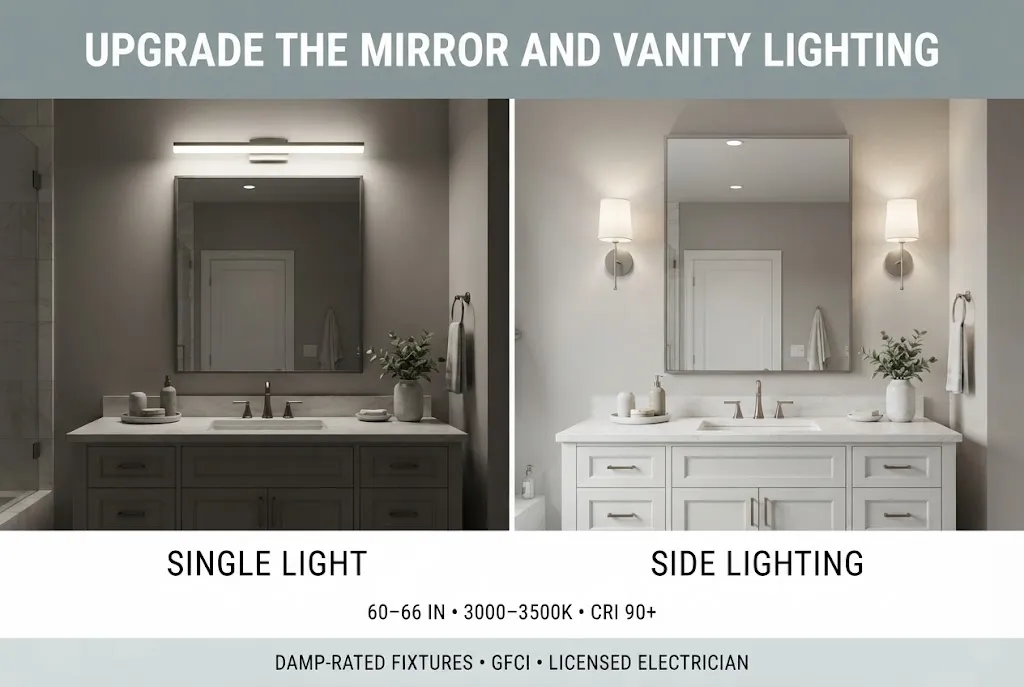
- Side lighting is best for tasks. Wall sconces on each side of the mirror, roughly at eye level (about 60 to 66 inches from the floor), light the face evenly.
- Choose the right color temperature. Warm white around 2700K to 3000K feels relaxing. Around 3000K to 3500K with a high color rendering index (CRI 90+) shows true skin tones.
- Use damp-rated fixtures. Any light near a sink or shower should be rated for damp or wet locations.
- Size the mirror to the vanity. A mirror a few inches narrower than the vanity looks balanced. For double vanities, use two mirrors, one centered over each sink.
- Consider a mirror cabinet. A recessed medicine cabinet adds storage without taking up counter space.
Safety Note
Moving or adding light fixtures means new wiring in a wet area. Use a licensed electrician, and make sure outlets near the vanity are GFCI-protected, which is required by code in most regions.
11. Rebuild the Storage Inside the Vanity
Budget: $30 to $400 | Skill level: Beginner to intermediate | Time: 1 hour to 1 day
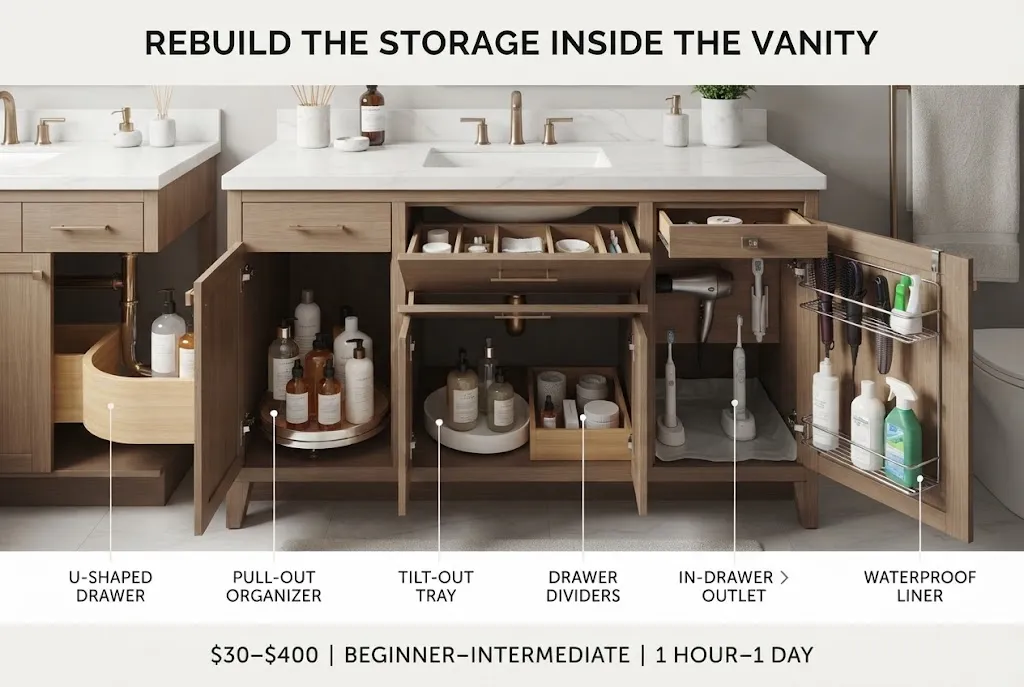
A beautiful vanity that is cluttered inside does not feel finished. The space under the sink is often wasted because of the pipes, but the right organizers turn it into useful storage.
- U-shaped drawers fit around the drain pipe so you can use the full width of the cabinet.
- Pull-out organizers and lazy Susans bring bottles at the back within easy reach.
- Tilt-out trays on the false panel below the sink hold toothbrushes and small items.
- Drawer dividers keep makeup, hair tools and grooming items separate and visible.
- In-drawer outlets let you store hair dryers and electric toothbrushes plugged in. This needs an electrician.
- Door-mounted racks use the back of cabinet doors for hair tools or cleaning supplies.
- A waterproof cabinet liner protects the base from leaks and drips, which is often why vanities fail.
Should You Refresh or Replace Your Vanity?
Before you choose an option from this list, decide whether your current vanity is worth keeping. Open the doors, empty the cabinet, and look closely at the base and the floor of the cabinet under the sink. Water damage almost always starts here.
| Refresh the vanity if… | Replace the vanity if… |
| The cabinet box is solid wood or good-quality plywood | The base is made of particleboard that has swollen or crumbled |
| Doors and drawers open, close, and line up properly | There is mold, a musty smell, or soft spots in the wood |
| The size and layout still suit how you use the room | You need more (or less) storage, or want a double sink |
| You only dislike the color, finish or hardware | The vanity blocks the door or makes the room feel cramped |
| Your budget is under about $1,500 | You are already moving plumbing or replacing the floor |
Expert Tip
Press firmly on the cabinet floor under the sink with your thumb. If it flexes, feels spongy, or leaves a dent, the material has absorbed water. Fix the leak first, then decide. Painting over a damaged base only hides the problem for a few months.
The Right Order to Remodel Your Vanity
Working in the wrong order can scratch new paint or damage a new countertop. Follow this sequence for the smoothest project:
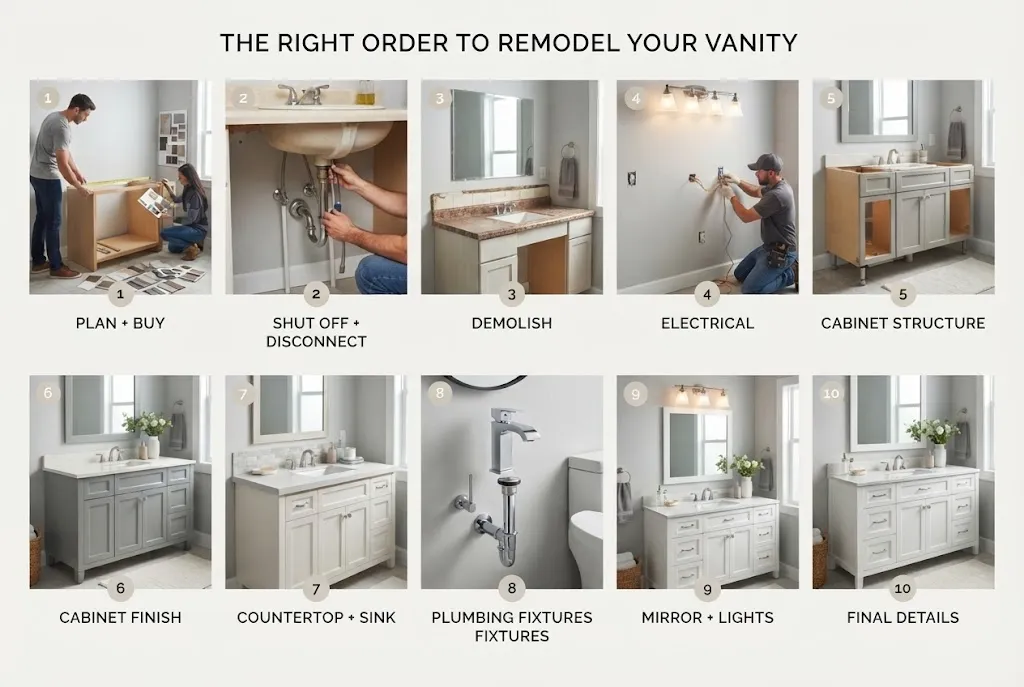
- Plan and buy: finalize measurements and order long-lead items such as countertops and faucets.
- Shut off and disconnect: turn off the water and disconnect the faucet and drain.
- Demolish: remove the old top, backsplash, and mirror. Repair any damaged walls.
- Electrical work: move or add lighting and outlets before any finishing.
- Cabinet structure: add legs, remove the toe kick, or install trim on the doors.
- Cabinet finish: paint or stain, then let it cure.
- Countertop, sink, and backsplash: install the new top and tile.
- Plumbing fixtures: install the faucet and drain, then test for leaks.
- Mirror and lights: hang the mirror and install fixtures.
- Final details: add hardware, organizers, and caulk the joints.
How Much Does a Vanity Remodel Cost?
Costs depend on your region, the materials you choose, and how much work you do yourself. The ranges below are general estimates in US dollars to help with planning. Always get local quotes before committing.
| Project | DIY estimate | With a professional |
| Paint or gel stain the cabinet | $50 to $150 | $300 to $900 |
| New knobs and pulls | $30 to $200 | Usually DIY |
| Shaker trim on doors | $40 to $120 | $250 to $600 |
| New faucet | $80 to $400 (fixture) | Add plumber labor |
| Pre-made vanity top with sink | $150 to $600 | Add $150 to $400 installation |
| Custom stone countertop | Not recommended | $500 to $2,500+ |
| Legs or bun feet | $60 to $250 | $250 to $600 |
| Mirror and lighting | $100 to $500 | Add electrician labor |
| Full vanity replacement | $300 to $1,500 | $1,000 to $4,000+ |
Safety, Moisture and Health Considerations
You must have an idea of the safety, moisture, and health considerations:
- Check for lead paint in older homes. In the US, homes built before 1978 may have lead-based paint. Test before sanding and follow lead-safe practices, or hire a certified contractor.
- Look for hidden water damage. Inspect the wall behind the old backsplash and the floor under the vanity. Stains, soft drywall, or a musty smell mean you need to fix the leak first.
- Ventilate while you work. Open windows and run the exhaust fan when using primers, stains, and adhesives. Low-VOC or zero-VOC products are gentler to work with in a small room.
- Turn off the power at the breaker before touching any light fixture or outlet.
- Secure the vanity to the wall so it cannot tip, especially in homes with small children.
Designing for Accessibility and Aging in Place
A remodel is the ideal time to make your vanity easier to use for years to come. A comfort-height vanity (34 to 36 inches) reduces bending for most adults. For wheelchair users, accessible design guidelines such as the ADA standards call for a sink rim no higher than 34 inches and open knee space underneath, which a floating vanity or open-front design makes possible. Lever-style faucet handles, D-shaped pulls instead of small knobs, and good side lighting also make daily routines easier for everyone.
Eco-Friendly Vanity Remodel Choices
If you want to go for the eco-friendly vanity remodel choice, below are some tricks to follow:
- Reuse before you replace. Refreshing a solid vanity keeps it out of landfill and saves money.
- Choose low-VOC finishes for better air quality in a small, enclosed room.
- Install a water-saving faucet. Products carrying the EPA WaterSense label use at least 20 percent less water than standard models.
- Use LED lighting, which lasts much longer and uses far less energy than older bulbs.
- Look for FSC-certified wood or reclaimed materials for new cabinetry and shelves.
Common Vanity Remodel Mistakes to Avoid
Avoid the below-mentioned mistakes for a hassle-free vanity remodel:
- Painting without prep: grease and gloss make paint peel within months.
- Buying the faucet before checking hole spacing: it may not fit your counter.
- Ignoring the drain height: raising a vanity or adding a vessel sink can leave the drain in the wrong place.
- Using regular wall paint on cabinets: it stays soft and marks easily.
- Skipping caulk: gaps between the counter, backsplash, and wall let water reach the cabinet.
- Choosing a vanity that is too deep: it can block the door or crowd the toilet.
- Mixing too many metal finishes: stick to one or two for a planned look.
How to Keep Your Remodeled Vanity Looking New
Below are some tips and tricks to keep your vanity looking new for a longer duration:
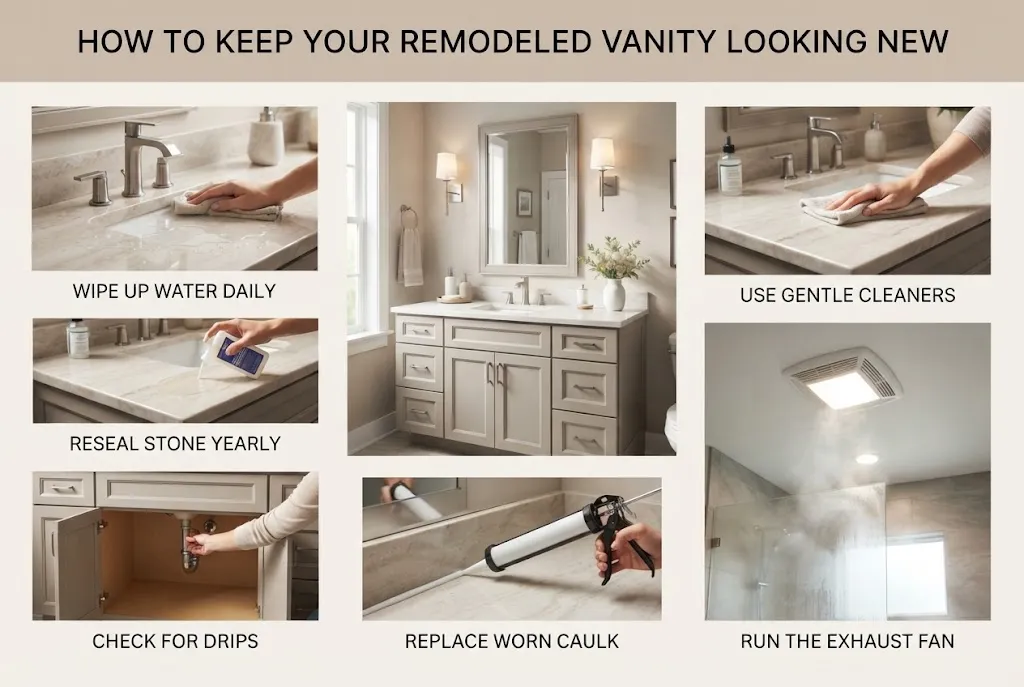
- Wipe up standing water on the countertop and around the faucet base every day.
- Use gentle, pH-neutral cleaners on painted cabinets and natural stone.
- Reseal granite, marble, and concrete as recommended, usually once a year.
- Check under the sink every few months for slow drips.
- Replace worn caulk as soon as it cracks or turns dark.
- Run the exhaust fan during and for 20 minutes after showers to control humidity.
Final Thoughts
Remodeling a vanity does not have to mean tearing out your whole bathroom. Start by checking whether your cabinet is sound, pick one clear style, and choose the ideas that fit your budget. For some people, fresh paint and new pulls are enough. For others, a new quartz top, a modern faucet, and side sconces create the complete change they want. Whatever you choose, careful preparation and the right order of work are what make a vanity remodel look professional and last for years.
Ready to start? Measure your space today, save a few photos of vanities you love, and pick the one idea from this list that would make the biggest difference to your morning routine.
Frequently Asked Questions
Can I remodel a bathroom vanity without replacing it?
Yes. If the cabinet box is solid and free of water damage, you can repaint or stain it, change the hardware, add trim to the doors, and replace the countertop, sink, and faucet. This gives a new look for a fraction of the cost of a replacement.
What is the cheapest way to update a bathroom vanity?
Painting the cabinet and changing the hardware is the cheapest high-impact update. Together they usually cost under $300 if you do the work yourself.
What kind of paint should I use on a bathroom vanity?
Use a cabinet-grade enamel, such as a waterborne alkyd or urethane-modified acrylic, over a bonding primer. A satin or semi-gloss sheen holds up best to humidity and cleaning.
How long does a vanity remodel take?
A paint and hardware refresh takes one weekend plus curing time. Replacing the countertop and faucet adds one to two days, and a custom stone top can take one to two weeks to fabricate.
Can I replace just the vanity top?
Yes, as long as the new top matches the width and depth of the cabinet. Remove the old top carefully, check the cabinet frame is level, and confirm the sink and faucet hole positions before buying.
Can I paint a laminate or thermofoil vanity?
You can paint laminate if you clean it well, scuff-sand it, and use a strong bonding primer. The thermofoil that is already peeling will not hold paint, so replacing the doors is a better option.
What is the best countertop for a bathroom vanity?
Quartz is the most popular choice because it is non-porous, stain-resistant, and does not need sealing. Granite is also durable, while laminate is the most budget-friendly.
How high should a bathroom vanity be?
Standard vanities are 30 to 32 inches tall. Comfort-height vanities of 34 to 36 inches are now more common because they reduce bending for most adults.


