
How to Install PVC Wall Panels Correctly – From Wall Preparation to Finishing
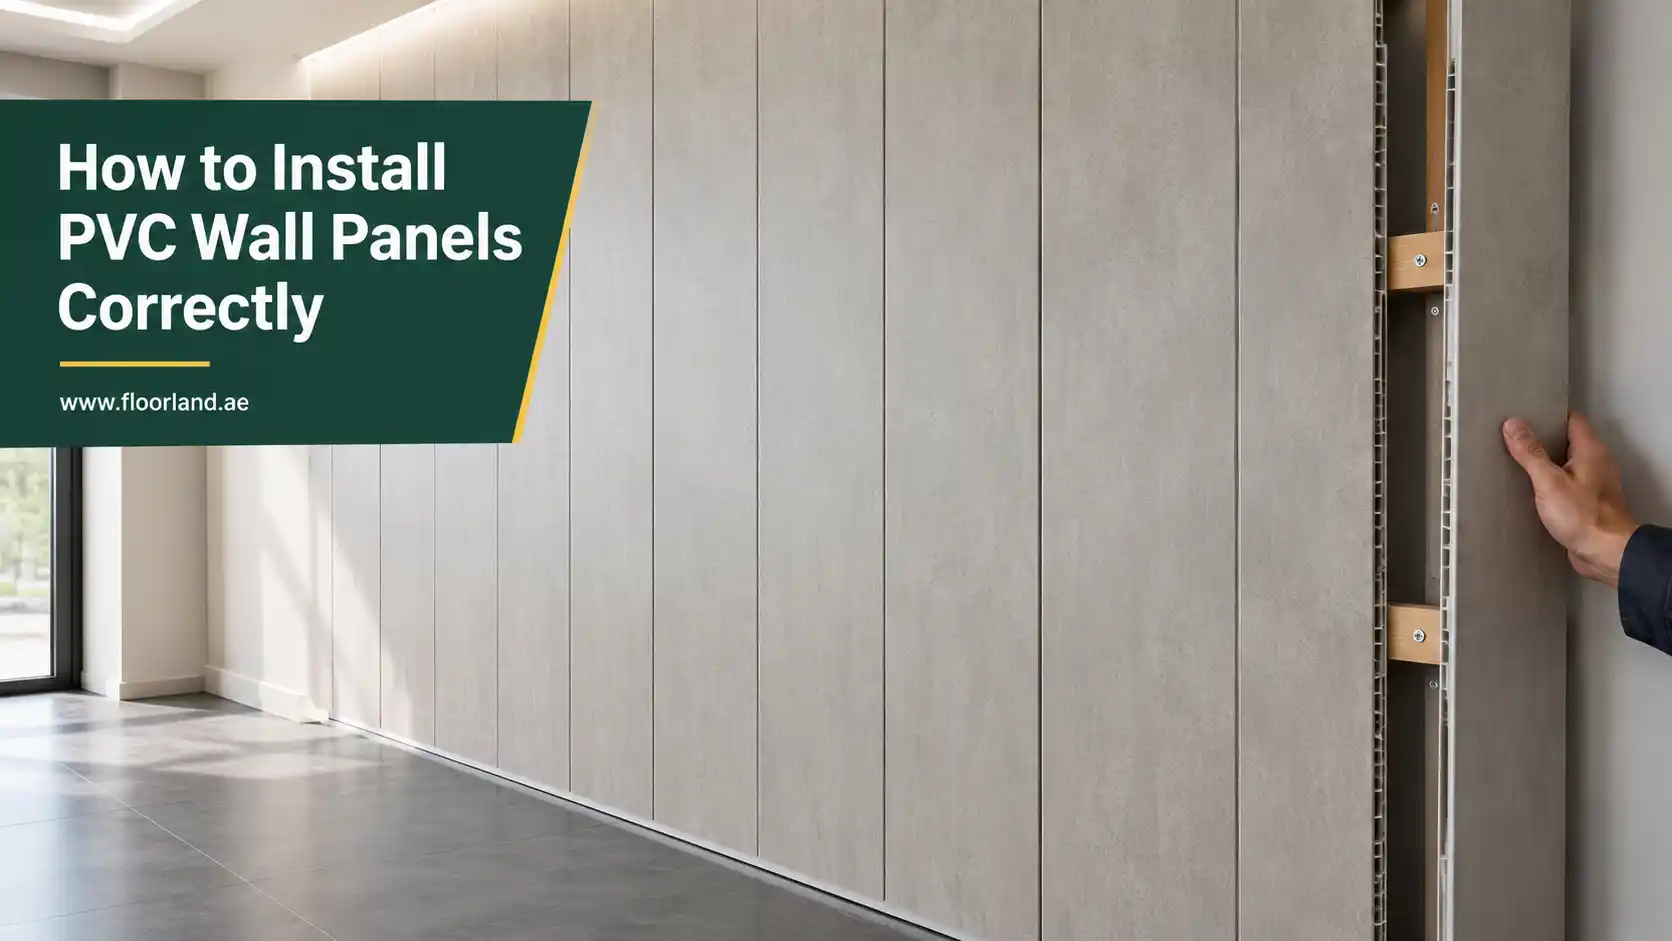
PVC wall panels can be installed on most sound, dry interior walls with basic hand tools. The process comes down to four things done well: a properly prepared surface, panels that have adjusted to the room, a perfectly plumb first panel, and a fixing method that suits both the panel and the wall behind it.
The details change from project to project. This detailed guide by Floor Land covers the 10-step process to install wall paneling. Whether you are planning a bathroom refresh or a feature wall with PVC wall panels, the same principles apply.
One rule overrides everything below: the panel manufacturer’s instructions take priority. Recommended adhesives, expansion gaps, and batten spacing vary by product, and warranties often depend on following them.
Identify Panel Type Before Installation
“PVC wall panel” covers several quite different products. Knowing which one you have tells you how it joins, how it is fixed, and how much wall prep it needs. Check the packaging or product data sheet before buying adhesive or fixings.
| Panel type | Typical use | How it joins | Usual fixing methods |
| Tongue-and-groove strip panels (often 250 mm to 400 mm wide) | Bathrooms, kitchens, utility rooms, ceilings | Interlocking tongue and groove along the long edges | Adhesive, adhesive plus concealed pins or staples, or fixings into battens |
| Large-format sheet panels (often around 1 m wide) | Shower enclosures, bath surrounds | Tongue and groove or separate jointing trims | Panel adhesive and sanitary sealant, sometimes over battens |
| Decorative or 3D tiles | Feature walls, living spaces | Butt joints or interlocking patterns | Adhesive, double-sided tape on suitable drywalls |
| Fluted, slatted or cladding-style profiles | Feature walls, media walls, commercial interiors | Clip systems or tongue and groove | Clips or screws into battens, adhesive for lightweight profiles |
| Self-adhesive panels | Light-duty decor, rental refreshes | Overlap or butt joints | Pre-applied adhesive backing |
Two checks matter more than the panel’s appearance. First, confirm whether the product is rated for wet areas. Some decorative ranges resist splashes but are not intended for shower walls. Second, confirm whether the panel is for interior use only. Most decorative PVC wall panels are for interior use; exterior PVC cladding is a different system with its own ventilation and expansion requirements.
If you are still choosing a style, browsing affordable wall paneling ideas can help you decide between strip panels, sheets and feature profiles before you commit to a fixing method.
Tools and Materials You Will Need
Most PVC panel installations need only standard DIY tools. Gather everything before you start, because adhesive working times leave little room to go looking for a missing trim.
| Item | Purpose and notes |
| Tape measure, pencil, straightedge | Measuring and marking cuts; a pencil marks PVC more cleanly than a pen |
| Spirit level or laser level | Setting the first panel plumb and checking every few panels after |
| Fine-tooth hand saw | Straight cuts across panels; The Panel Company suggests around 14 teeth per inch |
| Jigsaw with a fine blade | Cut-outs for sockets, pipes, and windows |
| Utility knife | Trimming thin panels and scoring along a straightedge |
| Hole saw or step drill | Neat round holes for pipes and shower valves |
| Caulking (skeleton) gun | Applying adhesive and sealant from cartridges |
| PVC-compatible panel adhesive | Usually solvent-free; check the panel maker’s recommendation |
| Sanitary-grade silicone sealant | Wet-area joints, bath and shower tray edges, trims |
| Finishing trims | Starter, end cap, internal and external corner, and joining (H) profiles |
| Stainless or zinc-plated pins, screws or non-corrosive staples | For concealed fixing through the tongue, or into battens |
| Battens and wall plugs (if needed) | Treated timber or PVC battens for uneven or damp-prone walls |
| Degreaser and clean cloths | Surface preparation and wiping off excess adhesive immediately |
| Safety glasses, gloves, dust mask | Cutting PVC produces sharp offcuts and fine dust |
| Voltage tester | Confirming circuits are dead before removing socket and switch plates |
Step-by-Step PVC Wall Panel Installation Process
The steps below describe the most common installation: interlocking PVC panels bonded directly to a prepared wall, with concealed fixings as an option. Batten installation follows the same sequence once the framework is in place; it is covered in detail in the next section.
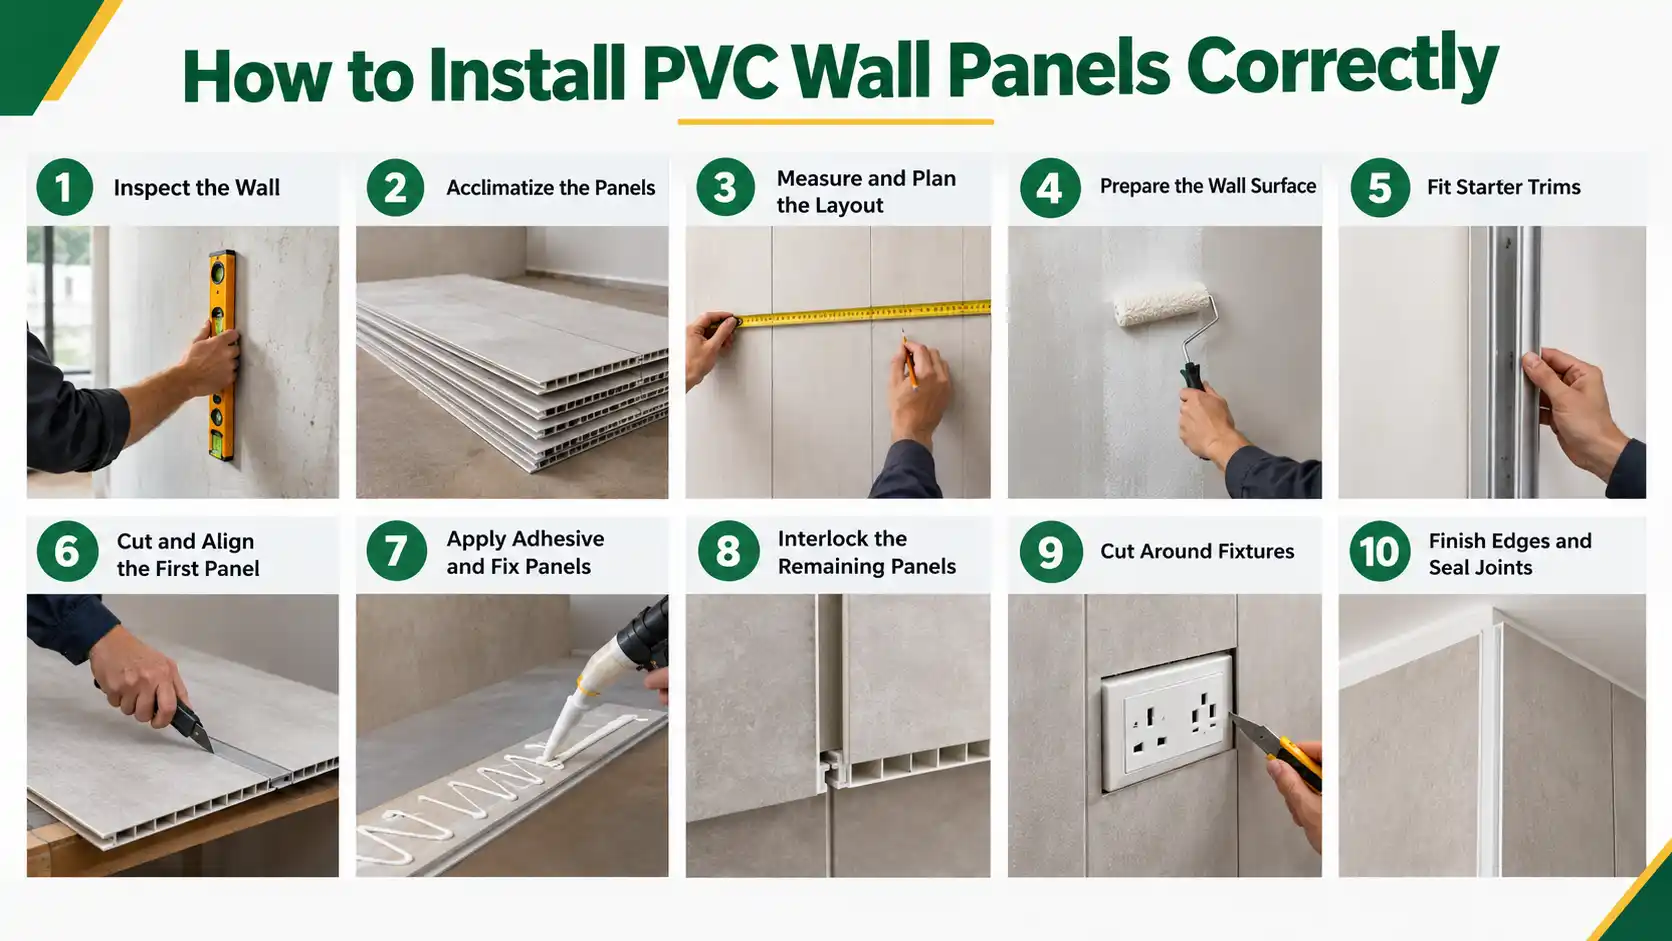
Step 1: Inspect the Wall and Solve Moisture Problems First
Panels will hide a wall, not cure it. Before buying materials, check for:
- Active damp or leaks. Stains, flaking paint, a musty smell, or soft plaster point to a moisture source that must be fixed first. PVC is waterproof, but trapping moisture behind it can damage the wall and encourage mould on the substrate.
- Loose or hollow-sounding plaster or tiles. Adhesive bonds only as well as the surface beneath it. Tap tiles; any that sound hollow or move should be refixed or removed.
- Flatness. Hold a long straightedge against the wall in several directions. Gaps of more than a few millimeters suggest battens or surface repairs.
- Services in the wall. Note where pipes and cables are likely to run before you drill for any fixings.
Step 2: Acclimatize the Panels
PVC expands when warm and contracts when cool. Fitting panels straight from a cold van or a hot storeroom is a common cause of later bowing or open joints. Unpack the panels and lay them flat in the room where they will be installed. Many experts instruct storing them horizontally in that room for 24 hours before installation; some other manufacturers ask for 48 hours. Keep them off damp floors and out of direct sunlight.
While the panels rest, check every pack in daylight for color consistency and damage. Suppliers commonly reject shade complaints once panels are installed.
Step 3: Measure, Calculate and Plan the Layout
Measure each wall’s width and height and note doors, windows, sockets and fixtures. To estimate panel quantity:
- Divide the wall width by the panel’s cover width (the visible width once joined, not including the tongue).
- Round up to a whole number for each wall.
- Check that the panel length covers the wall height; if not, plan joining trims or a deliberate horizontal break.
- Add a margin, commonly around 10%, for cutting waste and the occasional damaged panel. Patterned or directional panels may need more.
Next, plan a balanced layout. If the calculation leaves a remainder of less than half a panel, the last strip will be awkwardly narrow. Trim the first and last panels by equal amounts instead, so both ends look intentional. For patterned panels, dry-lay a few on the floor to see how the design continues across joints.
If the paneling is part of a larger refurbishment, settle the order of works now: flooring, sanitaryware and electrical changes often need to happen before or alongside paneling. Our roundup of home renovation ideas can help you sequence a wider project.
Step 4: Prepare the Wall Surface
Good adhesion depends on a clean, dry, stable surface.
- Painted walls: wash with a degreaser, rinse and let dry. Lightly sand glossy or “easy-clean” paint to give the adhesive something to grip, or test a small area first.
- Plaster and plasterboard: fill holes, scrape off nibs and loose material, and dust down. Bare, very porous plaster may benefit from a primer if the adhesive maker recommends one.
- Tiles: clean thoroughly to remove soap residue and grease, re-fix loose tiles, and let everything dry. Some panel systems recommend removing protruding tile features such as soap dishes.
- Wallpaper: remove it. Adhesive will bond to the paper, and the paper will eventually separate from the wall.
- Fixtures: remove towel rails, shelves, mirrors, and accessories. For socket and switch plates, isolate the circuit at the distribution board and confirm it is dead with a tester first.
Step 5: Fit Starter Trims and Corner Profiles
Many PVC systems use trims to hold and finish panel edges. Fit any starter trims, internal corner trims and two-part profiles before the panels. With two-part trims, fix the back section first and clip the decorative cover on at the end, as recommended in PVC Cladding’s fitting instructions.
Use a level on each trim, because a crooked starter trim will throw out every panel that follows. Leave the small gap specified by the manufacturer at the base, especially above a bath or shower tray. At floor level, a matching PVC skirting profile can give a neat, water-resistant finish where panels meet the floor.
Step 6: Cut and Fix the First Panel Plumb
Start at the corner or edge your layout plan identified, usually the most visible corner or the edge of a starter trim.
- Measure the height at both ends of the panel position, because floors and ceilings are rarely level. Transfer the measurement to the panel and subtract the expansion gap the manufacturer specifies.
- Cut the panel. With a hand saw, cut with the decorative face up. With a jigsaw, which cuts on the upstroke, cutting with the face down usually reduces chipping on the visible side; follow your manufacturer’s guidance.
- If the first panel goes into a corner, cut off the tongue or groove that would face the corner so the panel sits squarely.
- Apply adhesive as described in Step 7, position the panel, and check it with a level on both its face and its edge. Adjust until it is perfectly vertical before the adhesive grabs.
Take your time here. A first panel that is 2 mm out of plumb will be noticeably out by the far end of the wall, and the error cannot be corrected later without removing panels.
Step 7: Apply Adhesive and Fix the Panel
Apply adhesive to the back of the panel in the pattern the adhesive and panel makers specify. Common patterns are vertical beads near each long edge plus a central bead, or regular dabs across the back. Leave the outer few centimeters near the tongue and groove clear so adhesive does not squeeze into the joint.
Press the panel firmly onto the wall, working from the center outward to spread the adhesive evenly. Some adhesives require you to press, pull away briefly and re-press once the adhesive becomes tacky; follow the cartridge instructions.
For extra security while the adhesive cures, especially on ceilings, tall walls or slightly uneven surfaces, drive pins, screws or staples through the tongue of each panel. The Panel Company suggests fixings roughly every 30 cm along the tongue; the next panel’s groove then hides them. If you staple, PVC Cladding advises non-corrosive staples at least 14 mm long.
Step 8: Interlock and Fix the Remaining Panels
Apply adhesive to the next panel, slot its groove over the tongue of the fixed panel and slide it into place until the joint closes. Press it to the wall and add any concealed fixings. Repeat across the wall.
- Check plumb with a level every two or three panels.
- Wipe away adhesive that reaches the face immediately, with the cleaner the adhesive maker recommends.
- Do not force tight joints with a hammer directly on the panel edge; use a tapping block or an offcut to spread the force.
- In showers and other wet zones, run a bead of sanitary silicone into the groove or along the tongue before joining each panel, as PVC Cladding’s instructions describe for shower cubicles.
Step 9: Cut Around Sockets, Switches, Pipes and Windows
Measure the position of each obstacle from the edge of the previous panel and from the floor or trim. Transfer those measurements to the panel, mark the opening and cut it with a jigsaw or hole saw. Make holes slightly larger than the pipe or fitting so the panel can move with temperature changes.
Panels add thickness to the wall, so socket and switch plates may no longer sit flush. Extension or spacer boxes can bring them forward. Electrical changes of this kind are regulated in many countries and may require a qualified electrician; check your local rules before altering wiring accessories.
Around windows and door frames, finish the panel edges with external corner trims or end caps. Miter the corners of trims for a clean appearance.
Step 10: Fit the Last Panel and Finish the Edges
The final panel usually needs cutting along its length. Measure the gap at the top and bottom, because walls are seldom perfectly square, and remember to deduct the expansion gap. Cut the panel, slide it into the end or corner trim first if your system allows, then ease it onto the tongue of the previous panel.
Finish by fitting the front sections of any two-part trims, then seal:
- Along the junction with baths, basins and shower trays.
- At internal and external corners in wet areas.
- Around pipes, valves and any cut-outs that could take water.
Use sanitary-grade silicone and follow its curing time before using the shower or bath. Remove protective film from the panel faces once dust-producing work is finished.
Choose a Fixing Method Based on Your Wall
The wall dictates the method more than the panel does. Use this as a starting point, then confirm against the manufacturer’s instructions.
| Wall condition | Recommended approach |
| Flat, sound plaster or plasterboard (drywall) | Direct bonding with a solvent-free panel adhesive |
| Existing ceramic tiles, firmly bonded | Direct bonding with a suitable adhesive or sealant after degreasing |
| Gloss or “easy-clean” paint | Abrade or remove the glossy layer, then bond; or use battens |
| Uneven, crumbling or patched walls | Timber or PVC battens (furring strips) packed level |
| Damp-prone walls, after the source of moisture is fixed | Treated or PVC battens with a ventilated gap behind the panels |
| Wallpapered walls | Strip the paper first; adhesive bonded to paper will fail with it |
Grosfillex’s guidance gives a useful tolerance: a wall with irregularities of less than about 3 mm can usually take panels directly without battens. Beyond that, you are better off leveling the wall or building a batten framework.
How to Install PVC Panels on Battens
Battens, also called furring strips, are the most forgiving method because they let you build a flat, stable surface over a poor wall. The general sequence:
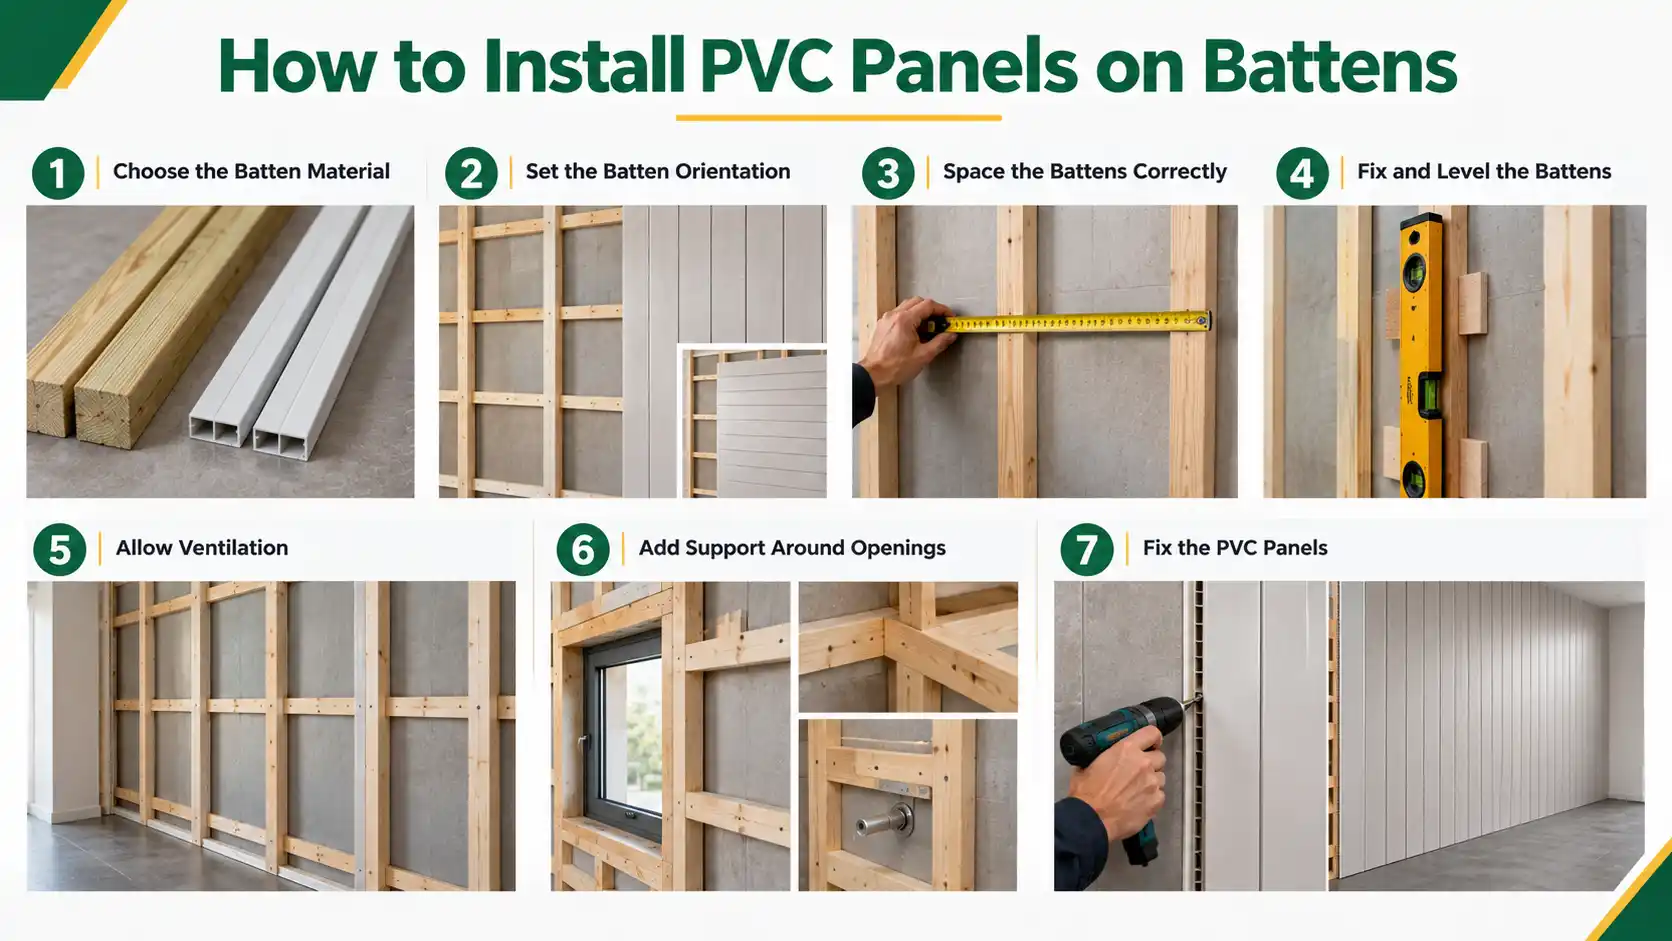
- Choose the batten material. Use treated, rot-resistant timber or PVC battens. In wet rooms, PVC battens avoid any risk of timber decay.
- Set the orientation. Battens run perpendicular to the panels. For vertical panels, fix battens horizontally; for horizontal panels, fix them vertically.
- Space them correctly. PVC Cladding’s specification for its interior panels gives batten centers of 25 cm to 40 cm. Large shower sheets may differ: one manufacturer’s instructions call for battens at the top and bottom of the panel, with intermediate battens around 500 mm apart. Always use your product’s figure.
- Fix and level them. Screw battens into studs, or into masonry with suitable wall plugs. Pack behind them with shims wherever needed, so their faces form a single flat plane; a bowed batten produces a bowed panel.
- Allow ventilation. Leave gaps in the battening so air can move behind the panels. This matters most on walls that have had damp problems.
- Add extra support at panel ends, around openings, at corners and wherever fixtures such as towel rails or grab rails will be mounted.
- Fix the panels through the tongue into each batten, with adhesive along the battens if the manufacturer specifies it.
If you plan to mount heavy items such as wall cabinets, mirrors or grab rails, mark the positions and add solid backing during this stage. Fixing heavy items through thin PVC alone can crush or crack the panel.
How to Install PVC Wall Panels Over Existing Tiles
Fitting PVC panels over existing tiles is one of the main reasons people choose them, and several manufacturers support it. The conditions are consistent:
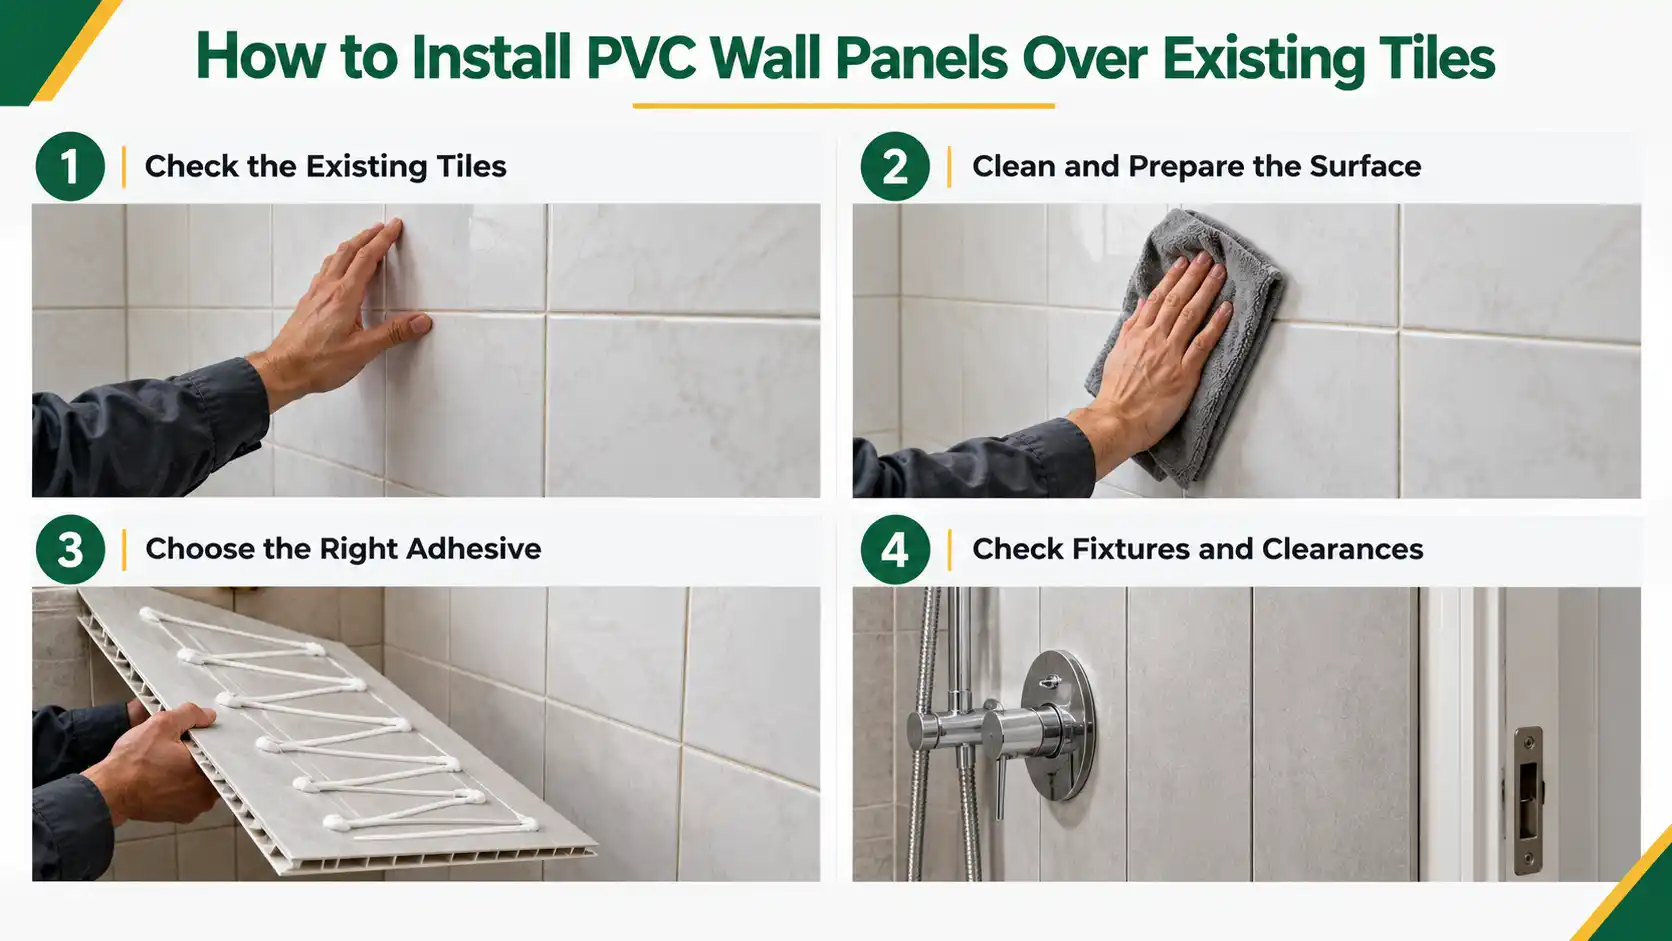
- Tiles must be firmly bonded, with no hollow or cracked areas.
- The surface must be clean, dry, and free of soap residue and grease.
- Use an adhesive or sealant the manufacturer approves for non-porous surfaces. The Panel Company, for instance, suggests silicone for installation over ceramic tiles and a solvent-free adhesive on porous surfaces such as plaster.
- Check that the added thickness will not interfere with door frames, window reveals, taps or shower valves. Pipework may need extending.
Troubleshooting PVC Wall Panel Problems
| Problem | Likely cause | What to do |
| Panels bowing or bulging outward | Expansion with no gap at the ends or edges; uneven wall; panels fitted cold | Remove trims, trim panel ends to create the specified gap, and refit; add battens if the wall is uneven |
| Gaps opening between panels | Contraction after fitting in heat; joints not fully engaged | Check plumb; re-engage joints; fit panels at normal room temperature in future |
| Panels lifting or coming away | Dusty, greasy or glossy surface; incompatible adhesive; wall too uneven for direct bonding | Remove, clean back to a sound surface, use the recommended adhesive, add concealed fixings or battens |
| Water marks or mould at joints or edges | Unsealed joints or trims; failed silicone; poor ventilation | Cut out and replace silicone; seal joints in wet zones; improve extraction |
| Panel warping near a cooker, heater or light | Heat beyond the panel’s tolerance | Replace the affected panel and add a heat-resistant barrier or relocate the heat source |
| Visible fixing heads | Fixings placed in the panel face instead of the tongue | Fill or cover only if the manufacturer approves; otherwise replace the panel |
| Socket plates not sitting flush | Added wall thickness | Have spacer or extension boxes fitted by a qualified electrician where required |
| Color variation between panels | Different production batches | Check packs before fitting and keep batches together on the same wall |
If a problem appears soon after installation, contact the supplier before removing anything. Many warranty claims require the original installation to be inspected.
How to Care for PVC Wall Panels After Installation
PVC panels need little maintenance, but the wrong cleaning products can dull or damage the printed surface.
- Routine cleaning: wipe with a soft cloth or sponge and warm water with a mild, non-abrasive household cleaner. PVC Cladding recommends non-abrasive domestic products and warns against solvents or solvent-containing cleaners.
- Avoid: scouring pads, abrasive creams, bleach-heavy or solvent-based products unless the manufacturer approves them, and steam cleaners aimed directly at joints.
- Bathrooms: squeegee or wipe shower panels after use to limit limescale and soap build-up, particularly in hard-water areas.
- Kitchens: remove grease splashes promptly, before they harden.
- Sealant checks: inspect silicone joints around baths, showers and trims periodically. Replace sections that are cracked, shrinking away, or persistently discolored, because failed sealant is the most common route for water to reach the wall.
- Damage repair: a single damaged strip panel can sometimes be cut out and replaced, depending on the joint system. Keep a few spare panels from the same batch for this purpose.
DIY or Professional Installation?
A single feature wall or a small bathroom on flat, sound walls is a reasonable DIY project for someone comfortable with measuring, cutting, and using a level. Professional installation becomes the better option when:
- The walls are uneven, damaged or have a history of damp, and need battens, repairs or moisture investigation first.
- The project involves a shower enclosure or wet room, where a sealing failure can damage floors, ceilings below or neighboring properties.
- Electrical or plumbing work is needed, such as moving sockets, extending pipework or relocating a shower valve. These trades are regulated in many countries.
- The building is commercial or shared, where fire classification, approvals or landlord consent may apply.
- The space is large or high, such as stairwells and double-height walls that require access equipment.
- The finish is unforgiving, for example high-gloss sheets or continuous patterns where every joint and cut is on show.
When comparing installers, ask which fixing method they plan to use and why, how they will handle expansion gaps and sealing, whether they follow the panel manufacturer’s instructions, and what warranty covers their workmanship.
Final Thoughts
A durable PVC panel installation depends less on speed than on sequence. Fix any moisture problem, prepare the wall, acclimatize the panels, get the first panel perfectly plumb, and leave room for movement. Seal every joint that water can reach, and follow the manufacturer’s instructions wherever they differ from general advice. Done that way, PVC panels give a clean, low-maintenance wall that should look right for years.
Frequently Asked Questions
Can PVC wall panels be installed directly on plasterboard or drywall?
Yes, provided the board is securely fixed, flat, dry, and clean. Bond the panels with a PVC-compatible, solvent-free adhesive and, where the manufacturer allows, add concealed fixings through the tongue into the board or the studs behind it.
Do PVC wall panels need battens?
Not on a flat, sound wall. Battens are recommended when the wall is uneven, damaged, or prone to damp, or when the manufacturer requires a ventilated cavity. As a rough guide from Grosfillex, walls with irregularities under about 3 mm can usually take panels directly.
What is the best adhesive for PVC wall panels?
The one your panel manufacturer specifies. In general, that means a solvent-free panel adhesive with strong initial grab, as solvent-based products can damage PVC. Some manufacturers specify a silicone or hybrid sealant-adhesive for non-porous surfaces such as tiles.
Can I install PVC wall panels over existing tiles?
Usually, yes. The tiles must be firmly bonded, clean, dry, and free from grease and soap residue. Check that the extra thickness will not interfere with taps, valves, window reveals or door frames.
Do PVC wall panels need expansion gaps?
Yes. PVC moves with temperature, so panels need small gaps at edges, ends, corners, and around pipes, normally hidden by trims or sealant. Around 3 mm is common for domestic panels, but the correct figure is the one in your product’s instructions.
How long does it take to install PVC wall panels?
It depends on the room size, the wall condition, and the number of cut-outs. Small rooms on well-prepared walls are often finished within a weekend. Allow additional time for acclimatizing the panels beforehand, any wall repairs or battening, and the sealant’s curing period before the shower is used.
Can PVC wall panels go behind a cooker or hob?
Not without protection. Standard PVC panels are typically rated to around 60°C, and suppliers such as PVC Cladding advise against fitting them behind cookers without a heat-resistant barrier such as stainless steel. Check the appliance’s required clearances too.
Can you paint PVC wall panels?
It depends on the product. Some paintable PVC panels and moldings are designed to take paint, with Ekena Millwork recommending 100% acrylic latex paint for its PVC products. Many printed decorative panels are not designed to be painted, and some manufacturers advise against it. Check before you buy if you plan to change the color later.
Are PVC wall panels suitable for hot or humid climates?
They cope well with humidity because the material does not absorb water. Heat is the bigger consideration: acclimatize panels to the room, install them at a normal indoor temperature rather than in extreme heat, leave the specified expansion gaps, and keep them away from strong heat sources. Following those steps matters more in climates with large temperature swings.