
Upholstery Cleaning: Methods, Costs, and When Deep Cleaning Is Needed
Upholstery absorbs body oils, traps dust, catches crumbs, and soaks up the occasional spilled drink, then hides most of that soil deep in the fibers where a vacuum never reaches. By the time the seat cushions look visibly grey, fine grit has already spent months grinding against the yarns every time someone sits down.
Good upholstery cleaning reverses that damage before it becomes permanent. Poor cleaning does the opposite and creates problems the original dirt never would have, from brown water rings to shrunken cushion covers and faded patches. This guide by Floor Land explains each major cleaning method, then shows you how to match a method to your fabric, what to expect to pay, and when routine care no longer does the job.
When you invest in quality upholstery, the right cleaning method protects that investment and adds years to the fabric’s life.
Professional Upholstery Cleaning Methods
Marketing language often lumps every method together as “steam cleaning.” In reality, professionals choose between several distinct systems. Each balances cleaning power against moisture, drying time, and fabric risk, and a skilled technician chooses the method only after assessing the fiber, dyes, and soil level.
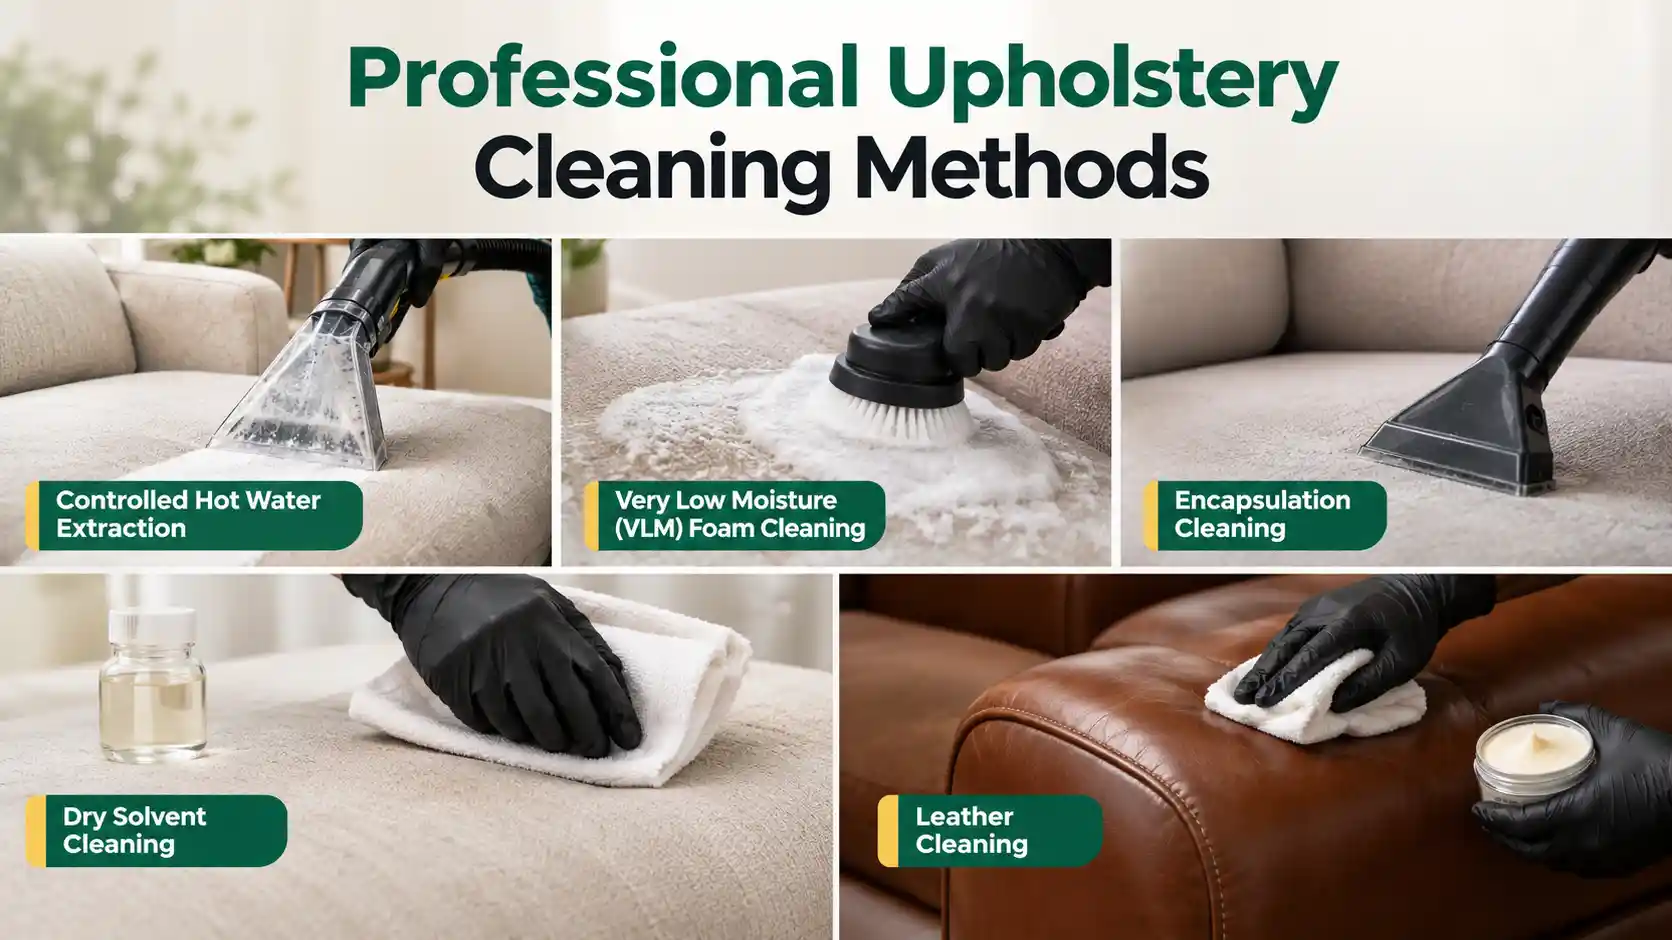
1. Controlled Hot Water Extraction
Hot water extraction delivers the deepest clean on water-safe fabrics. The technician pre-sprays the fabric, agitates it, then rinses and extracts with a dedicated upholstery tool. Upholstery extraction differs sharply from carpet work; professional standards define it as a controlled, low-moisture process built specifically for upholstery, not heavy flushing.
- Best for: W and WS synthetics, heavy body-oil soiling, food spills, and pet odors.
- Avoid on: S- and X-coded fabrics, silk, and unstable dyes.
- Drying time: Usually a few hours with good airflow.
Dining and office seating benefits especially from extraction because spills sink into seat cushions quickly. If your dining seats look worn rather than just dirty, professional chair upholstery lets you switch to a more cleanable fabric.
2. Very Low Moisture (VLM) Foam Cleaning
VLM cleaning protects fabrics that can’t take much water. The technician applies a small amount of cleaning agent, then removes suspended soil and detergent by hand-toweling, using microfibre or orbital agitation with absorbent pads. When the fabric calls for even less moisture, as with natural fibers, cleaners whip the solution into a foam instead of applying it as a liquid.
- Best for: Cotton, linen, viscose blends, and lightly to moderately soiled pieces.
- Avoid: Heavily contaminated furniture, such as pieces with pet urine in the padding.
- Drying time: Often under an hour.
This method also suits fixed pieces that you can’t tip on their side or carry outdoors. Upholstered beds collect hair oils night after night, so headboard upholstery responds well to a gentle foam clean that won’t soak into the padding behind it.
3. Encapsulation Cleaning
Encapsulation uses polymer-based detergents that dry into brittle crystals around the soil, which the technician then vacuums away. Its biggest advantage is speed, with drying usually under an hour and sometimes as little as 15 minutes.
- Best for: Office chairs, hotel and restaurant seating, and other synthetics that need to return to use quickly.
- Avoid on: Heavily soiled pieces, since more soil demands more chemistry and more moisture.
- Watch out for residue left behind if the technician skips a thorough final vacuum.
The method does have critics. Some industry veterans argue that toweling alone removes too little soil and happens at the wrong point in the process, so many skilled technicians add a light extraction rinse when soil levels run high.
4. Dry Solvent Cleaning
Solvent cleaning exists for S-coded fabrics and dyes that bleed on contact with water. Professional manuals treat it as a specialty, last-resort method reserved for dyes or textures too sensitive to moisture, not a routine alternative to water-based cleaning.
- Best for: S-coded fabrics, oil-based stains, and moisture-sensitive dyes.
- Avoid on: Some foam-backed and vinyl-coated fabrics that solvents can soften.
- Requirements: Proper ventilation and a trained specialist.
5. Leather Cleaning
Leather follows its own rules and doesn’t use the W/S code system. The right approach depends on the type of finish:
- Pigmented (protected) leather: Use a pH-balanced leather cleaner, then apply a conditioner.
- Aniline leather: Absorbs liquids readily and stains easily, so it needs specialist products and very light application.
- Nubuck and suede: Need dry cleaning methods, specialist erasers, and nap brushing rather than liquid cleaners.
A proper leather clean always finishes with conditioning. Stripping body oils without replacing moisture leaves the hide prone to stiffness and cracking.
DIY Upholstery Cleaning Methods
Home cleaning methods can’t match professional equipment for depth, but they handle routine maintenance and fresh spills well. Used correctly, they extend the time between professional visits and keep small marks from becoming permanent stains.
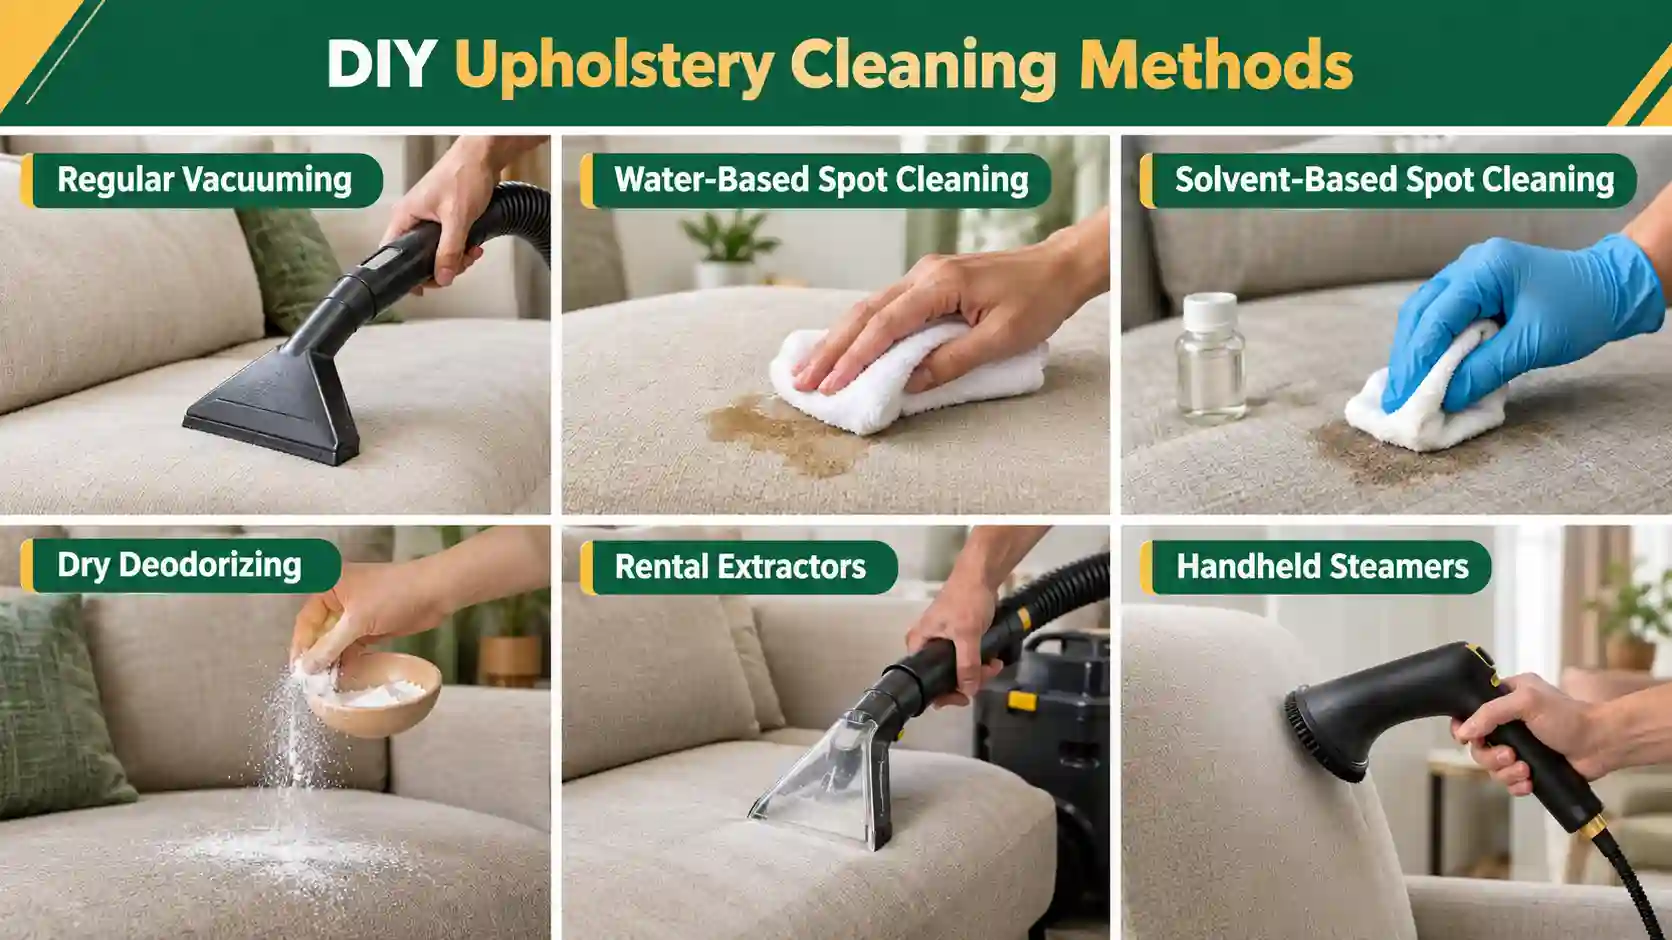
1. Regular Vacuuming
Vacuuming forms the foundation of all upholstery care. It removes the abrasive grit that slowly cuts into fibers and the dust that feeds dust mites.
- Vacuum weekly with an upholstery attachment, including the crevices beneath the cushions.
- Use a soft brush head on velvet, chenille, and other pile fabrics to avoid crushing them.
- Flip and rotate loose cushions every two weeks, so they wear evenly.
- Fluff feather and fiber-filled cushions to keep them from flattening and creasing the fabric.
For extra protection on a delicate sofa, removable sofa covers take the daily wear instead, and you can simply launder or replace them.
2. Water-Based Spot Cleaning
Water-based spot cleaning suits W and WS fabrics and works best on fresh spills. Your first two minutes after a spill decide whether it becomes a permanent stain:
- Blot immediately with a white cloth, working from the outside edge inward to keep the spill from spreading.
- Never rub, since friction pushes the stain deeper and frays the fabric surface.
- Mix a few drops of mild, dye-free dish soap into lukewarm distilled water to avoid mineral rings.
- Apply the solution to the cloth, not directly onto the fabric, to keep moisture away from the padding.
- Blot with a cloth dampened in plain water to rinse out soap residue.
- Dry the area quickly with a fan or a hairdryer on its cool setting.
3. Solvent-Based Spot Cleaning
S-coded fabrics need a water-free dry-cleaning solvent, available as a consumer upholstery spot cleaner. These products also work well on greasy marks on WS fabrics.
- Work in a well-ventilated room and keep the product away from heat sources.
- Dab a small amount onto a white cloth and lightly blot the mark.
- Use as little solvent as possible, since excess can leave a ring or soften fabric backings.
- Let the area air-dry fully before anyone sits on it.
4. Dry Deodorizing
Baking soda absorbs mild odors from cooking, sweat, and general use without adding moisture, which makes it safe for most fabric types after a spot test.
- Vacuum the surface first to remove loose debris.
- Sprinkle a light, even layer of baking soda across the fabric.
- Leave it for at least 30 minutes, or overnight for stronger smells.
- Vacuum thoroughly with an upholstery attachment until no powder remains.
This method refreshes surface odors only. It won’t neutralize pet urine or smells trapped deep in the cushion foam.
5. Rental Extractors
Rental machines look tempting on price. Renting an upholstery-capable extractor costs roughly 30–70 per day, plus about 10–25 for cleaning solution. The trade-off is control: consumer machines can over-wet the fabric and damage it, especially on delicate materials.
If you decide to try one, follow a few firm rules:
- Use it only on W-coded synthetic fabrics.
- Make slow, overlapping dry passes after every wet pass to pull out as much moisture as possible.
- Keep the room well ventilated until the furniture is completely dry.
- Avoid it entirely on S-coded, X-coded, natural-fiber, and leather pieces.
6. Handheld Steamers
Handheld garment steamers and steam cleaners release hot vapor but don’t extract soil, so they freshen fabric rather than clean it. They can relax creases and reduce surface bacteria on W-coded synthetics, but the heat and moisture can shrink natural fibers, crush piles, and set protein stains such as blood. Treat them as a finishing tool, not a cleaning method.
How to Choose the Right Method for Your Fabric
Experienced technicians never reach for a cleaning solution first. They identify the fiber, check dye stability, and judge how much moisture, heat, and agitation the piece can safely tolerate. You should follow the same logic before trying any DIY method.
Cleanability also deserves attention when you’re buying. If you’re choosing upholstery fabric for a busy family room, the material you pick today will determine how easy, or how risky, future cleaning will be.
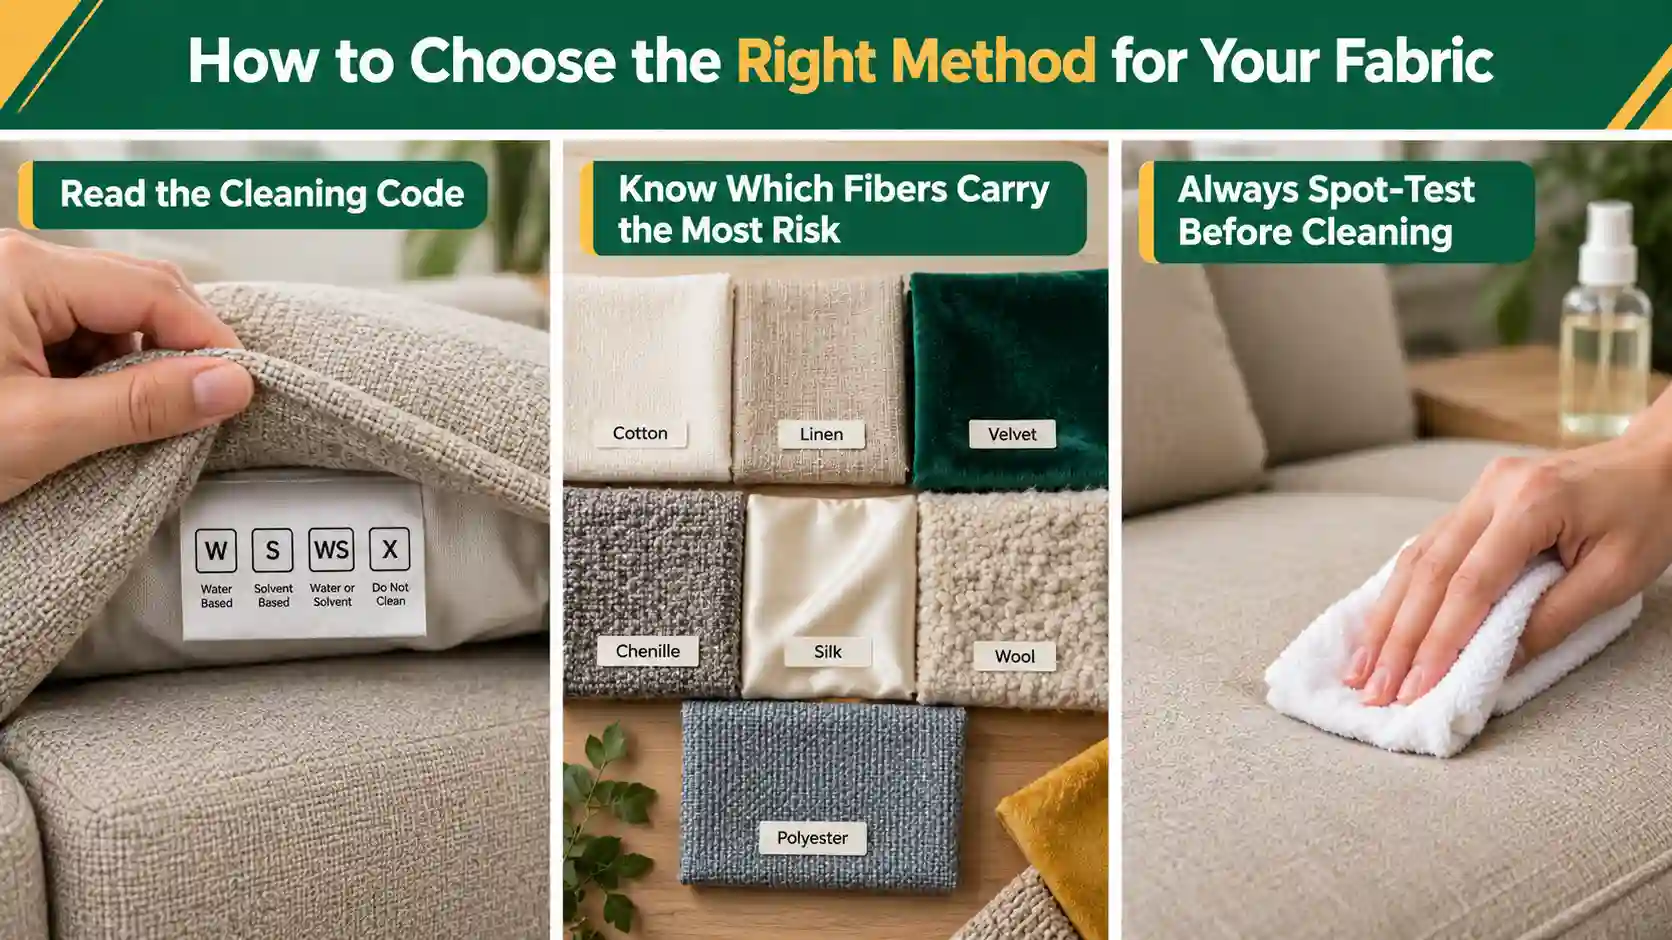
1. Read the Cleaning Code
Most upholstered furniture carries a small tag under a seat cushion or on the deck beneath it. That tag holds a one- or two-letter code that tells you which cleaning agents the fabric can handle:
- W: Water-based cleaners only.
- S: Solvent-based dry-cleaning agents only, with no water.
- WS (or S/W): Either water-based or solvent-based cleaners.
- X: Vacuuming or light brushing only, with no liquid of any kind.
One detail catches even seasoned cleaners out. On fiber content labels, the same letters can mean something completely different: WS as a fiber composition code refers to cashmere, so you need to confirm whether you’re reading the care label or the content label.
Never cut these tags off. When you order a custom sofa, ask the maker to record the fabric’s cleaning code in writing so you still have it years later.
2. Know Which Fibers Carry the Most Risk
Each fiber reacts differently to water, heat, and chemistry. Knowing your fabric’s risk profile explains why a professional might choose one method over another.
- Cotton and linen: These cellulose fibers can develop browning, a yellow-brown discoloration caused by over-wetting, slow drying, high-pH residue, or cellulose migrating to the surface.
- Rayon and viscose: These silky regenerated fibers lose strength when wet and need neutral chemistry and strict moisture control.
- Velvet and chenille: Their pile crushes and distorts easily, so they need gentle agitation and careful grooming after cleaning.
- Silk: It water-spots, loses color easily, and usually needs a specialist.
- Wool: It resists soil well but shrinks and feels under heat, high alkalinity, and aggressive scrubbing.
- Polyester, olefin, and nylon: These synthetics forgive far more mistakes. On thin synthetic fabrics, soil typically stays on the surface, which makes them quick and safe to clean.
Solution-dyed acrylics and performance polyesters, the materials behind most quality outdoor upholstery, tolerate cleaning agents that would strip color from natural fibers.
3. Always Spot-Test Before Cleaning
Even a correct cleaning code doesn’t guarantee that the dyes will hold. A professional tests every piece before cleaning it, and you should do the same before any DIY treatment:
- Choose a hidden area, such as the back of the skirt or the underside of a cushion.
- Apply a small amount of the cleaning solution with a white cloth.
- Wait a few minutes, then press a clean white towel firmly against the spot.
- Check the towel for color transfer and the fabric for rings, shrinkage, or changes in texture.
- Let the area dry fully before judging the result, since some reactions show only once moisture evaporates.
What Happens During a Professional Upholstery Clean
A thorough professional service follows a clear sequence. Knowing the steps helps you spot a careless cleaner and judge whether you’re getting full value for your money.
- Inspection: The technician examines fabric condition, existing stains, wear, sun damage, and loose seams, and points out anything that may not improve.
- Code and fiber check: They read the cleaning tag and, if it’s missing, run a burn test on a loose thread or a dye test to identify the fiber.
- Dry soil removal: They vacuum the entire piece with an upholstery tool, because dry soil turns to mud once it meets water.
- Pre-testing: They test the chosen chemistry on a hidden spot to confirm dye stability.
- Pre-spotting: They treat individual stains with targeted products before the main clean.
- Main cleaning: They apply the chosen method, working in small sections to control moisture.
- pH balancing: On natural fibers, they apply a mild acidic rinse to neutralize alkaline residue and prevent browning.
- Grooming: They brush the pile in one direction so velvet, chenille, and microfibre dry evenly without patchy shading.
- Drying support: They set up air movers or advise you on ventilation to speed up drying.
- Protection (optional): They apply a fabric protector once the surface is dry enough to accept it.
Common Stains and How Professionals Treat Them
Different stains need different chemistry. Professionals treat each stain by its type, because the wrong product can set a mark permanently. Here’s how experts typically approach the most common culprits:
- Coffee and tea: These contain tannins, so technicians use a tannin spotter or a mild acidic solution instead of alkaline detergents.
- Red wine and fruit juice: These carry strong dyes that need prompt treatment with a specialist dye-reducing agent.
- Grease, oil, and body oils: These dissolve best with a solvent-based spotter or a degreasing pre-spray.
- Ink and ballpoint pen: These respond to solvent spotters, though older ink marks may only lighten.
- Blood: Cold water and protein enzymes work best, since heat cooks the protein into the fibers.
- Pet urine: This needs enzyme treatment that reaches the foam, followed by extraction, because surface cleaning leaves the odor source behind.
- Makeup and foundation: These combine oils and pigments, so technicians first use a solvent, then a water-based rinse.
- Chewing gum and wax: Technicians freeze or scrape these first, then remove the remaining residue with a solvent.
How Much Does Upholstery Cleaning Cost?
Upholstery cleaning prices vary with the size of the piece, the fabric, the soil level, and local labor rates. Most cleaners charge per piece rather than per hour, which makes it easy to estimate your budget once you know what you want cleaned.
Typical Prices by Furniture Type
US market prices give a useful benchmark:
- Three-seat sofa: $100 to $300, with the national average sitting near $175.
- Loveseat: $60 to $150.
- Sectional: $120 to $400, depending on size.
- Armchair or recliner: $40 to $120.
- Dining chair: about $15 to $40, usually covering the seat only, with backs often costing extra.
Prices in other markets follow a similar pattern. In the UK, for example, a sofa typically costs £40 to £90 to clean, with London rates running around 20–30% higher.
What Pushes the Price Up
Several factors move a quote above the average range:
- Delicate fibers: Leather, suede, and velvet usually cost more because they need special products and extra process steps.
- Size and layout: Sectionals and oversized sofas take more labor hours and may carry a per-seat premium.
- Heavy soiling: Pieces that haven’t seen a professional clean in years often need a second pass.
- Pet urine and odors: Enzyme treatments and padding-level decontamination add to the bill.
- Add-ons: Fabric protector, deodorizing, and sanitizing each carry their own charge.
- Minimum call-out fees: Most cleaners charge a minimum service fee of $60 to $100 per visit.
How to Get the Best Value
A few smart decisions stretch your budget further without cutting corners on quality:
- Book several pieces in one visit so the minimum fee covers everything.
- Combine upholstery and carpet cleaning, since many companies discount bundled jobs.
- Schedule cleaning before the fabric gets heavily soiled, which keeps the job quicker and cheaper.
- Ask for an itemized quote so you can drop add-ons you don’t need.
- Compare quotes on method and process, not just price, because a cheap clean that damages fabric costs far more in the long run.
When Deep Cleaning Is Needed
Regular vacuuming removes loose surface dust, but it can’t touch the oily film that locks soil into the fibers. Your furniture gives clear signals when it’s moved beyond what routine care can fix.
What Builds Up Inside Your Upholstery
Upholstery behaves like a filter. Air moves through it every time someone sits down or stands up, and the fabric and padding catch whatever that air carries:
- Body oils and sweat: These collect on armrests, headrests, and seat fronts, then act like glue for airborne dust.
- Abrasive grit: Fine sand and soil particles settle between yarns and cut into them under pressure, which causes premature thinning and fraying.
- Dust mite debris: Mites feed on shed skin cells, and their waste particles trigger allergy and asthma symptoms in sensitive people.
- Pet dander and saliva: Pets leave proteins on fabric that linger long after you remove the visible hair.
- Food and drink residue: Sugary spills attract fresh soil and often reappear as brown spots weeks later.
- Cooking grease: In open-plan homes, airborne kitchen grease settles on nearby furniture and gradually dulls the color.
Signs Your Upholstery Needs a Deep Clean
Watch for these warning signs:
- Shiny or darker armrests and headrests: That sheen means body oil has started trapping soil where skin touches fabric.
- Cushion tops that don’t match the undersides: Flip a cushion and compare both faces; a clear color difference shows soil has spread across the whole seating surface.
- A smell that rises when you sit down: Your weight pushes trapped air out of the cushion, and a stale or musty odor points to contamination inside the padding.
- Worsening allergy symptoms at home: A thorough clean often brings noticeable relief by removing stored allergens.
- Pet or child accidents: Urine soaks into the foam and keeps releasing odor as it breaks down, which surface sprays can’t fix.
- Stains that keep coming back: Residue in the cushion core wicks back up as the fabric dries, and only proper extraction breaks that cycle.
- Second-hand or inherited furniture: Clean any pre-owned piece before it becomes part of your home, no matter how clean it looks.
- After illness in the household: A professional clean removes germs and residue that settle into fabric during recovery.
How Often Should You Deep Clean Upholstery?
Your household’s habits matter more than any fixed rule. Use this schedule as a starting point:
| Household Type | Recommended Frequency |
| Light use, adults only | Every 18–24 months |
| Average family home | Every 12–18 months |
| Homes with pets or young children | Every 6–12 months |
| Allergy or asthma sufferers | Every 6 months |
| Commercial seating (offices, hotels, cafés) | Every 3–6 months |
When Cleaning Won’t Save the Piece
Cleaning removes soil, but it can’t rebuild worn fabric. Some damage calls for reupholstery rather than another round of cleaning, and spotting it early saves you from paying for a clean that only makes the wear more obvious.
Consider reupholstering instead of cleaning when you see:
- Sun-rotted fibers that tear when you pull them gently.
- Bald patches in velvet or chenille pile.
- Permanent fading or dye loss across large areas.
- Split seams, fraying piping, or holes in high-wear zones.
- Flattened, crumbling, or sagging cushion foam.
- Deep odor contamination that has soaked into the frame and padding.
A solid hardwood frame with good joinery deserves fresh fabric and new padding far more than landfill.
Questions to Ask Before You Hire a Cleaner
The right questions reveal a cleaner’s expertise in a few minutes. A professional answers them confidently, while a less experienced operator struggles or deflects.
- Which cleaning method do you plan to use on my fabric, and why?
- Do you check the cleaning code and test for dye stability before you start?
- What certifications or training do your technicians hold?
- How long will the furniture take to dry?
- Do you include pre-spotting and stain treatment in the quote, or charge for them separately?
- What happens if a stain doesn’t come out or the fabric reacts badly?
- Do you carry insurance for damage to furniture?
A cleaner who names a method before asking about your fabric is guessing, and guessing ruins upholstery.
Protect the Result After Cleaning
The hours and weeks after a professional clean shape how long the results last. A little care at this stage keeps your furniture looking fresh much longer.
- Open windows or run fans to speed up drying.
- Keep everyone, including pets, off the furniture until it feels completely dry.
- Avoid placing dark cushions or throws on damp fabric, since their dyes can transfer.
- Ask your technician to apply a fabric protector so spills bead up long enough for you to deal with them.
- Keep furniture out of strong direct sunlight to slow fading and fiber breakdown.
- Lay throws over armrests and headrest areas if family members often sit with bare arms or wet hair.
Final Thoughts
Upholstery cleaning works best when you treat it as part of a long-term care plan rather than an emergency fix. Read the cleaning code, match the method to the fiber, respond to spills quickly, and book a professional deep clean before soil starts cutting into the yarns. Follow that approach, and your furniture keeps its color, comfort, and value for many years longer than a neglected piece ever could.
Frequently Asked Questions
How long does upholstery take to dry after professional cleaning?
Drying time depends on the method. Encapsulation and foam cleaning can dry in under an hour, while hot water extraction typically takes a few hours. Good ventilation shortens drying time for every method.
Can I clean an X-coded sofa myself?
Only with a vacuum and a soft brush. Any liquid, including plain water, risks permanent marks or texture damage, so leave stain removal on X-coded fabrics to a specialist.
Does professional cleaning remove every stain?
Skilled technicians remove most fresh and organic stains, but ink, dye transfer, bleach spots, and long-set rust may only lighten. A reputable cleaner tells you this before starting rather than after.
How long does a professional upholstery clean take?
A standard three-seat sofa usually takes one to two hours from inspection to grooming. Sectionals, heavily soiled pieces, and jobs that need pet odor treatment take longer.
Does upholstery cleaning kill dust mites?
Hot water extraction removes a large share of mites and their allergenic debris, and some cleaners add anti-allergen treatments. Regular vacuuming afterward helps keep numbers down.
Will cleaning make my sofa look new again?
Cleaning restores color and freshness by removing soil, but it can’t reverse fading, pile loss, or worn fibres. Expect a dramatic improvement on soiled fabric, not a factory-new finish on worn fabric.