
How to Clean Terracotta Tiles: 9 Simple Ways for Indoor and Outdoor Floors
To clean terracotta tiles, sweep away loose grit, then mop with warm water and a pH-neutral cleaner using a well-wrung mop, and dry the floor straight after. Treat stains with a targeted method, such as a baking soda poultice for grease, and reseal the tiles every one to three years so dirt cannot soak into the clay. For routine cleaning, avoid acidic and harsh alkaline products, because they etch the surface and strip the protective finish.
Terracotta is fired clay, and its open, porous body gives it that warm, lived-in character. That same quality is why a cleaning habit that works on porcelain can leave terracotta dull, patchy, or stained. Below, you will find nine cleaning methods laid out in order, starting with everyday care and ending with sealing. The advice follows established tile restoration practice, so you can work with confidence instead of guesswork.
Why Terracotta Needs Special Care
Terracotta means “baked earth” in Italian. It is made from natural clay fired at relatively low temperatures, usually below 1,100°C, which leaves it full of tiny capillaries that pull liquid inward. Porcelain absorbs less than 0.5% of its weight in water, while terracotta commonly absorbs 8% to 15%. Handmade styles, such as Mexican Saltillo, can absorb even more.
This means spills sink in quickly, cleaning chemicals soak into the tile rather than sitting on top, and moisture moving through the clay can carry mineral salts to the surface. Every method in this guide is designed around those three facts.
Glazed or unglazed? If your tiles have a glossy glaze fired onto the face, they behave much like ceramic and need far less special care. This guide focuses on unglazed terracotta, the type found in most farmhouse kitchens, conservatories and patios.
Do Two Quick Checks Before You Start
Spend five minutes on these checks first. They tell you which of the nine methods your best-quality floor needs and which products are safe to use.
Check 1: Run the Water Drop Test
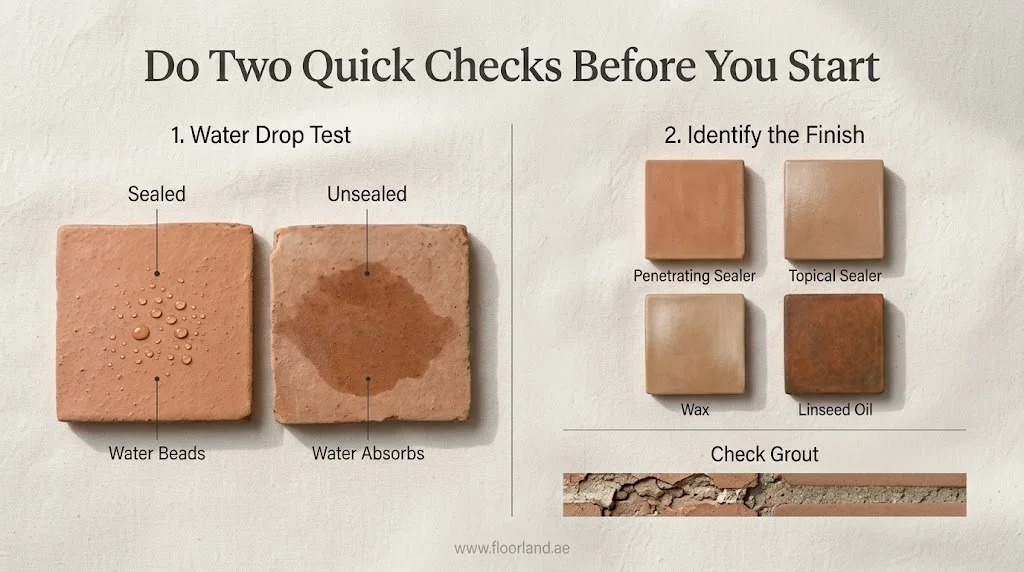
Place a few drops of water on several tiles, including one in a busy walkway and one in a quiet corner. Watch them for about a minute. If the water beads and sits on the surface, the sealer is working. If the clay darkens and the water disappears, the tile is unsealed, or the protection has worn through, and it will need Method 9 soon.
Check 2: Identify the Finish and Grout Condition
- Penetrating (impregnating) sealer: soaks into the clay and leaves a natural, matte look with no visible film.
- Topical sealer: forms a coating on top of the tile, with a satin or gloss sheen. It tends to wear first in traffic lanes.
- Wax: common on older floors. It feels slightly soft, and a fingernail dragged across it may leave a faint mark.
- Linseed oil: a traditional finish in France and Spain. It deepens the color but can turn tacky or dark when too many coats build up.
Each finish reacts differently to cleaners. A product that is harmless on a penetrating sealer can soften wax, and a solvent that removes wax may be too harsh for a modern topical coating. While you are down at floor level, note any cracked or crumbling grout, since it lets water run under the tiles.
Safe Cleaners and Tools for Terracotta
Choosing a cleaner by its pH is the simplest way to protect terracotta. The scale runs from 0 to 14, with 7 being neutral. The further a product moves from neutral in either direction, the more it affects the tile and its finish.
| pH range | Cleaner type | When to use it | Risk to terracotta |
| 0 to 4 | Acidic | Efflorescence or cement haze only | Etches clay and weakens grout if misused |
| 6 to 8 | Neutral | Routine weekly cleaning | Very low |
| 9 to 11 | Mildly alkaline | Greasy build-up and periodic deep cleans | Gradually wears sealer with frequent use |
| 12 to 14 | Strongly alkaline | Stripping old wax or sealer | Removes all protection |
Your basic kit: a soft-bristle broom or a vacuum with a hard-floor head, a microfibre flat mop, two buckets, a soft nylon brush, clean cloths, and rubber gloves with eye protection for anything stronger than a neutral cleaner. A wet vacuum is very helpful for deep cleaning and stripping.
Keep these away from terracotta: bleach, ammonia, undiluted vinegar or lemon juice, scouring powders, steel wool, oil soaps, and supermarket floor polish. Some etch or discolor the clay, some scratch it, and others leave a film that traps dirt and stops sealer from bonding later.
A word on vinegar. Many guides suggest diluted vinegar. It can shift light limescale on a well-sealed floor, but it is still an acid, and repeated use eats into both the clay and the cement in the grout. A neutral tile cleaner does the everyday job without that risk.
9 Effective Ways to Clean Terracotta Tiles
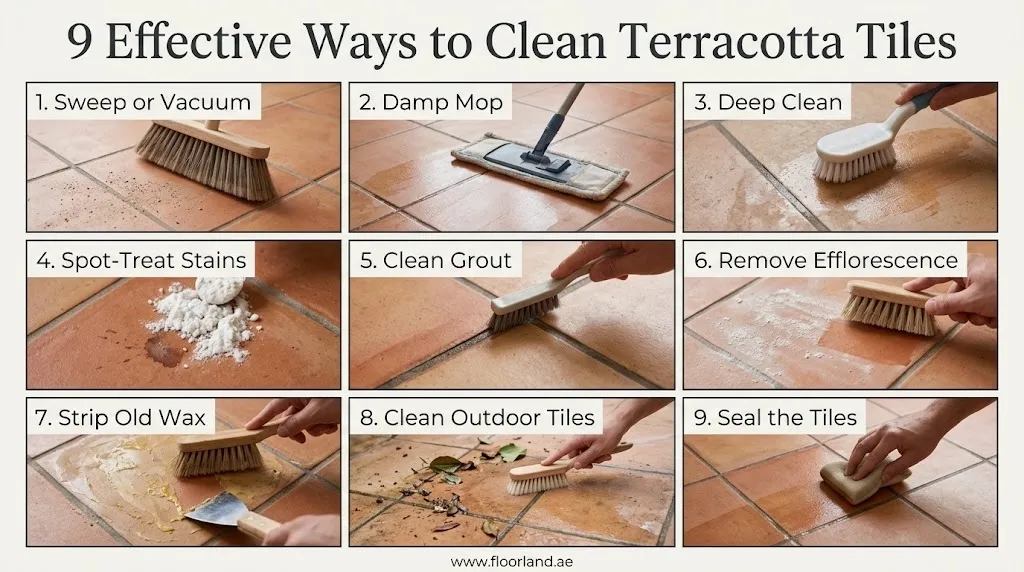
Use this table to find the method you need, then jump to the step-by-step instructions below.
| # | Method | Best for | How often |
| 1 | Sweep or vacuum | Removing grit before it scratches | Daily in busy areas |
| 2 | Damp mop with a neutral cleaner | Everyday dirt and footprints | Once or twice a week |
| 3 | Deep clean with a mild alkaline cleaner | Dull, greasy or grimy floors | Every 3 to 6 months |
| 4 | Spot-treat stains | Grease, wine, wax, rust, paint, urine | As needed |
| 5 | Clean the grout lines | Dark joints and mildew | Monthly |
| 6 | Remove efflorescence | White, chalky salt bloom | As needed |
| 7 | Strip old wax or sealer | Yellowed, blotchy or sticky finishes | Every few years, if at all |
| 8 | Clean outdoor terracotta | Patios, balconies and pool edges | Seasonally |
| 9 | Seal the tiles | Protecting the floor after cleaning | Every 1 to 3 years |
1. Sweep or Vacuum Daily
Grit acts like sandpaper underfoot and wears down sealer faster than anything else. Sweep with a soft-bristle broom or vacuum with a hard-floor head, and switch off any spinning beater bar, which can scuff soft clay. A good doormat at each entrance traps much of the dirt before it ever reaches the tiles.
Best for: keeping grit off the surface before it causes damage.
2. Damp Mop With a pH-Neutral Cleaner
This method is best for the weekly clean on a sealed floor in good condition.
- Mix the solution. Add a pH-neutral tile cleaner to warm water at the dose on the label. Extra product won’t clean the floor; it leaves a sticky film that attracts dirt.
- Wring the mop well. It should feel damp, not dripping. Standing water is the main cause of patchiness on terracotta.
- Work in small sections. Mop around 2 square meters at a time, moving from the far side of the room toward the door.
- Rinse if the floor feels tacky. Most neutral cleaners are no-rinse, but a quick pass with clean water removes any leftover residue.
- Dry the surface. Buff with a dry microfibre mop or towel, and open a window or run a fan to speed things up.
3. Deep Clean With a Mild Alkaline Cleaner
If floors still look dull or greasy after regular mopping, this method is most suitable for such situations:
- Prepare the room. Movecustom furniture and rugs, then vacuum thoroughly, including edges and under kickboards.
- Apply the cleaner. Dilute a mildly alkaline terracotta cleaner at the manufacturer’s heavy-duty ratio and spread it over one section.
- Give it time. Leave it for 5 to 10 minutes to break down grease, but don’t let it dry on the surface.
- Scrub. Use a soft nylon brush, or a floor machine with a white or red pad for larger rooms.
- Lift the dirty solution. Pick it up with a wet vacuum or absorbent clothes. If it soaks back in, the dirt goes with it.
- Rinse twice. Go over the area with clean water and extract it each time.
- Let it dry fully. Allow at least 24 hours, then repeat the water drop test to see whether you need to reseal.
Field tip: Test any new product on a hidden tile first, such as one under a sofa or inside a pantry. Handmade tiles vary from batch to batch, and a product that looks fine in one spot can mark another.
4. Spot-Treat Stains
Speed matters more than strength. Blot fresh spills with a dry cloth straight away and never rub, since rubbing pushes the liquid deeper into the pores. For set-in stains, match the treatment to the cause:
| Stain | Best approach |
| Grease and cooking oil | Mix baking soda or diatomaceous earth with a degreasing cleaner into a thick paste. Spread it about 5 mm deep, cover with cling film, and leave for 24 to 48 hours. Scrape off, rinse, and repeat if needed. |
| Red wine, coffee, tea, fruit juice | Make a poultice with 6% hydrogen peroxide and a powder such as baking soda. Test first, as it can lighten some clays. |
| Candle wax | Harden it with an ice cube and lift it with a plastic scraper. Lay a paper towel over any residue and warm it gently with an iron on low. |
| Rust | Use a rust remover labeled safe for natural stone and tile. General-purpose rust removers are usually too acidic. |
| Paint | Wipe fresh water-based paint with warm water. For dried paint, ease it off with a plastic scraper and a small amount of suitable solvent, tested first. |
| Pet urine | Blot, then apply an enzyme-based cleaner that breaks down odor-causing compounds. Rinse and dry. |
A poultice works by drawing the stain up out of the pores as the paste dries. The key is patience, because removing it early leaves most of the stain behind.
5. Clean the Grout Lines
Cleaning the grout lines is the most crucial element of the terracotta tiles:
- Brush dry first. Loosen dust and debris from the joints with a soft nylon brush.
- Apply an oxygen-based cleaner. Mix sodium percarbonate powder with warm water and work it into the grout. It lifts mildew and discoloration without the risks of chlorine bleach.
- Scrub gently along each line. Keep the brush on the grout, not the tile face.
- Rinse and dry. Wipe the lines with clean water and dry them with a cloth.
Once the grout is clean and dry, a grout sealer helps it resist future staining. Repair any cracked joints before your next deep clean so water cannot get beneath the tiles.
6. Remove Efflorescence
It is common on new floors, on floors laid over slabs without a damp-proof membrane, and on outdoor tiles after rain.
- Dry-brush first. Sweep the powder away with a soft brush while the floor is dry. Adding water now redissolves the salts and pulls them back into the tile.
- Let the floor finish drying. On new installations, salts often keep surfacing for several weeks. Keep brushing them off and hold off on sealing until the bloom stops.
- Use an efflorescence remover only if brushing fails. These are mild acid products. Pre-wet the tiles with clean water so the acid stays near the surface, apply for the time on the label, scrub, then rinse at least three times.
- Find the source. If the bloom keeps coming back, look for rising damp, a leaking pipe, or poor drainage.
On floors prone to damp, seal with a breathable penetrating product. A film-forming sealer can trap moisture underneath and make the problem worse.
Best for: the white, chalky bloom that appears when water inside or beneath the tiles evaporates and leaves mineral salts behind.
7. Strip Old Wax or Worn Sealer
Stripping old wax is the best way to treat yellowed, blotchy, or sticky finishes that no amount of mopping will fix.
- Ventilate and protect yourself. Open windows and wear gloves and eye protection.
- Apply the stripper. Use a wax and sealer stripper made for terracotta, at the strength on the label, and work one small area at a time.
- Wait 10 to 15 minutes. Keep the area wet so the stripper can soften the old coating.
- Agitate and extract. Scrub with a nylon brush or machine pad, then remove the slurry with a wet vacuum.
- Rinse until clear. Keep rinsing until the water runs clean and the floor no longer feels slippery.
- Dry before sealing. Leave the floor for 48 to 72 hours, longer in cool or damp weather.
Never follow a stripper with an acidic product without thorough rinsing in between, as the two react and leave a salty residue in the pores. Floors finished with linseed oil need a solvent-based stripper designed for oil finishes, and large or heavily darkened floors are best handed to a restoration specialist.
8. Clean Outdoor Terracotta Safely
Follow the steps mentioned below for cleaning the outdoor terracotta tiles:
- Clear debris. Sweep away leaves and soil. Wet leaves release tannins that leave brown marks, and soil in the joints feeds weeds and moss.
- Treat algae and moss. Apply a patio cleaner based on benzalkonium chloride to dry tiles on a dry day. It keeps working after application, so light brushing plus a few days of weather often finishes the job.
- Pressure washes with care, if at all. Use a low setting and a wide fan nozzle, and keep the tip at least 30 to 50 cm from the surface. Never use a rotating turbo nozzle or aim straight at grout joints.
- Time it for the weather. In hot climates, clean early in the morning or in the evening so solutions do not dry into streaks. In cold climates, clean in late summer or early autumn so tiles can be resealed before the first frost.
In freezing winters, only frost-resistant terracotta belongs outdoors. Water that freezes inside the pores expands and can make the tile face flake away, a problem known as spalling.
9. Seal the Tiles to Protect Your Work
| Sealer type | Look | Best for | Upkeep |
| Penetrating (impregnating) | Natural, matte | Outdoor areas, damp-prone slabs, sunny patios, and a raw clay look | Low; reapply when water stops beading |
| Topical (surface) | Satin or gloss | Dry indoor rooms where easy wipe-down matters | Higher; wears in traffic lanes and may need stripping later |
- Confirm the floor is dry. Tape a 50 x 50 cm square of plastic sheet to the tile overnight. If condensation forms underneath or the tile looks darker, wait longer.
- Apply a thin, even coat. Use a lambswool applicator, a wide brush or a low-pressure sprayer.
- Remove the excess. Wipe off any sealer still sitting on the surface within the time on the label, usually 10 to 20 minutes. Leftover sealer dries sticky or hazy.
- Add more coats. Apply a second coat once the first is touch dry, and a third on very thirsty handmade tiles.
- Let it cure. Keep foot traffic off for 24 hours, and keep rugs, furniture, and water off the floor for 72 hours.
Indoors, most floors need resealing every two to three years. Outdoor tiles usually need it every year.
Mistakes That Damage Terracotta Floors
Below is a list of mistakes that can damage terracotta floor tiles instead of cleaning them:
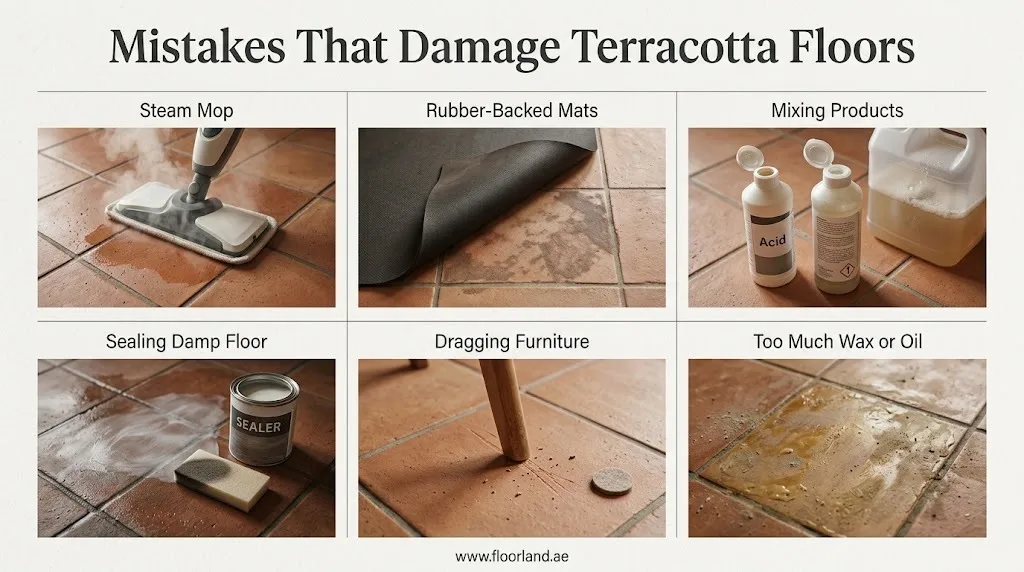
- Using a steam mop. Heat and pressure force moisture deep into the clay and can soften or lift sealers.
- Laying rubber-backed mats. They trap moisture and can discolor the tile underneath. Choose natural-fiber mats or ones with a breathable backing.
- Mixing products. Combining cleaners can release harmful fumes or leave residue as the chemicals neutralize each other.
- Sealing a damp floor. Trapped moisture can cloud the sealer and push salts up under the coating.
- Dragging furniture. Terracotta is soft enough to scratch and chip. Felt pads on chair and table legs make a noticeable difference.
- Piling on wax or oil to restore shine. Extra layers yellow over time and lock grime into the surface.
When to Call a Professional
Most routine care is easy to handle yourself, but some jobs are worth handing over:
- Heavy wax or linseed oil build-up across a large area
- Efflorescence that returns after repeated dry brushing
- Loose, cracked or hollow-sounding tiles
- Antique or reclaimed floors with heritage value
- Large patios that need machine scrubbing and resealing
Before booking, ask the contractor which products they plan to use, whether they will test a small area first, and whether they will finish with a breathable sealer. A reputable restorer will explain their process without hesitation.
Final Thoughts
Caring for terracotta tiles takes consistency, not intense effort. Daily sweeping or vacuuming combined with regular damp mopping using a pH-neutral cleaner maintains their natural beauty and prevents grit build-up without stripping protective coatings. Reserve deep cleaning, heavy stain treatments, or specialized seal removers strictly for occasional spot issues or specific problems. Inspect the protective sealant annually to ensure moisture resistance stays intact. By maintaining this steady, gentle cleaning routine, you protect the clay’s porous surface and allow it to age gracefully, developing the deep, warm patina that gives genuine terracotta its timeless, rustic charm.
Frequently Asked Questions
How do I make dull terracotta tiles shine again?
Shine comes from the finish, not the clay itself. Start with a deep clean, since grime alone can make a floor look flat. If it is still dull once dry, apply a topical sealer with a satin or gloss finish, or a liquid maintenance wax made for terracotta, and buff it with a soft pad.
Can I use washing-up liquid on terracotta?
A few drops of mild washing-up liquid in a full bucket of warm water is fine now and then. Using more leaves a slippery film, so rinse with clean water afterward. A dedicated neutral tile cleaner is the better long-term choice.
Is baking soda safe for terracotta tiles?
Yes, for spot treatments and poultices. It is only mildly alkaline and gently abrasive. Rinse well afterward, because any powder left in the pores can dry as a pale residue.
Why do my terracotta tiles look patchy after cleaning?
Usually, the tiles dry at different rates, which is normal for up to a day. If the patches remain, the cause is often cleaner residue or sealer that has worn unevenly. A thorough rinse, followed by resealing if the water drop test fails, normally evens the floor out.
Can I use a robot mop on terracotta?
Robot vacuums are fine on sealed and unsealed terracotta. Mopping robots are suitable for well-sealed floors if they use very little water and a neutral cleaner. Keep them off unsealed tiles, where even small amounts of water can leave marks.
How long should terracotta dry after a deep clean?
The surface usually feels dry within a few hours, but the body of the tile holds moisture much longer. Allow at least 24 hours before normal use and 48 to 72 hours before sealing, extending this in cold or humid conditions.