
How to Fix Creaky Floors: Common Causes and Proven Solutions

The best way to fix creaky floors depends on what is causing it and whether you can reach the underside of the floor through a basement or crawlspace. In many cases, you can stop the noise in less than an hour by tightening the floor with screws, adding a wood shim to fill a gap, or using powdered graphite between rubbing floorboards.
This guide by Floor land walks through how to pinpoint the exact source of a squeak. You will also learn the most common structural and seasonal causes behind it. After that, I will explain step-by-step repairs for hardwood, engineered wood, laminate, vinyl, tile, and carpeted floors. So let’s start learning
Quick Reference: Common Causes and Fixes
| Cause | Where It Happens | Best Fix | DIY or Pro |
| Boards rubbing together | Between floorboards | Powdered graphite or talc | DIY |
| Gap between subfloor and joist | Basement or crawlspace | Glue and shim | DIY |
| Loose subfloor-to-joist connection | Under floor, at the joist | Screws driven through subfloor into joist | DIY |
| Worn or protruding nails | Under the flooring surface | Replace with screws; trim protruding nails | DIY |
| Warped or uncrowned joists | Structural framing | Sistering a new joist alongside | Pro |
| Seasonal wood movement | Throughout wood flooring | Humidity control (40-60%) | DIY (prevention) |
| Water-damaged or rotted subfloor | Under the flooring | Replace subfloor section | Pro |
Common Causes of Creaky Floors
Most creaks trace back to one of eight causes. If you know which one you are dealing with tells you which repair to use. It is worth spending a few minutes on diagnosis before reaching for a tool.
- Friction Between Floorboards: Floorboards rub against each other as you walk, creating creaking sounds.
- Loose or Worn-Out Fasteners: Nails or screws become loose over time, allowing the floor to move.
- Gaps Between Subfloor and Joists: Small gaps let the subfloor flex, causing creak under pressure.
- Uneven Joists: Joists at different heights make the subfloor bend and create noise.
- Missing or Loose Blocking: Poorly secured blocking allows joists to shift and produce creak.
- Humidity and Seasonal Changes: Wood expands and shrinks with moisture changes, leading to gaps and noise.
- Poor Installation: Improperly installed flooring or subfloor can start creaking early.
- Foundation Settling: Minor structural movement can loosen the floor and cause widespread creak.
Is a Creaky Floor Dangerous? What the Sound Actually Means
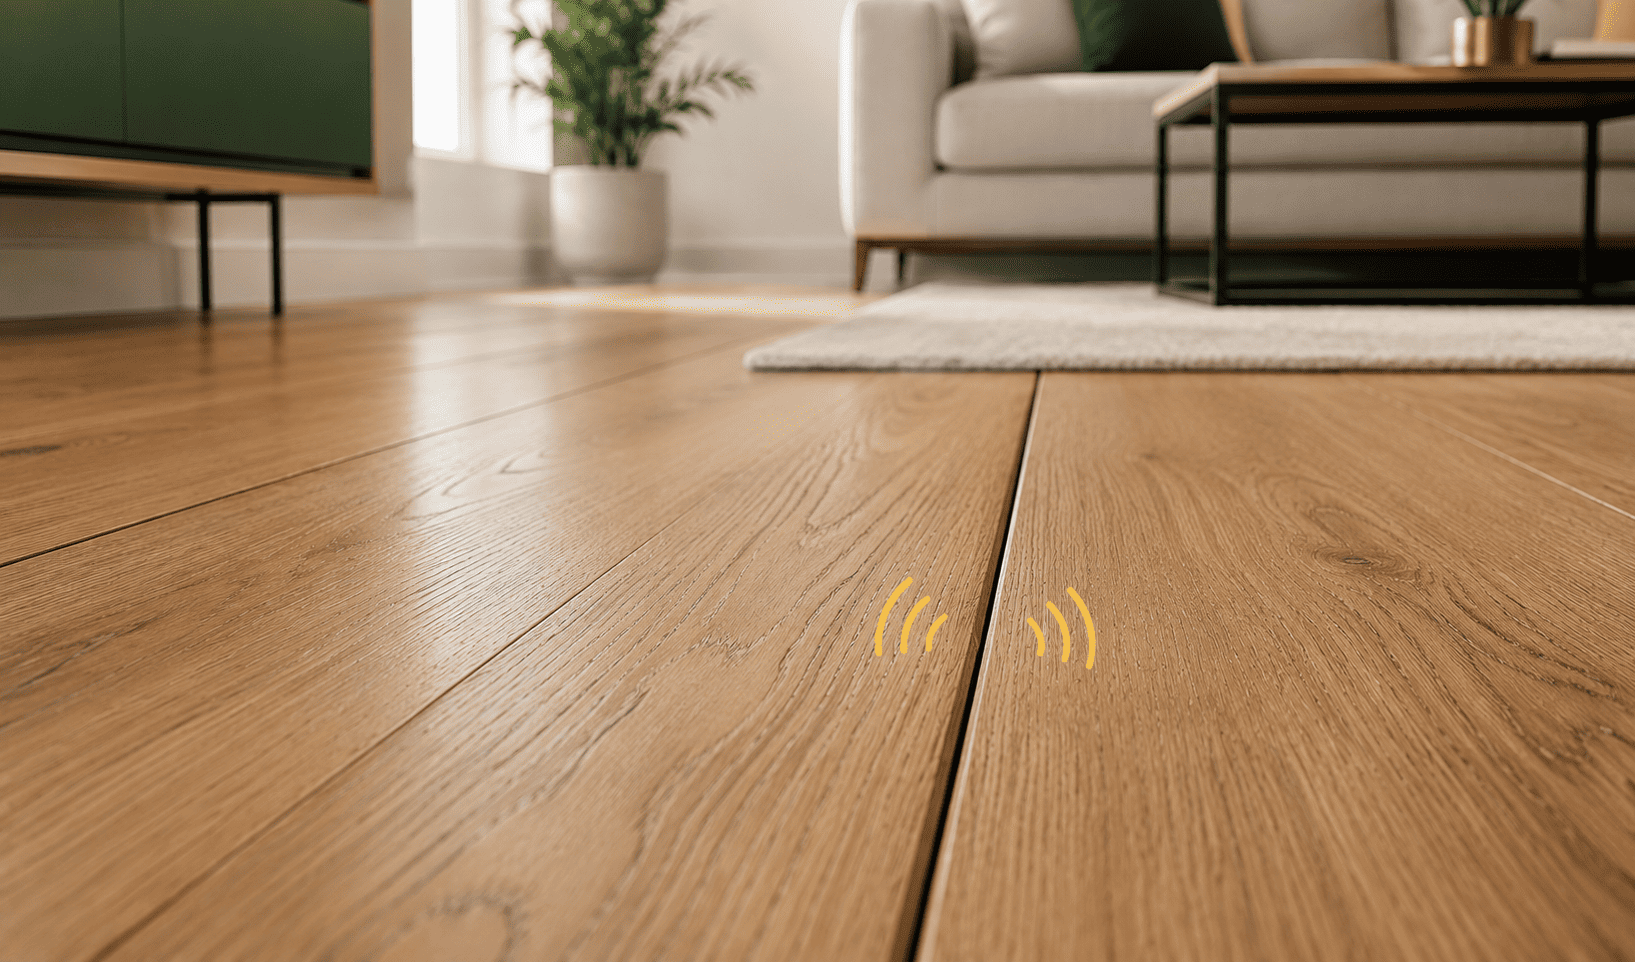
The creaky floor sound itself rarely means anything is structurally wrong. A squeak is friction, not failure. It is the noise of two wood surfaces, or a nail head and a wood surface, sliding against each other by a fraction of a millimeter every time weight shifts onto that spot. That kind of movement is normal in a wood-framed house. Lumber expands, contracts, and settles slightly for as long as the building stands. A squeak is often just the audible evidence of that ordinary movement.
That said, a creak is worth paying attention to, because it is also the easiest early warning sign your house gives you. Fixing a loose subfloor or a small gap between a joist and the floor early can save you money. At this stage, the repair is usually simple and only requires proper fastening. If you ignore the problem, the constant movement can make the gap larger. Over time, it can also damage the surrounding floorboards and lead to more expensive repairs.
Is a Creaky Floor Dangerous? What the Sound Actually Means
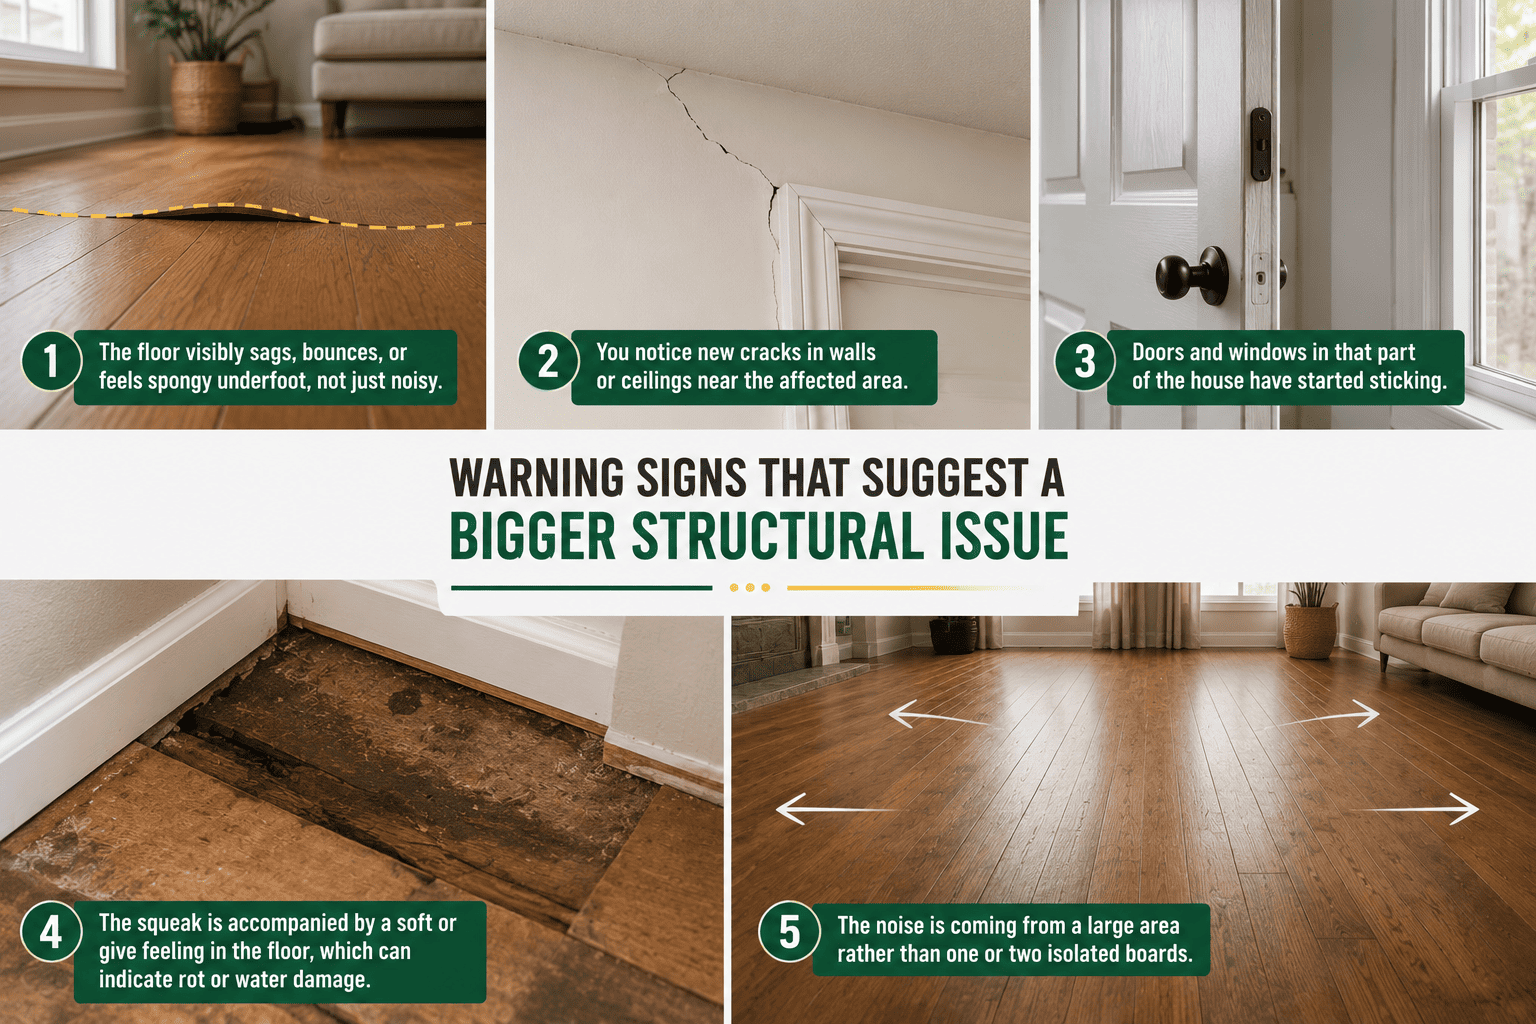
A squeak on its own is not a red flag. If it is combined with any of the following, it is worth a closer look from a contractor or structural professional:
- The floor visibly sags, bounces, or feels spongy underfoot, not just noisy.
- You notice new cracks in walls or ceilings near the affected area.
- Doors and windows in that part of the house have started sticking.
- The squeak is accompanied by a soft or give feeling in the floor, which can indicate rot or water damage.
- The noise is coming from a large area rather than one or two isolated boards.
How to Diagnose a Creaky Floor Before You Fix It
Every repair method in this guide depends on knowing exactly where the squeak is coming from. So diagnosis is not a step to rush through. If you guess at the location, it wastes fasteners, creates unnecessary holes in good flooring, and often leaves the actual squeak untouched. Look at the tools you will require to diagnose creaky floors:
| Tool | Purpose |
| Flashlight | Checks the floor from the basement or crawlspace. |
| Stud Finder | Locates the joists below the floor. |
| Painter’s Tape or Chalk | Marks the creaky areas. |
| Cordless Drill | Installs screws to secure loose flooring. |
| Wood Shims and Glue | Fills gaps between joists and the subfloor. |
| Deck Screws | Tightens loose floorboards and subfloors. |
| Powdered Graphite | Stops rubbing between floorboards. |
| Wood Filler | Hides screw holes after the repair. |
The most reliable approach is the two-person walk-and-listen method flooring contractors use. One person walks slowly across the floor, shifting their weight onto the balls of their feet and rocking gently at each spot. The second person either kneels close to the floor upstairs or, better, goes underneath in the basement or crawlspace to listen and watch for movement. Mark each creaky spot with painter’s tape or chalk as you find it.
If you have access below the floor, look for daylight or visible gaps between the subfloor and the joists at the marked locations. If you are working from above only, pay attention to whether the squeak sounds like wood rubbing on wood, a dull grinding creak, or metal rubbing on wood, a sharper, higher-pitched squeak, since that difference points to different fixes.
How to Fix a Creaky Floor From Below
If you have an unfinished basement or crawlspace under the creaky area, this is the best place to start. Repairs made from below are invisible from the living space and generally hold up longer than surface fixes.
1. Shimming Gaps Between Joist and Subfloor
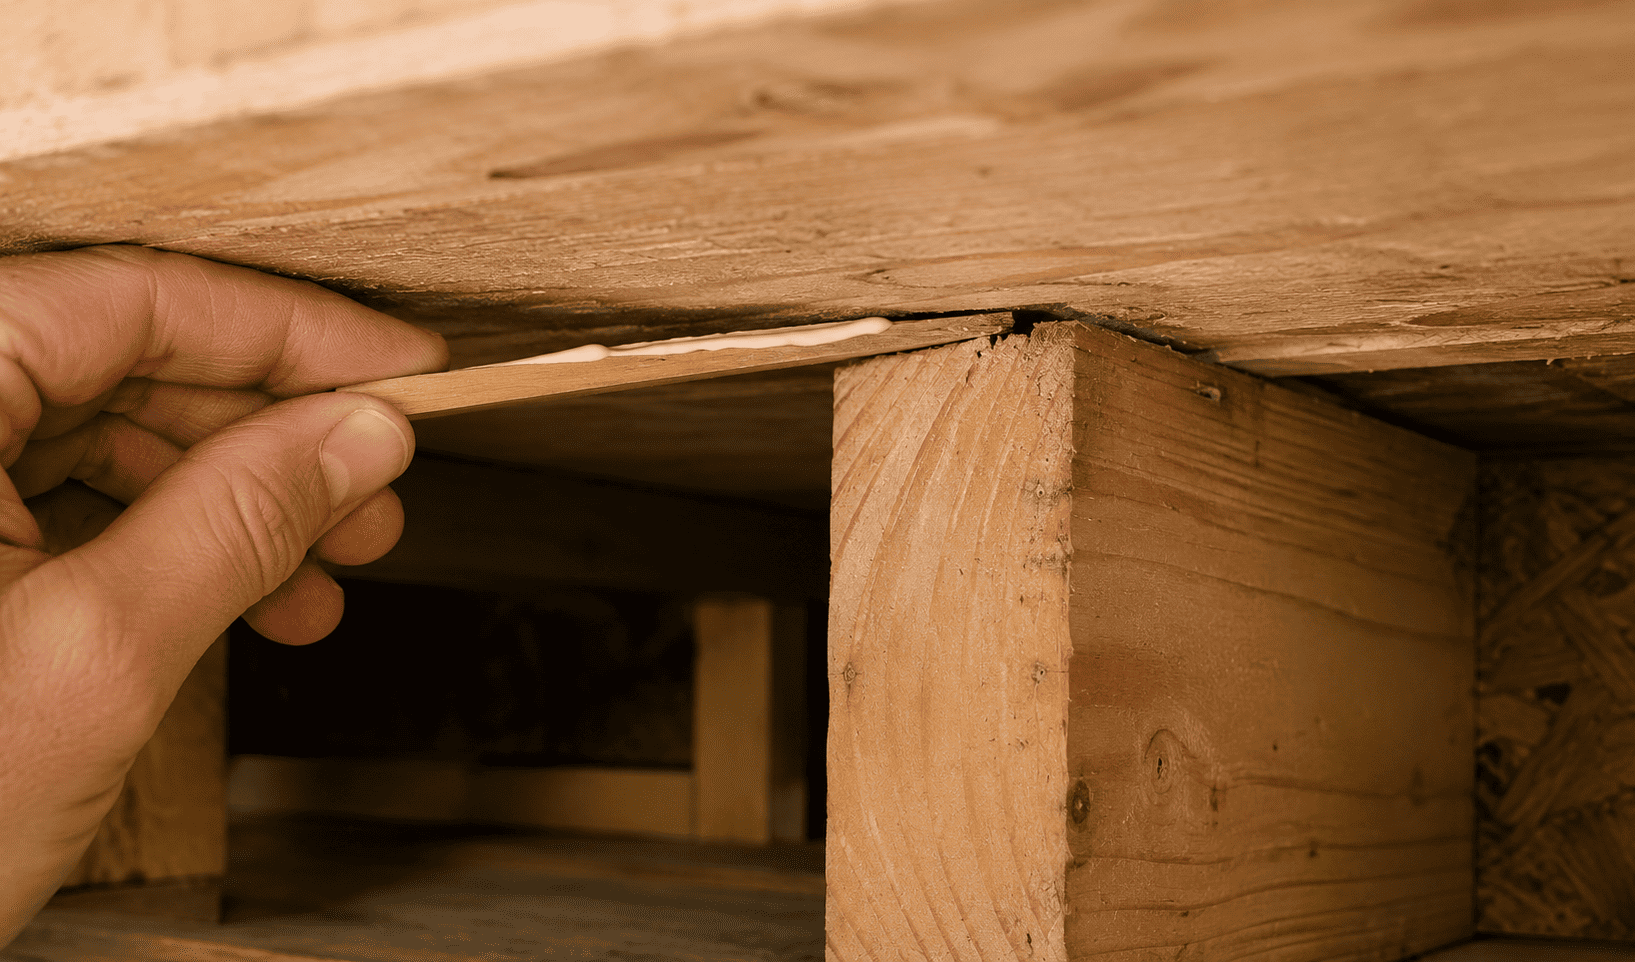
Once you have located a gap between the top of a joist and the subfloor, apply a thin bead of carpenter’s glue to a wood shim and gently slide it into the gap by hand.
Push it in just far enough to fill the space snugly. Avoid hammering the shim in aggressively. If you forcefully push the subfloor upward, you may create a small bump in the finished floor above. If a single shim does not fully close the gap, add a second one from the opposite side rather than forcing one shim deeper.
2. Screwing the Subfloor to the Joist
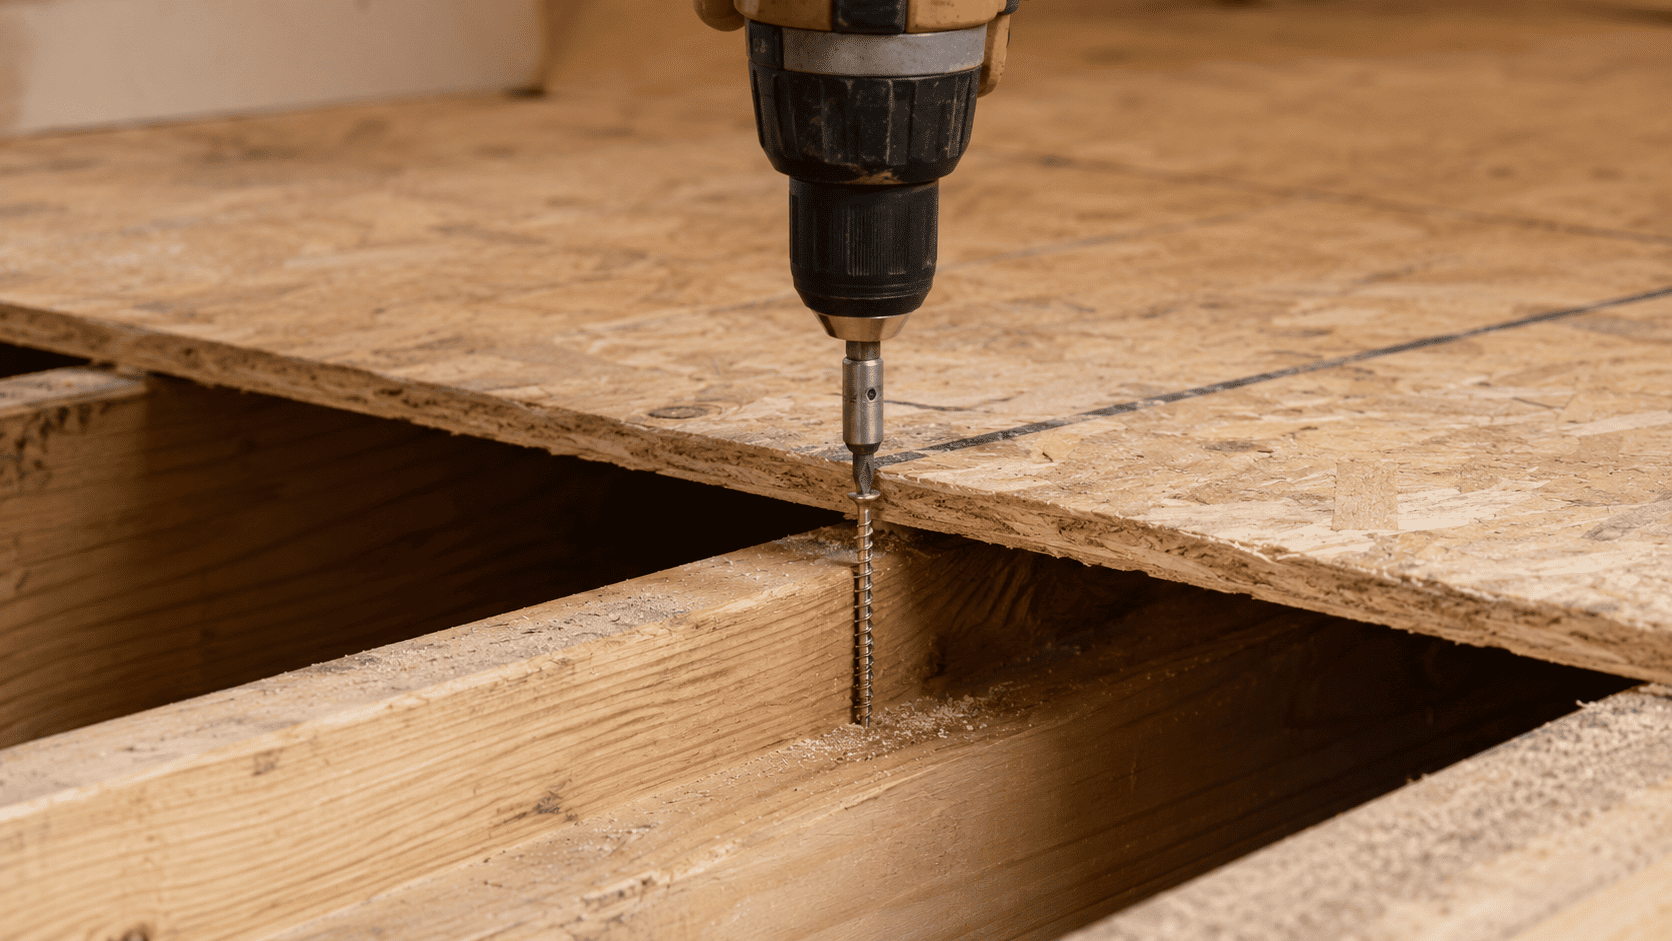
If the subfloor is loose or the gap is too small for a shim, drive a construction screw through the joist into the subfloor to secure it.
Choose a screw long enough to bite solidly into the subfloor without poking through the finished floor above. This method works because it physically pulls the two loose pieces back together, eliminating the movement that was causing the friction.
3. Adding Blocking or a Cleat for Extra Support
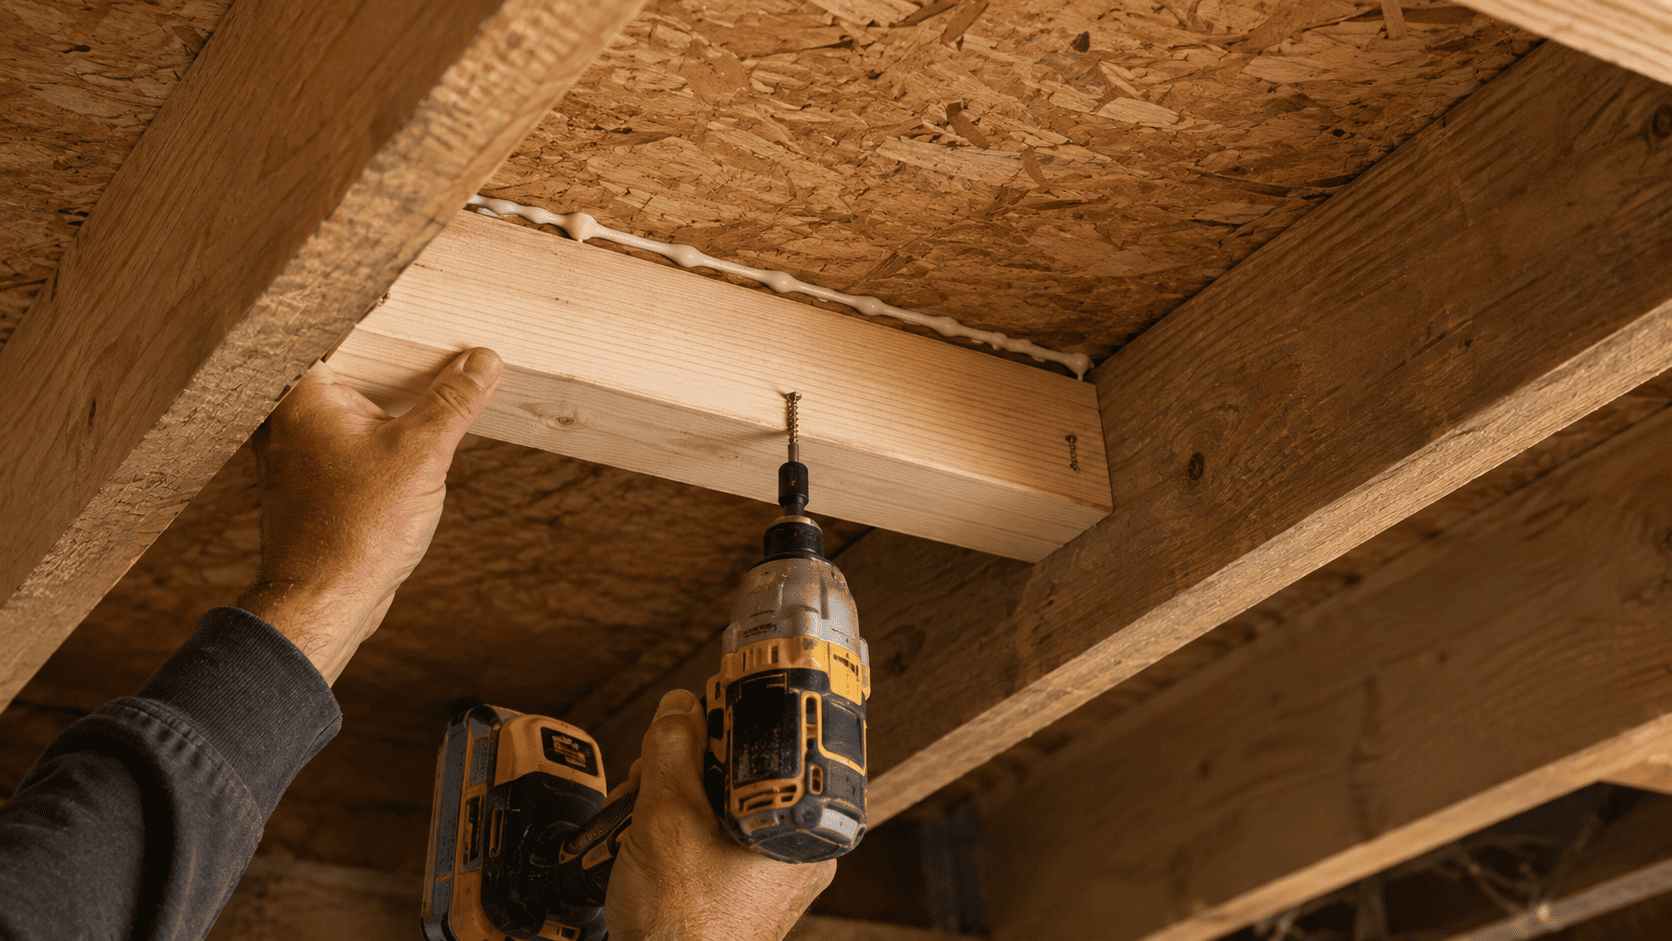
If the creak is happening between two joists rather than at a single joist, nail or screw a 2×4 or 2×6 cleat flat against the side of the joist. It also touches the underside of the subfloor at the creaky spot, then run construction adhesive along the top edge before securing it. This gives the subfloor a new point of support exactly where it needs one, closing the gap that was causing the noise.
Safety Considerations When Working in a Crawlspace or Basement
- Wear a dust mask or respirator, since crawlspaces often collect mold spores, insulation fibers, and rodent debris.
- Use a headlamp rather than holding a flashlight, so both hands stay free.
- Watch for exposed electrical wiring and never drive a screw or nail without confirming what is on the other side of the subfloor.
- Avoid kneeling directly on vapor barriers or ductwork, which can tear or dent under weight.
- If you find signs of active water intrusion or significant wood rot, stop and consult a professional before doing any fastening work in that area.
How to Fix a Creaky Floor From Above
Not every home has accessible framing below the creaky spot. Finished basements, slab-on-grade construction, and upper floors of multi-story homes all require working from the top side of the floor instead.
1. Using Powder or Lubricant for a Temporary Fix
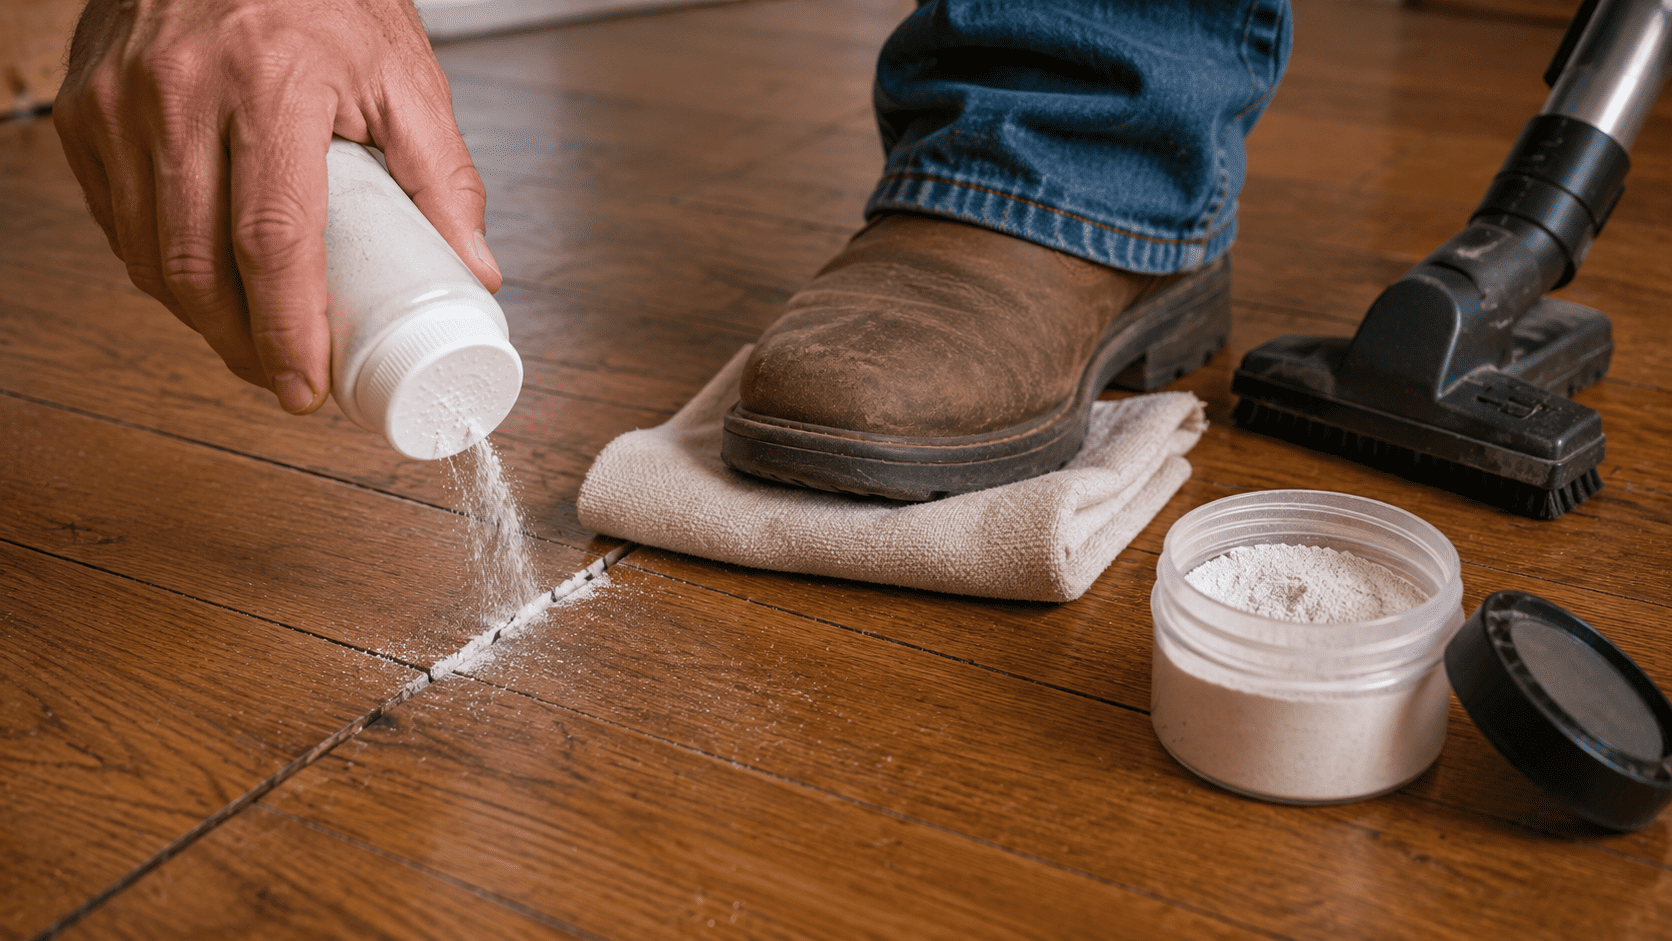
For creak caused by boards rubbing together rather than a structural gap, sprinkle powdered graphite, talcum powder, or powdered soapstone into the seam between the boards. Lay a cloth over the area and walk on it repeatedly to work the powder deep into the joint, then vacuum up the excess.
This works because it reduces the friction between the two wood surfaces, so they slide against each other silently instead of catching and releasing. It is a genuinely useful fix, though it is a lubrication solution rather than a structural one, so it can wear off and need reapplication over time.
2. Driving Finishing Nails or Specialty Breakaway Screws Into the Joist
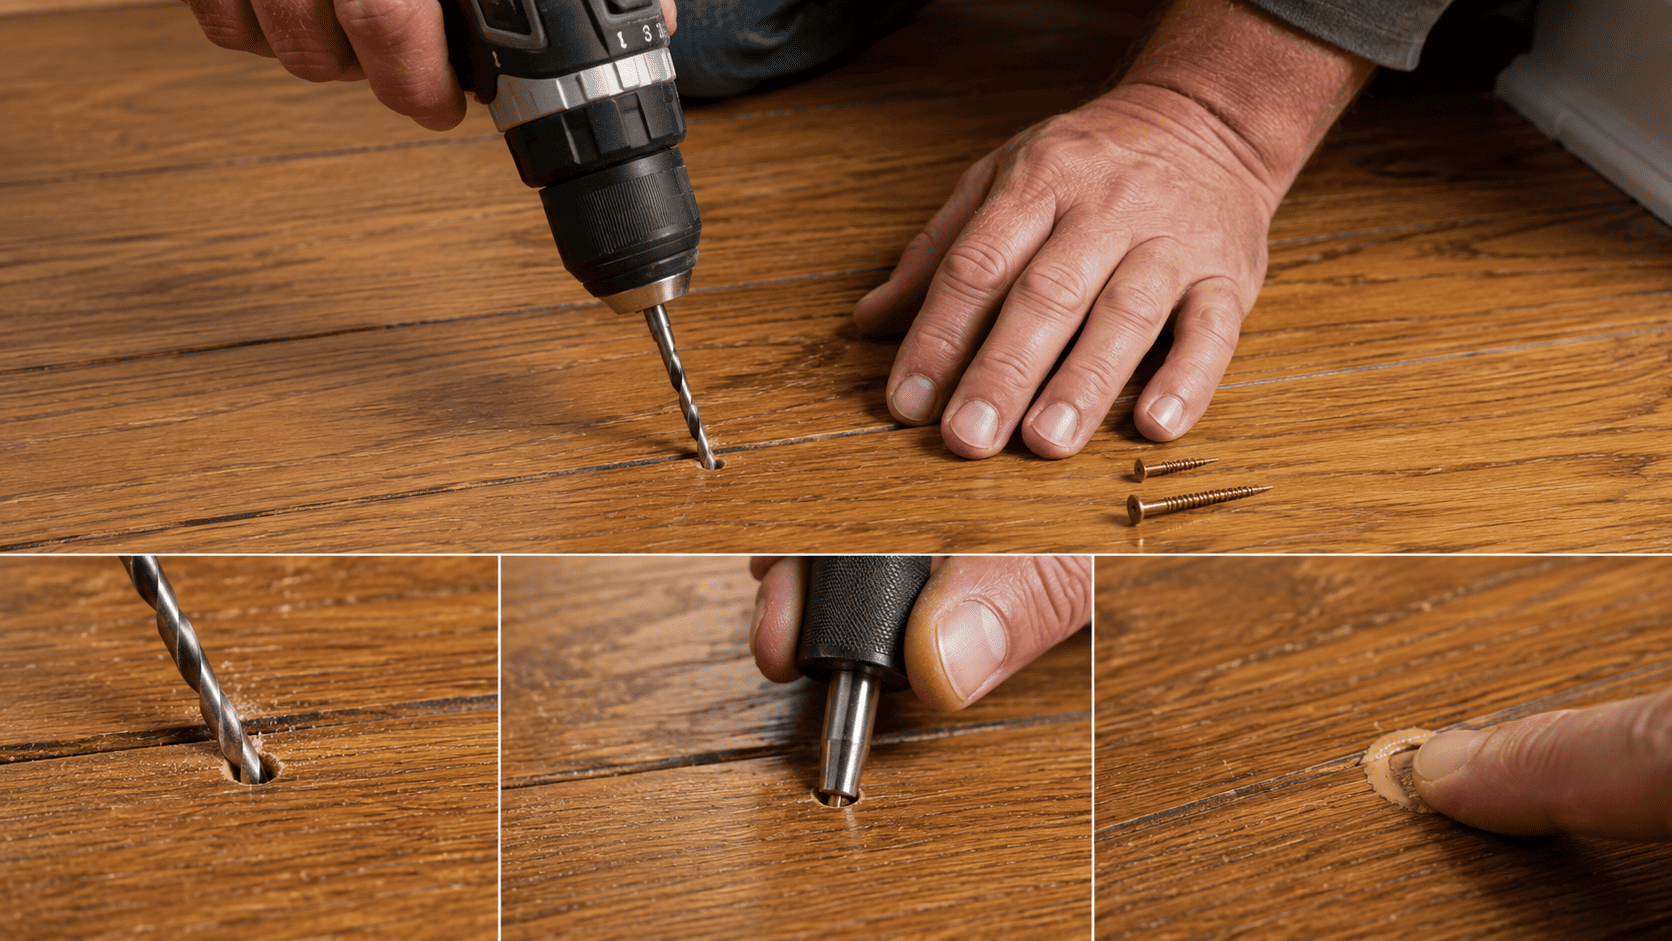
Locate the joist beneath the squeak with a stud finder, then drill a pilot hole at a slight angle through the floorboard and into the joist to avoid splitting the wood.
Drive a finishing nail or trim screw into the pilot hole, set the head below the surface with a nail set, and fill the hole with wood filler that matches your floor’s finish. This method physically clamps the floorboard to the joist, which removes the small vertical movement that was creating the noise.
3. Using a Creak-Repair Kit
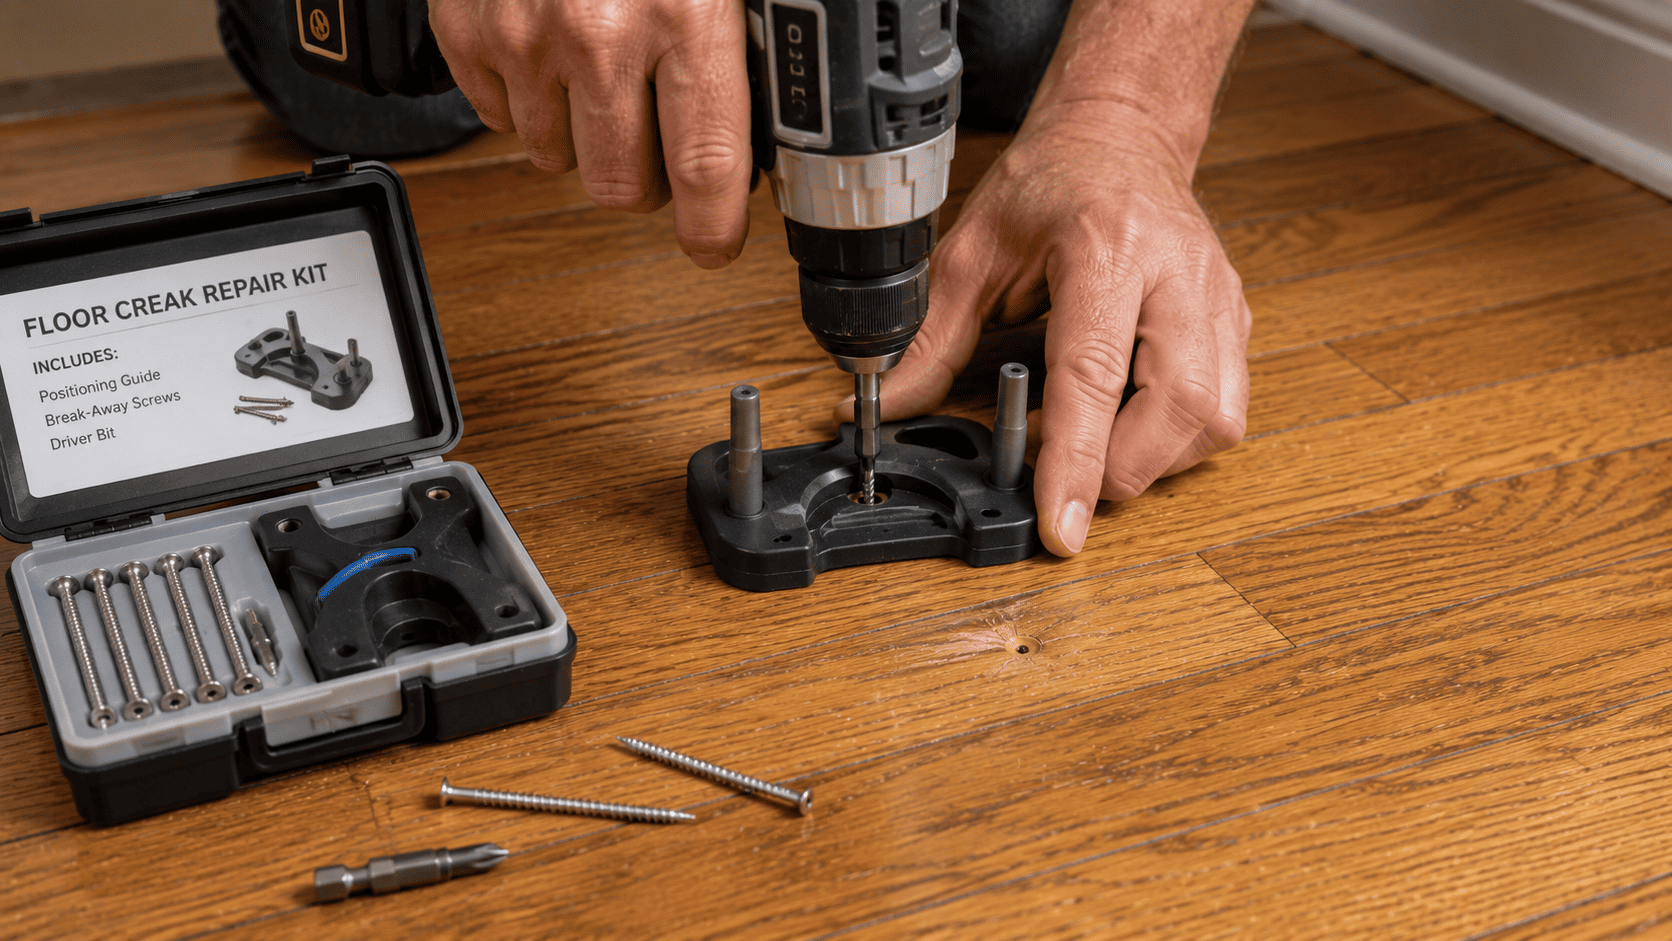
Purpose-built kits use a guide that helps you locate the joist accurately and a specialty screw designed to snap off cleanly just below the surface of the flooring once it is driven in. These kits are worth the cost if you are dealing with several squeaks in one visit, since the break-away design leaves a much smaller, easier-to-hide hole than a standard screw.
Common Mistakes That Make Creak Worse
- Driving a screw or nail without confirming you have hit the joist, which can crack the floorboard or leave a proud fastener that squeaks even louder
- Hammering a shim too far into a gap, which can lift the floor and create a visible high spot
- Overusing lubricant powder on a floor with a wax finish, which can dull or discolor the surface over repeated applications
- Skipping the pilot hole on solid hardwood, which frequently splits the board
- Assuming every squeak in a room has the same source and only fixing the first one you find
Fixing Creaky Floors by Flooring Type
The framing-level causes covered above apply to nearly every floor type, but the surface-level repair changes depending on what is actually underfoot.
1. Solid Hardwood Floors
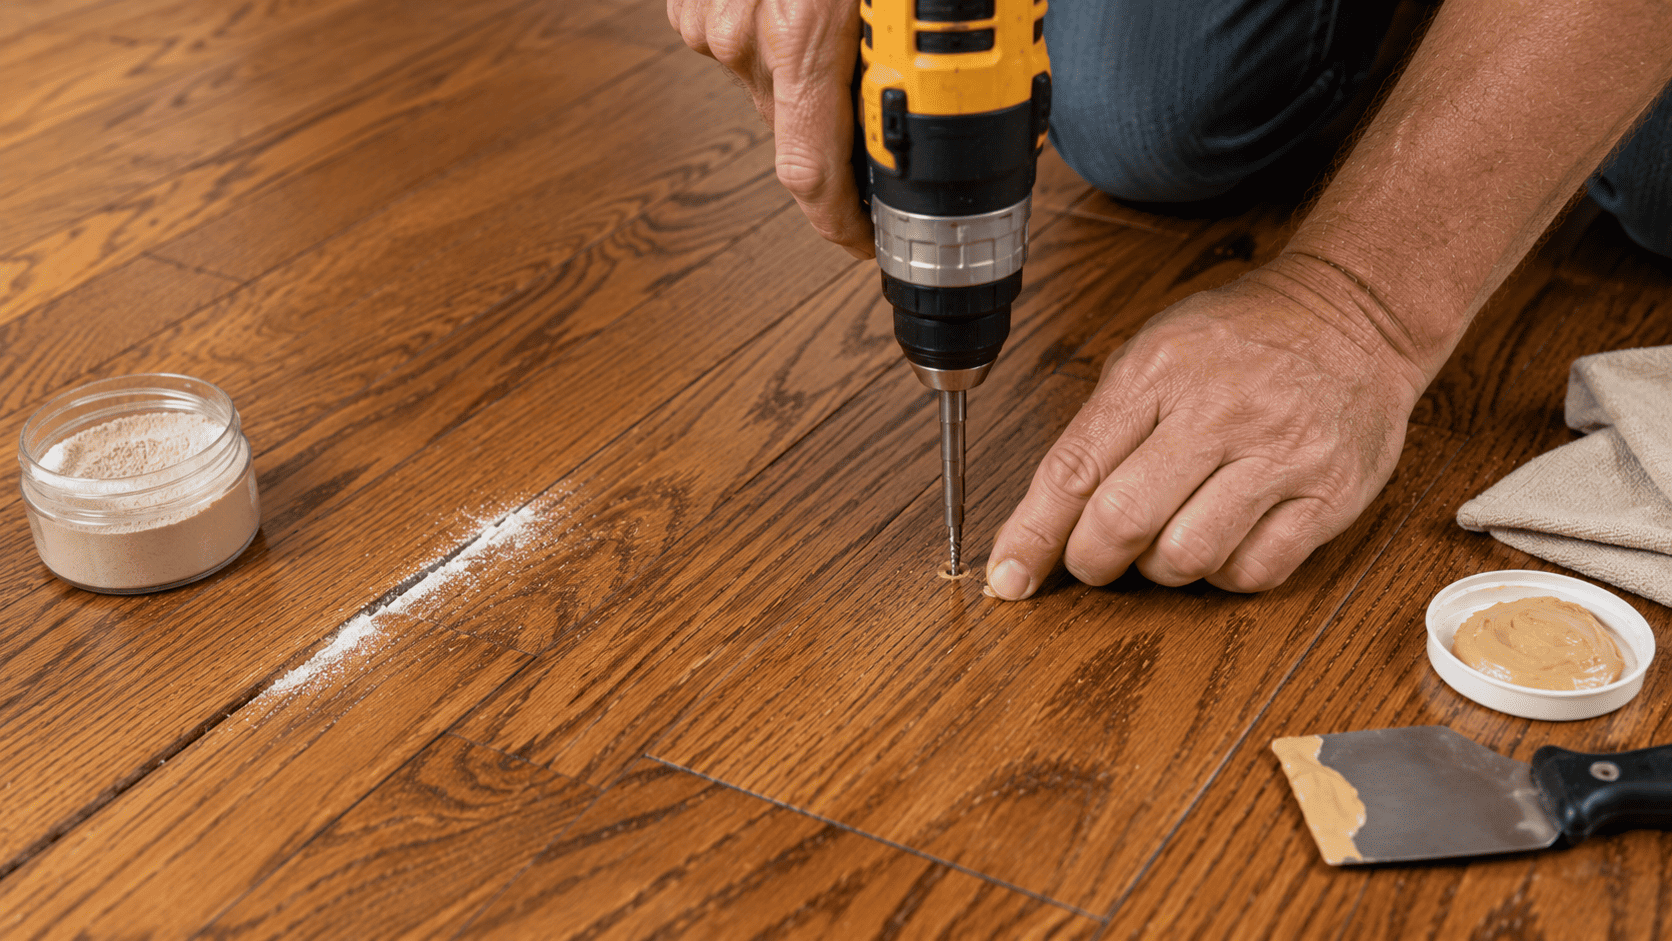
Solid hardwood floors responds well to both the lubrication method and the finishing-nail method described above. Solid wood boards are thick enough to hold a nail or screw securely. When you perform from-above repairs on hardwood correctly, they tend to be reliable and long-lasting.
2. Engineered Wood Floors
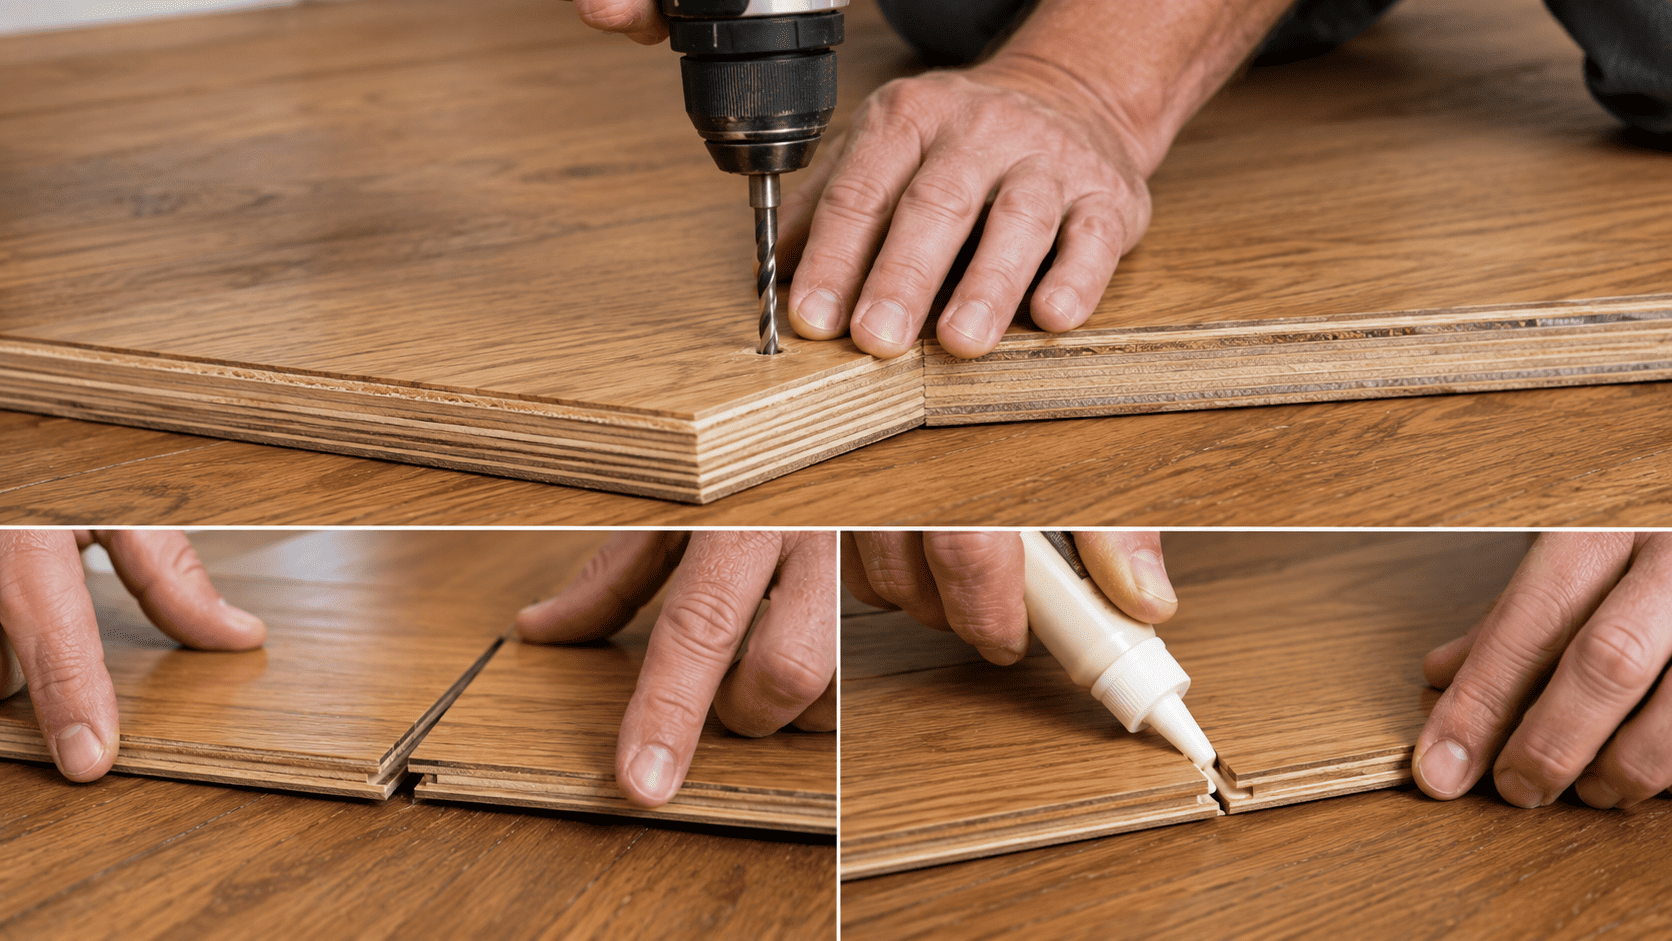
Engineered wood has a thinner solid wood wear layer over plywood, so it is more prone to splitting if you drive a fastener without a pilot hole. If your engineered floor is a floating installation rather than glued or nailed down, creaks often come from the click-lock joints separating slightly rather than from the subfloor. In these cases, the fix is usually adjusting or regluing the affected boards rather than fastening through them.
3. Laminate Floors
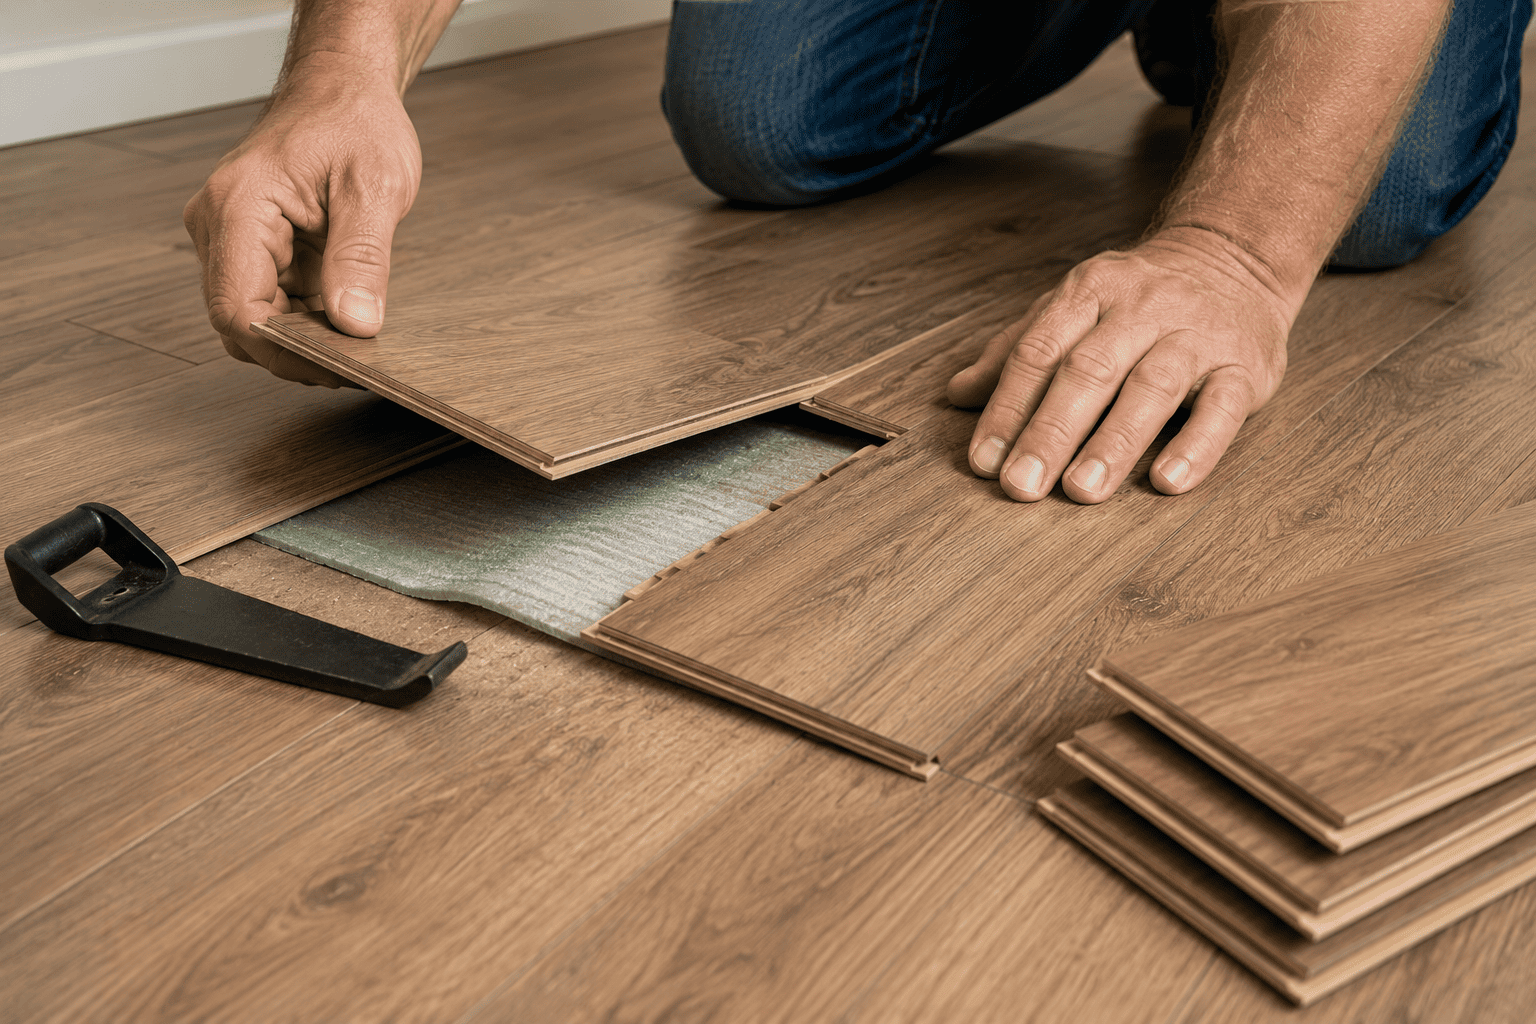
Laminate floor is almost always installed as a floating floor over a foam or felt underlayment. So creaks here are rarely a subfloor issue and more often come from the underlayment shifting or the locking joints between planks losing their tight fit. Screwing through laminate is not recommended, since it will crack the wear layer. Instead, focus on whether the underlayment has bunched or thinned in the creaky area. It usually means a partial reinstallation of that section.
4. Vinyl and Luxury Vinyl Plank (LVP) Floors
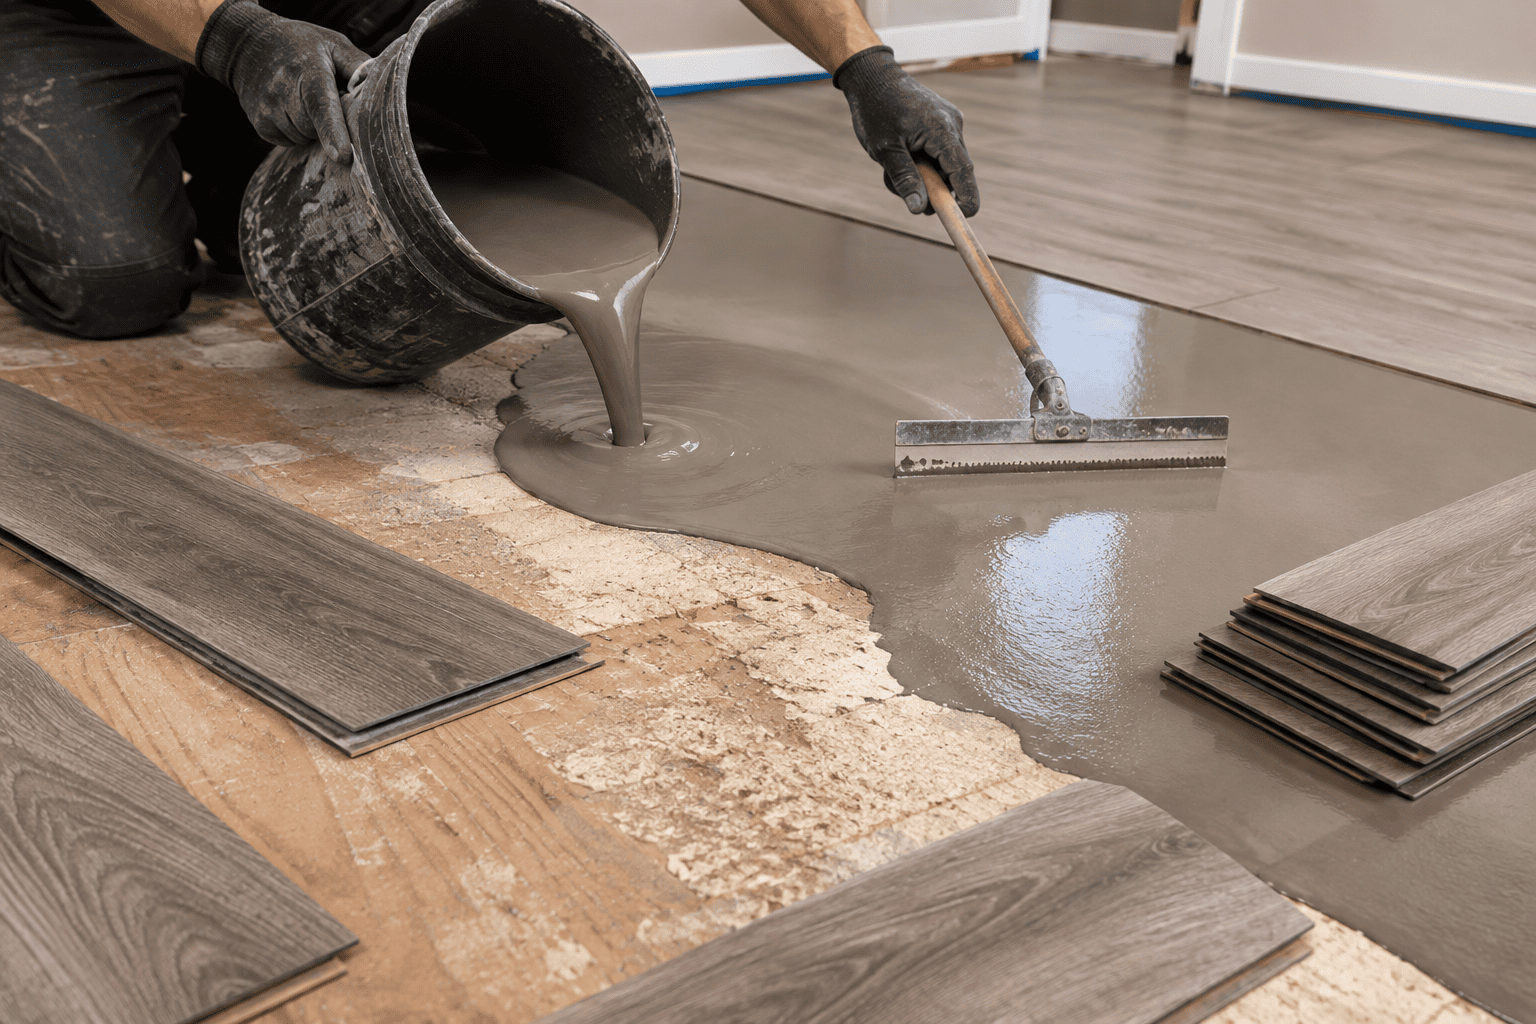
LVP is also typically a floating floor, and creak under vinyl usually points to an uneven or unlevel subfloor rather than the vinyl itself. Because vinyl floor flexes more than wood, it can telegraph even small subfloor imperfections as noise.
If the creak persists across a wide area, you can apply self-leveling underlayment compound before reinstalling the planks. It is often a more effective long-term fix than spot repairs.
5. Tile Floors
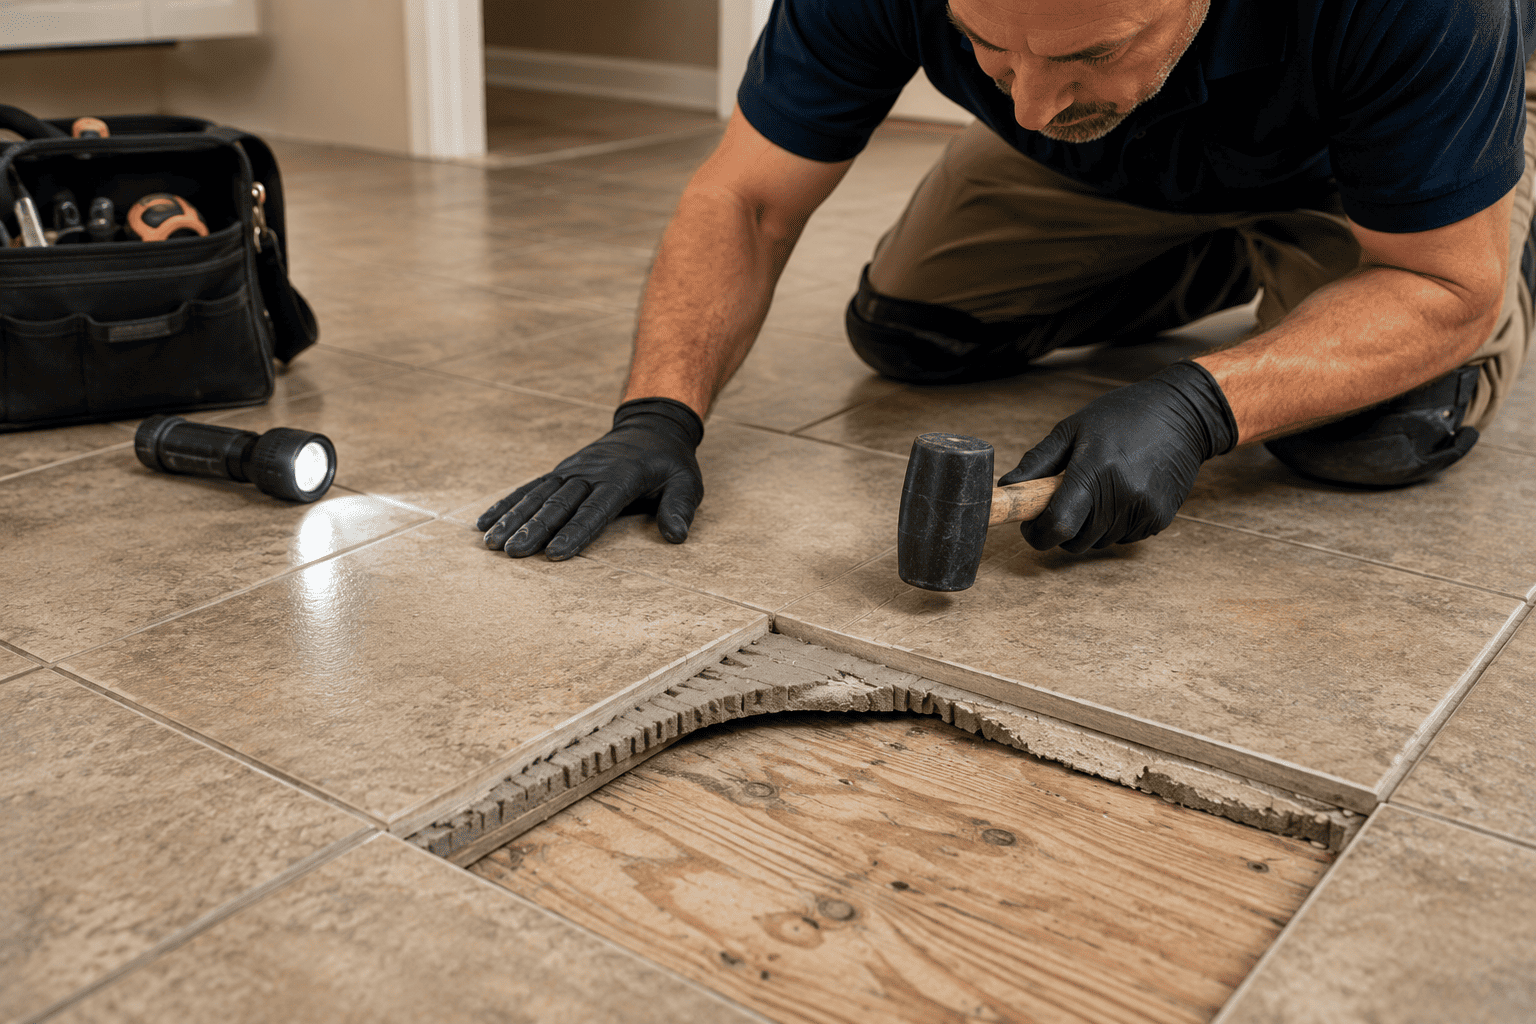
A squeak or crack sound under tile is a more serious signal than under other flooring types. Tile is rigid and should not move at all once properly installed. A creak here usually means the subfloor was not adequately reinforced before the tile was set, or the thin-set mortar has separated from the subfloor in that spot. This scenario justifies paying for a professional assessment before attempting a DIY fix, because driving a screw through tile risks cracking it.
6. Carpeted Floors
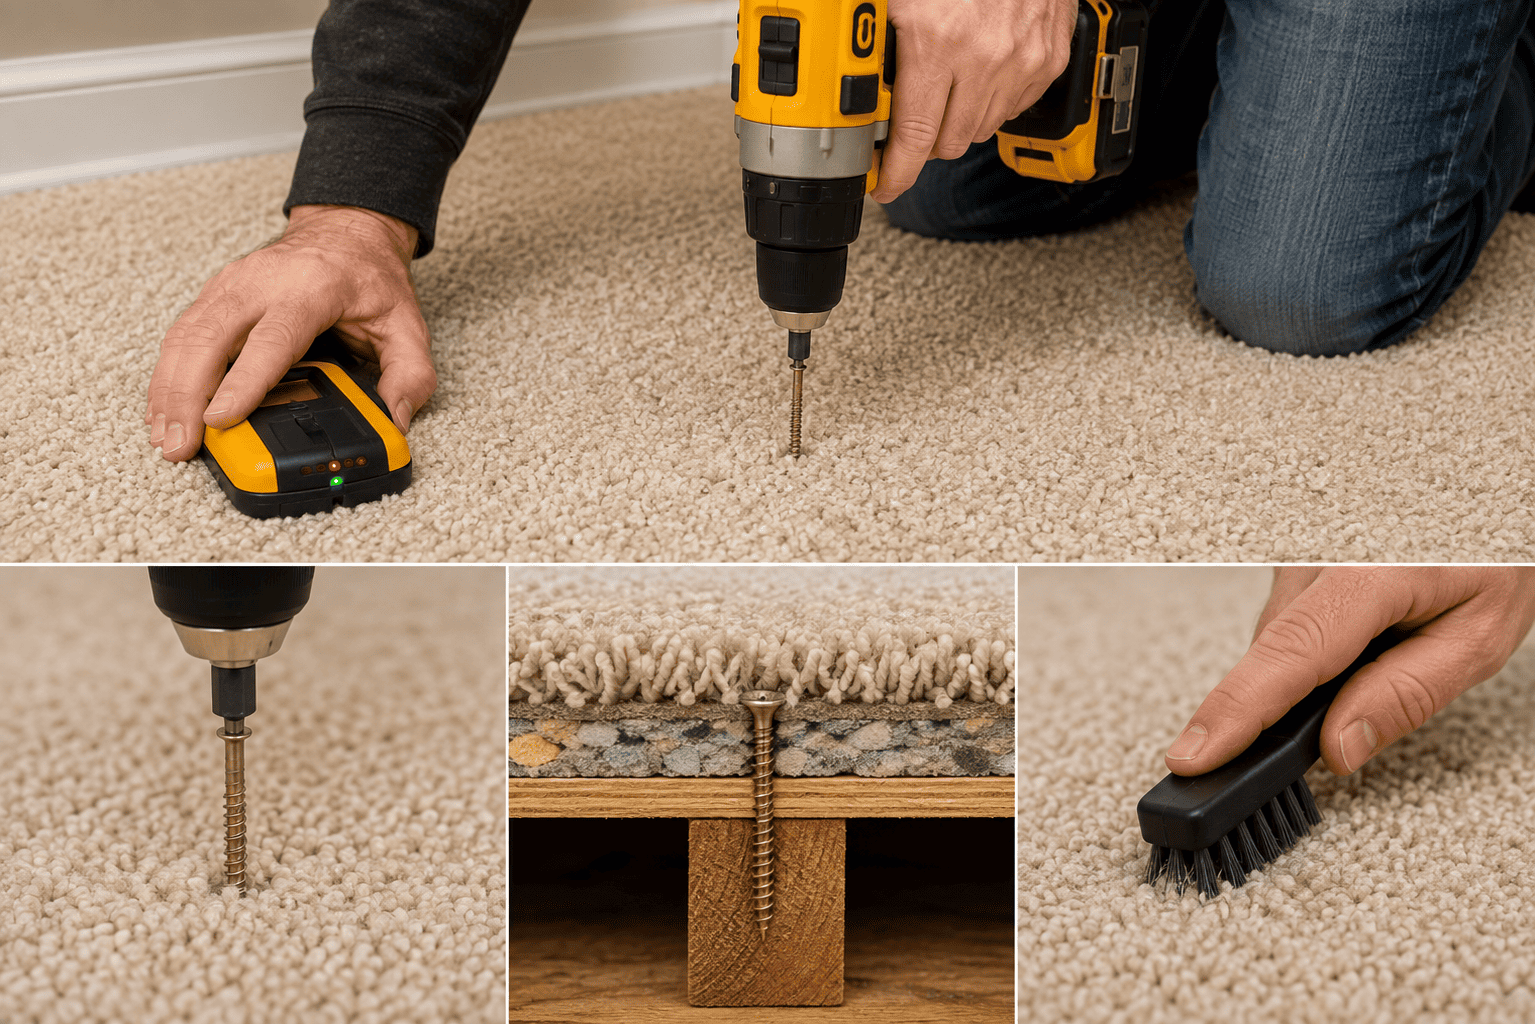
To fix a creak without removing the high-quality carpet, use a stud finder to locate the joist. Drive a specialty carpet-rated screw through the carpet and pad directly into the joist, countersinking the head below the carpet backing. Afterward, comb the pile over the screw to hide any trace. This method mirrors the top-down hardwood fix, but uses a longer screw to clear the extra padding.
7. Subfloor-Specific Repairs
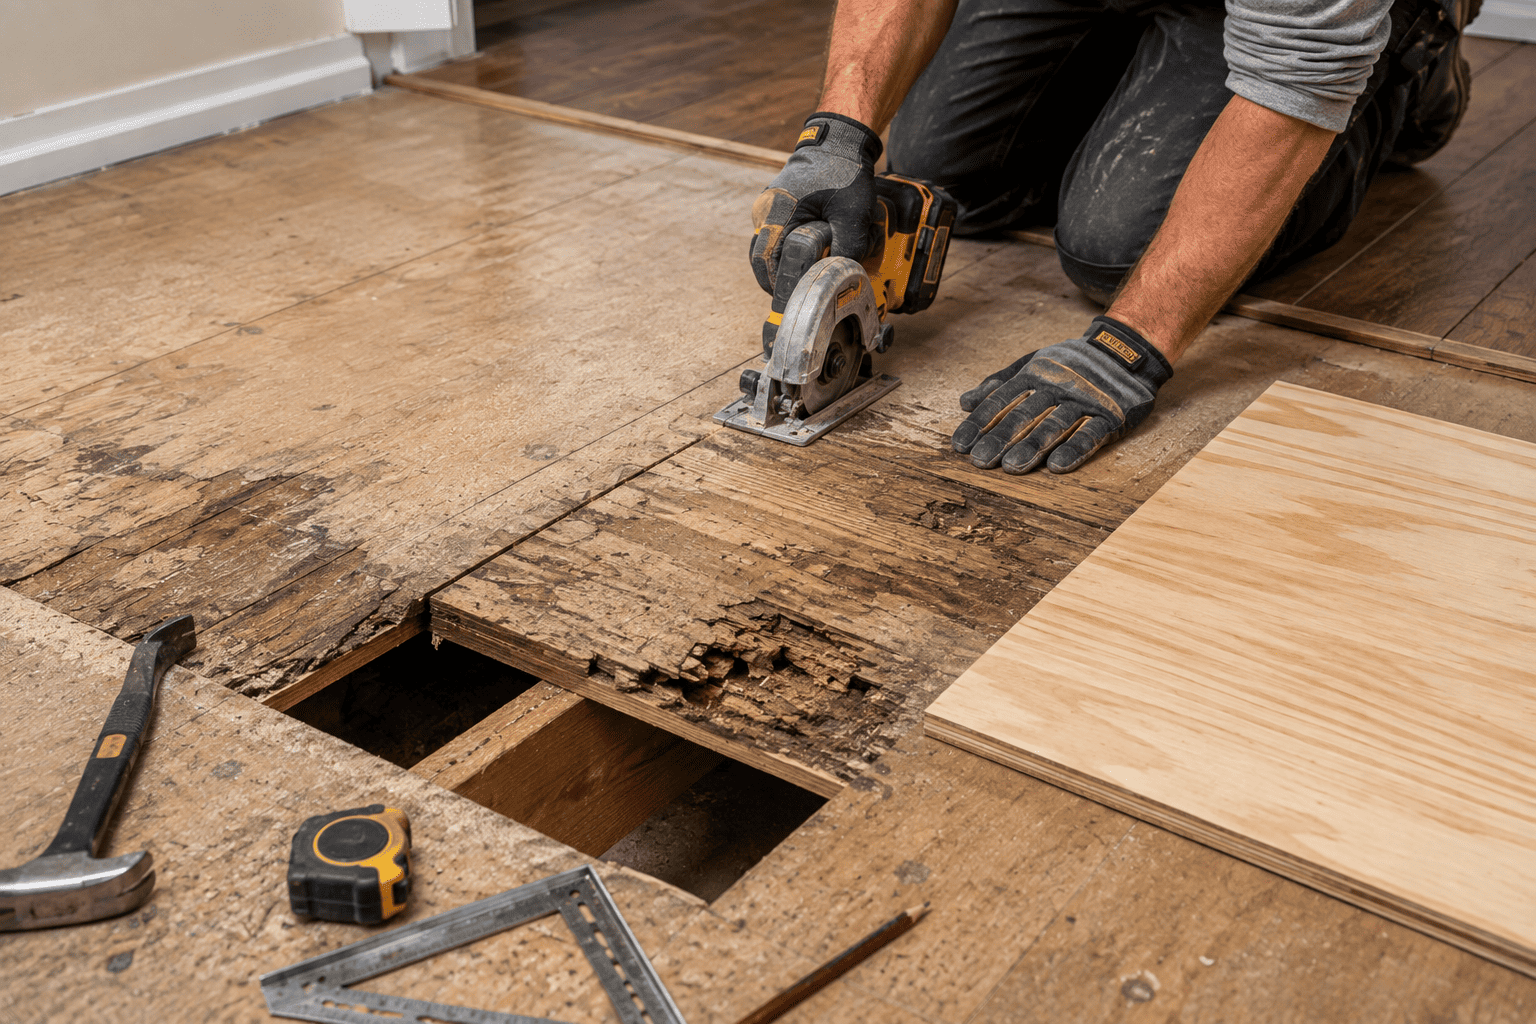
Fastening won’t fix a subfloor that has developed voids from moisture, debris, or uneven seams, because you are dealing with compromised wood rather than loose boards. You will need to cut out and replace any delaminating or water-damaged plywood or OSB before attempting a finish repair. Hire a contractor for this job, since it typically requires pulling up a section of the finish flooring.
How to Fix Creaky Stairs?
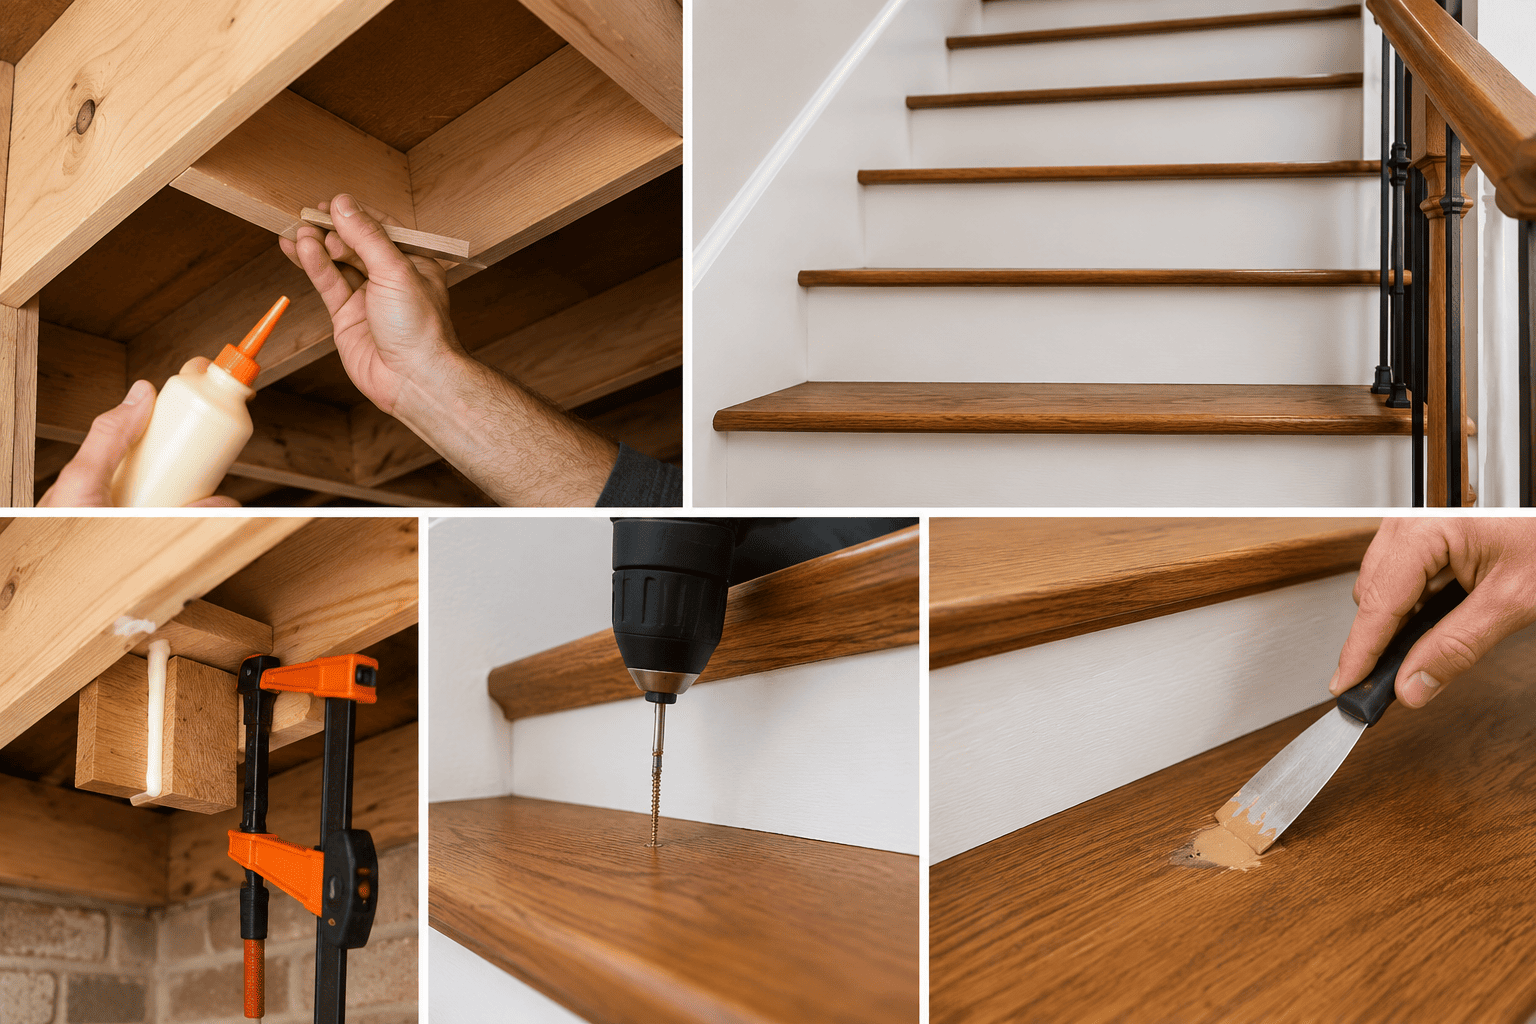
Stairs creak for the same underlying reasons as floors, friction and loosened fasteners. But the fix depends heavily on whether you can get behind the staircase.
1. Accessing Stairs From Behind
If the underside of your stairs is exposed through a closet or unfinished basement, you can see exactly where each tread meets its riser and stringer. Apply carpenter’s glue to a thin shim and tap it gently into any gap you find at the creaky joint. The same way you would shim a subfloor gap. You can also apply construction adhesive directly to any loose glue blocks and clamp them back into place overnight.
2. Fixing Stairs With No Rear Access
When the back of the staircase is finished or inaccessible, work from the top. Locate the point where the tread rubs against the riser or stringer, usually right where the squeak is loudest, and drive a trim screw down through the tread into the riser below at a slight angle. Countersink the screw head and fill with a matching wood filler putty. For carpeted stairs, use the same countersunk carpet-screw approach described for carpeted floors above.
DIY vs. Professional Repair: How to Decide

Most creaks fall well within a confident homeowner’s ability to fix in an afternoon with basic tools. The decision to hire a professional usually comes down to access, scale, and what is actually causing the noise rather than the difficulty of driving a screw.
When a DIY Fix Is Enough
- The squeak is isolated to one or two spots rather than spread across a whole room
- You can identify the joist or subfloor location with a stud finder
- The floor feels solid underfoot, without sagging or bounce
- You have basic comfort using a drill and working in a crawlspace or basement if needed
When to Call a Flooring Contractor or Structural Professional
- The squeak covers a large area or seems to be getting worse over a short period
- The floor sags, bounces, or feels soft when you walk on it
- You suspect water damage, rot, or pest damage in the subfloor or joists
- The squeak is under tile, and you are not confident diagnosing it without cracking the surface
- You have tried the standard fixes in this guide and the squeak keeps returning
Troubleshooting: When Creak Won’t Go Away
Occasionally a creak survives the standard fixes, and it is worth knowing why before you assume the repair failed.
1. Multiple Overlapping Squeak Sources
A single spot can have more than one thing going on at once, such as a loose fastener and a dried-out finish combined. If a fix quiets the sound but does not eliminate it completely, go back and check the same spot for a second cause rather than assuming the repair did not work.
2. Creaks That Only Happen Seasonally
If a creak shows up every winter and disappears by summer. It is very likely a humidity-driven gap rather than a structural problem. Additionally, it is often not worth chasing with fasteners, since the wood will close the gap back up on its own once humidity rises.
3. Creaks That Return After a Repair
This usually happens because the fastener missed the joist or a single shim couldn’t fill the gap. Reopen the area, make sure you hit solid wood, and combine fixes, like using both a shim and a screw in the same spot.
How to Prevent Creaky Floors From Coming Back

These are some ways to prevent the creaky floors from coming back:
- Keep indoor humidity between 40 and 60 percent using a humidifier in dry winter months. Use a dehumidifier in humid summer months. Stable humidity keeps wood from repeatedly shrinking and swelling.
- Walk your floors seasonally, especially at the start of winter and summer. Address new creaks while they are still a simple lubrication or single-screw fix.
- Make sure any new flooring is properly acclimated to your home’s humidity for the manufacturer’s recommended period before installation.
- Recheck and tighten fasteners in high-traffic areas, such as hallways and entryways, every few years as part of routine home maintenance.
- Address plumbing or roof leaks near flooring immediately. Moisture damage to a subfloor is one of the few creak causes that gets significantly more expensive the longer it is left alone
Final Thoughts
A creaky floor can be annoying, but it is usually much easier to fix than most people expect. Once you identify what is causing the noise, the right repair often takes only basic tools and a little patience. Whether the issue is loose fasteners, rubbing floorboards, or a small gap between the subfloor and joists, dealing with it early can prevent bigger and more expensive repairs later.
The most important step is taking time to diagnose the problem instead of guessing. A simple inspection helps you choose the correct solution and avoids unnecessary damage to your flooring. If your floor also feels soft, bouncy, or shows signs of water damage, it is best to bring in a professional before the problem gets worse.
With regular maintenance and quick attention to new squeaks, your floors can stay quiet, stable, and comfortable for years. A little effort today can save you time, money, and frustration in the future.
Frequently Asked Questions
Indoor heating lowers humidity, which causes solid wood floorboards to lose moisture and shrink slightly. That shrinkage opens tiny gaps between boards that were not there in more humid months, increasing friction and noise until humidity rises again in spring.
Usually not. Most squeaks are caused by ordinary friction between floorboards, fasteners, and joists, not by structural failure. A squeak becomes a bigger concern only when it is paired with sagging, bouncing, or a soft feeling underfoot.
Yes, in most cases. Working from below with shims and screws requires no removal at all, and from-above fixes like lubricant powder or a countersunk screw with filler leave the surrounding flooring intact.
Almost never just for squeaking. Replacement is only necessary when the underlying subfloor or joists have been damaged by water, rot, or pests, which is a different issue from ordinary friction-based squeaking.
A DIY fix typically costs under 30 dollars for shims, screws, and a lubricant kit. A professional visit for spot repairs generally runs a few hundred dollars, while larger repairs involving subfloor or joist replacement cost significantly more depending on the size of the affected area.
It can help significantly with seasonal squeaks caused by dry winter air, since maintaining stable humidity reduces the wood shrinkage that opens gaps between boards. It will not fix squeaks caused by loose fasteners or subfloor gaps, which need a physical repair.
New floors creak most often because of insufficient acclimation before installation, subfloor panels that were not fastened tightly enough, or flooring installed before the room’s humidity had stabilized. This is worth raising with your installer, since it may be covered under an installation warranty.
Locate the joist with a stud finder, then drive a specialty carpet-rated screw through the carpet, pad, and subfloor into the joist, countersinking the head below the carpet backing so it is not visible or felt underfoot.
Use the two-person method: one person walks and shifts weight across the floor. While the other listens and watches from below in a basement or crawlspace, marking each squeaky spot as it is found.
Yes, in the vast majority of cases. A creak alone indicates friction, not weakness. It is only worth pausing to inspect further if the floor also feels soft, bouncy, or visibly uneven.
Minor squeaks rarely affect an inspection report or resale value on their own, since they are considered a normal, easily fixable characteristic of wood-framed homes. Inspectors pay closer attention only when squeaking is paired with other signs of structural movement.


