
How to Install Vinyl Plank Flooring? Top 3 Trusted Methods
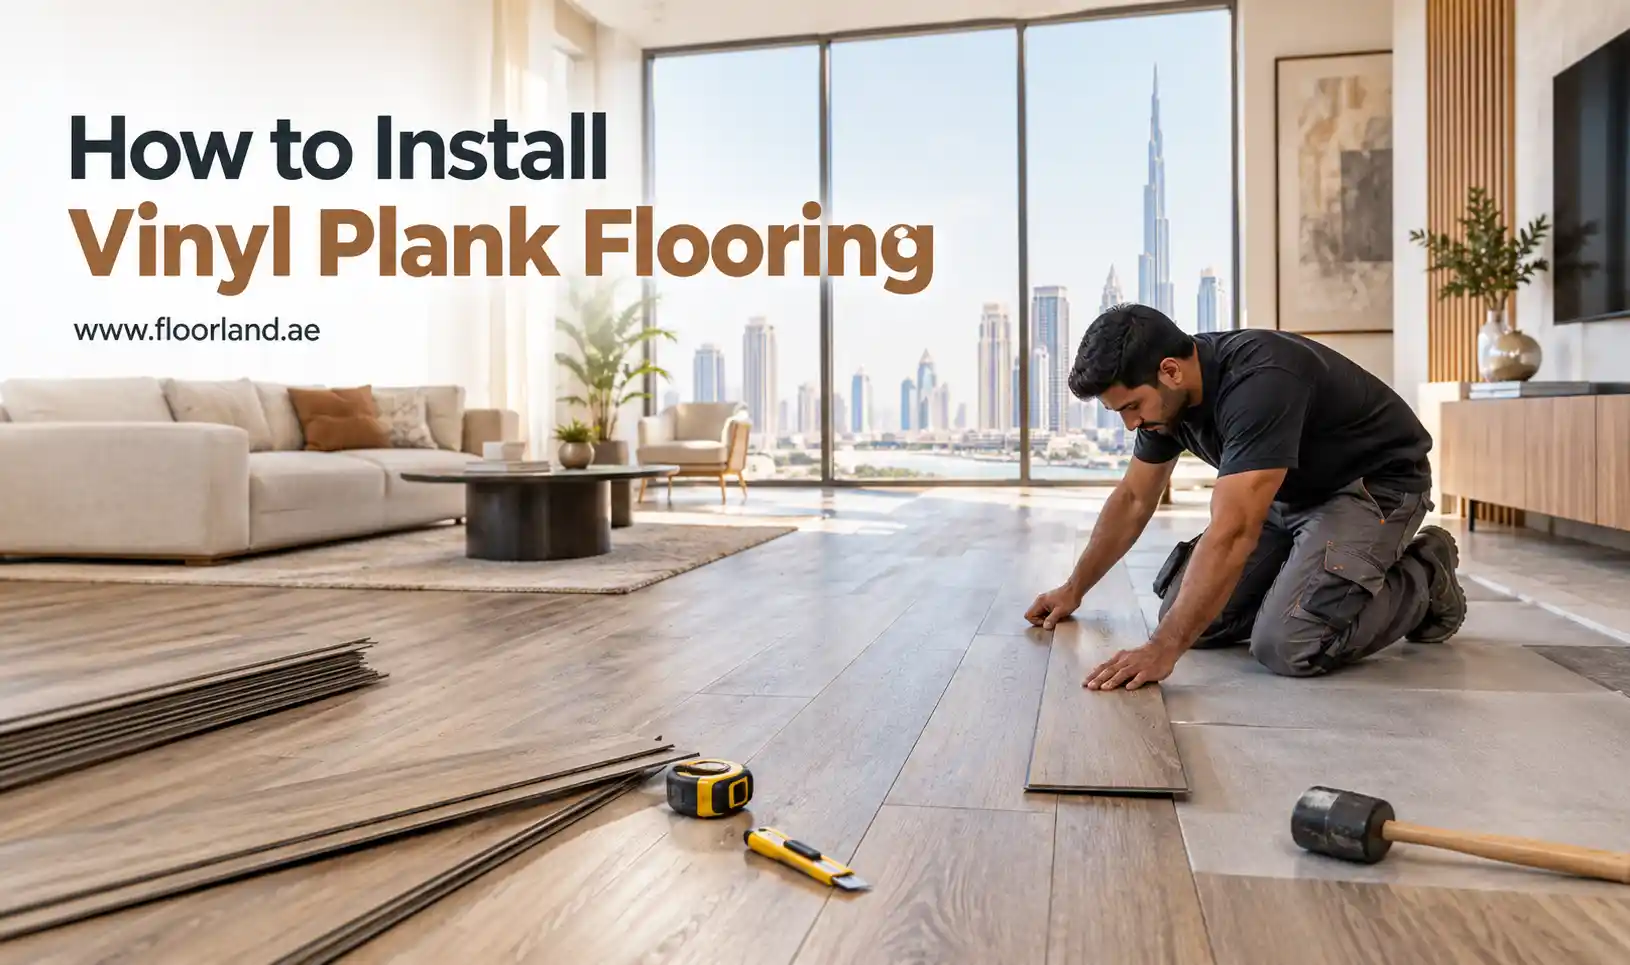
To install vinyl plank flooring, prepare the subfloor, acclimate the planks, create an expansion gap, and click the planks together row by row. Most click-lock vinyl flooring uses a floating installation method, so you do not need glue or nails. Start by leaving the unopened flooring boxes in the installation room for 48 hours. Next, make sure the subfloor is clean, dry, and completely level.
Place 1/4-inch spacers along the walls to maintain the required expansion gap. Lay the first row, then secure each plank before moving to the next row. Keep plank seams staggered by at least 8 to 10 inches between rows to create a stable, natural-looking floor. With basic tools like a tape measure, utility knife, and rubber mallet, you can finish most small rooms in a weekend. This Floor Land guide covers the best way to install vinyl plank floors and lists the tools you’ll need.
What Tools and Materials Do You Need?
Some tools are useful no matter which method you’re using. Others only apply to a specific installation type. Check your vinyl flooring‘s instructions before buying anything, since requirements vary by product.
- Tape measure
- Pencil
- Straightedge or chalk line
- Utility knife with sharp blades
- Rubber mallet
- Tapping block
- Pull bar for tight spaces along walls
- Spacers, where the manufacturer specifies an expansion gap
- Safety glasses and knee pads
How to Prepare the Room Before Installation
Room preparation is largely the same across all three installation methods. Getting it right prevents delays once you’re partway through laying planks.
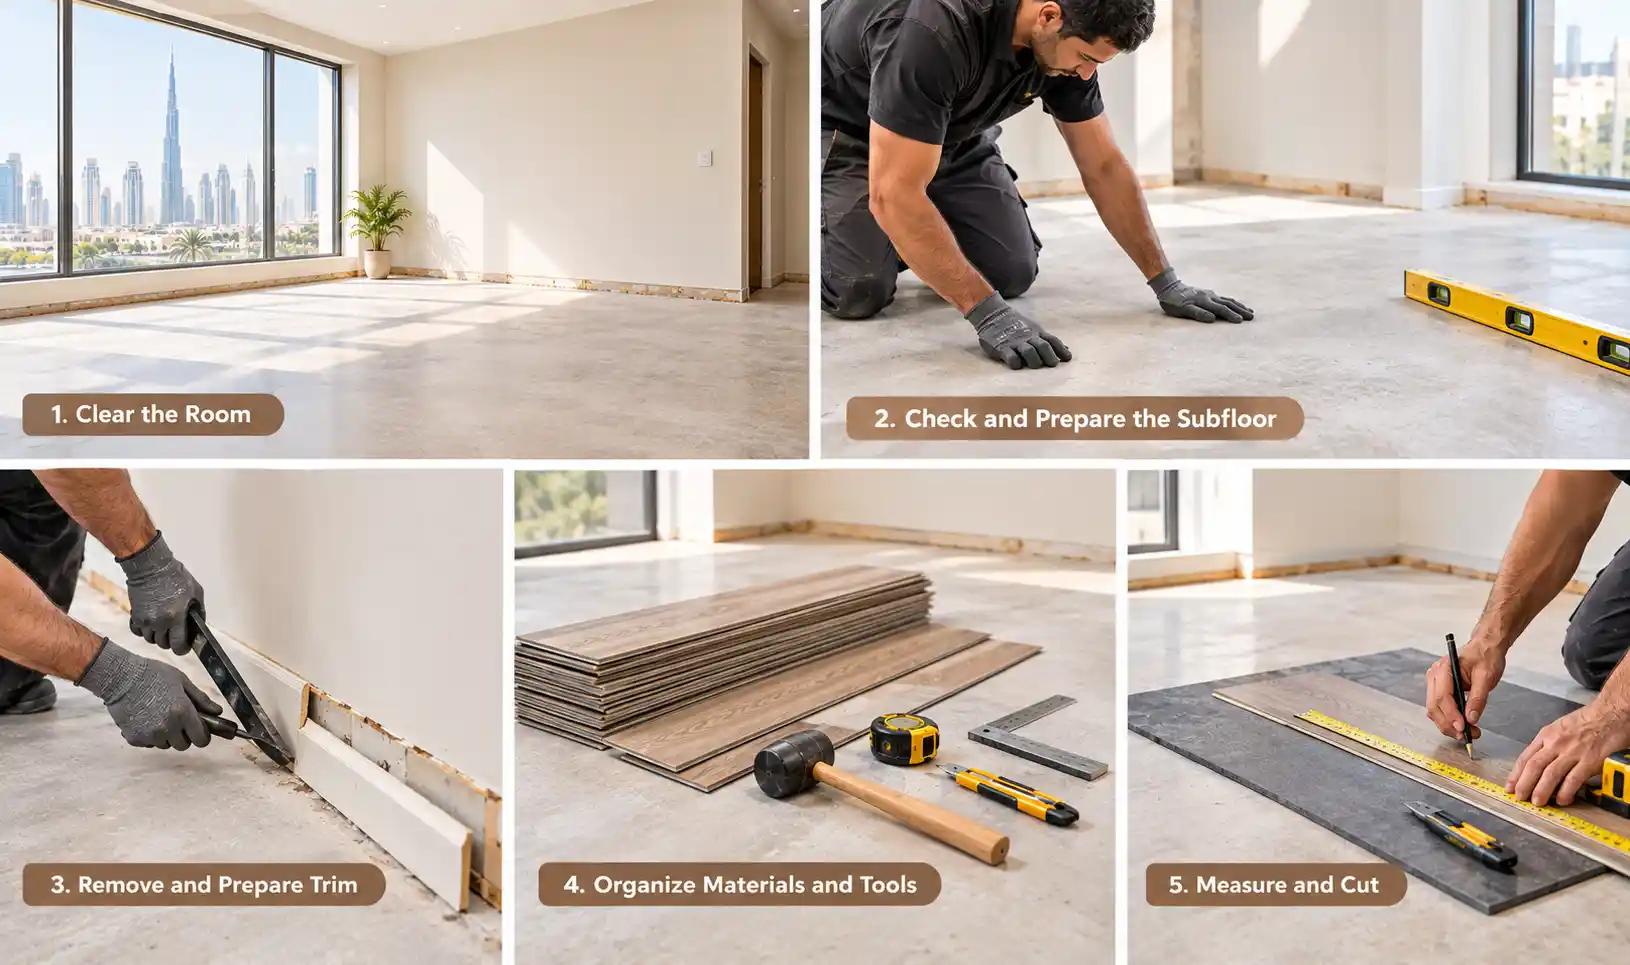
- Clear the room of custom furniture and, where possible, work in sections if you can’t empty it completely.
- Remove old flooring if your product requires a bare subfloor, or confirm what you can leave in place if you’re installing over an existing floor.
- Take off baseboards or trim along the walls where the new flooring will meet them, so the planks can slide underneath for a cleaner finish.
- Sweep and vacuum the room thoroughly, including corners and along the walls.
- Let the flooring and the room reach a stable, comfortable indoor temperature before you start, and give the material time to adjust if the manufacturer recommends it.
- Decide which wall you’ll start against, based on the room’s shape and the direction you want the planks to run.
- Check that doors open and close without dragging on the new floor height, and trim door casings if needed.
- Set up a cutting station nearby with good lighting so you’re not carrying planks back and forth across the room.
How to Prepare the Subfloor?
The subfloor supports everything else, so its condition directly affects how the finished floor looks and performs. Vinyl plank is thin and flexible enough that dips, ridges, debris, and moisture problems in the subfloor often show through the surface, sometimes within weeks of installation.
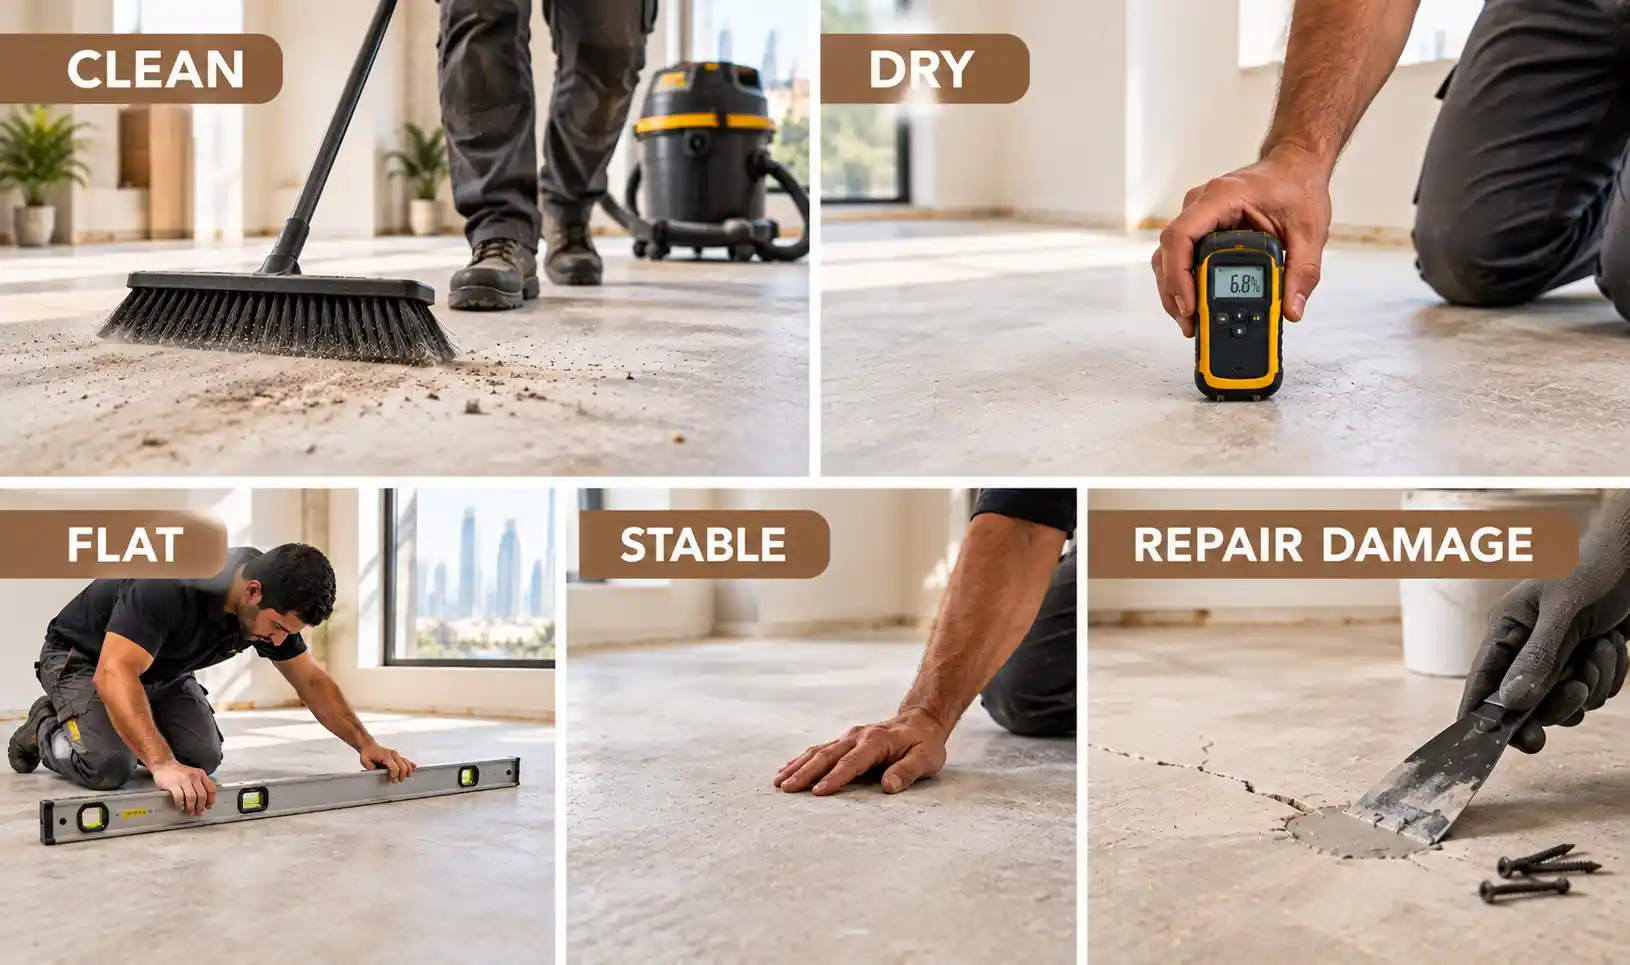
What to Check
- Cleanliness: dust, grit, and old adhesive residue all interfere with a floating floor’s fit and a bonded floor’s grip.
- Dryness: excess moisture in the subfloor can affect adhesives and cause long-term problems with any flooring type.
- Flatness: humps and dips can telegraph through the planks or stop click-lock joints from seating properly.
- Stability: loose or bouncy sections of subfloor need to be secured before flooring goes down.
- Cracks or damage: gaps, holes, and damaged boards or tiles should be repaired first.
- Protruding nails or screws: these need to be set flush or removed so they don’t puncture the new flooring.
- Existing flooring condition: some products allow installation directly over sound, flat tile, hardwood flooring, or a single layer of existing vinyl. Others require it to be removed.
What Are the Different Ways to Install Vinyl Plank Flooring?
Vinyl plank flooring comes in three main installation formats. The format depends on the product, not personal preference, so check your box or the manufacturer’s specification sheet before you plan your approach.
Method No.1: Click-Lock Installation
Click-lock planks have a tongue-and-groove or angled locking edge milled into each side. You fit one plank into the next at a slight angle, then press or tap it flat until the edges lock together. The result is a floating floor: the planks connect to each other but aren’t fixed to the subfloor, so you usually don’t need adhesive.
How to Install Click-Lock Vinyl Plank Flooring
Click-lock installation is a floating-floor process. Work row by row methodically, and don’t rush the first row since it sets the alignment for everything after it.
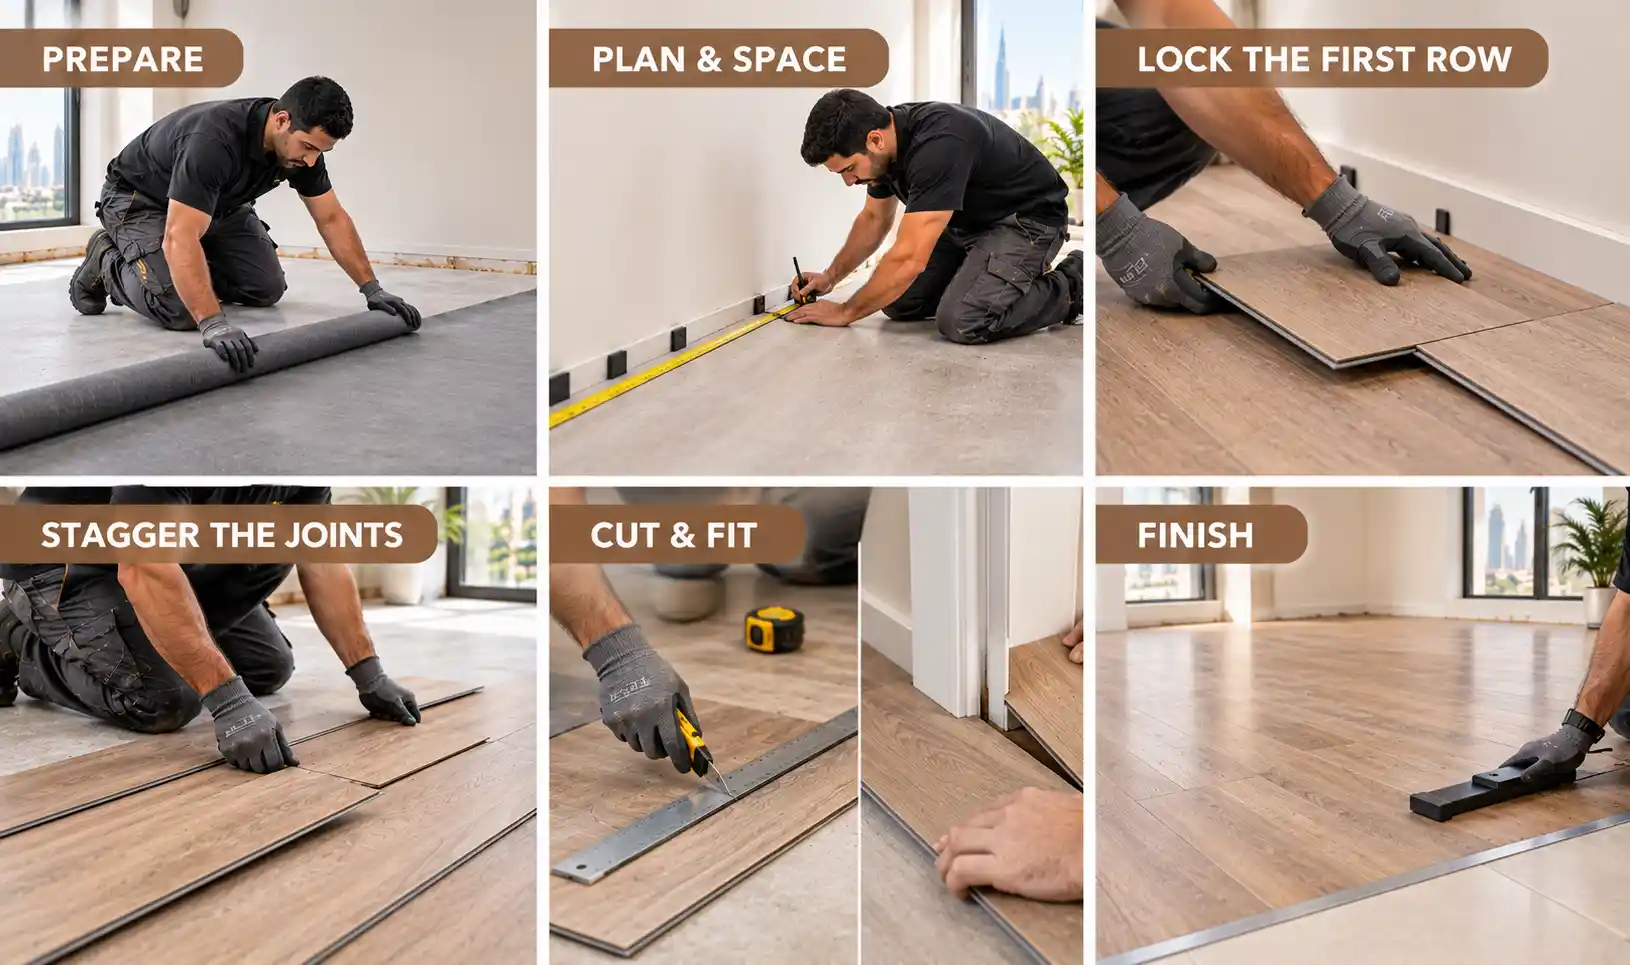
- Prepare the Subfloor: Clean, flatten, and inspect the subfloor first. Lay any required underlayment if your planks don’t have one built in.
- Plan the First Row: Measure the starting wall and mark a straight reference line using a chalk line or straightedge.
- Set the Required Spacing: Place spacers along the starting wall to maintain the expansion gap called for by your product’s instructions.
- Cut the First Plank if Needed: If a full plank won’t give you a balanced final row, trim the first plank to the width you calculated during layout planning.
- Install the First Row: Position the first plank against the spacers and reference line. Connect the next plank at a slight angle into the groove, then press it flat until it locks.
- Connect Subsequent Planks: Continue along the row, using a tapping block and rubber mallet on the short ends to close any small gaps without damaging the edges.
- Stagger the Joints: Start the second row with an off-cut or a fresh plank cut to a different length, so the end joints don’t line up with the row before it.
- Continue Across the Room: Work row by row, checking periodically that rows stay straight and that the reference line is being maintained.
- Cut the Final Pieces: Measure and cut planks for the last row, factoring in the expansion gap at the far wall.
- Fit Around Obstacles: Cut notches or partial planks to work around door frames, vents, and other permanent fixtures.
- Complete the Final Row: Use a pull bar to draw the last row tightly into place if there isn’t room to tap it with a mallet.
- Install Transitions and Trim: Fit transition strips where the new floor meets another surface, then reinstall baseboards or trim to cover the expansion gap.
Advantages: no wet adhesive to manage, a relatively fast install for a DIYer, and individual planks can sometimes be unlocked and replaced without tearing out the whole floor.
Limitations: a floating floor telegraphs subfloor dips and high spots more than a bonded floor, and the locking mechanism depends on accurate, square cuts to keep working properly.
Where it suits: click-lock is a common choice for DIY installations, rental properties, and rooms where the subfloor is already in reasonably good condition.
Method No.2: Glue-Down Installation
Glue-down planks are secured to the subfloor with adhesive, either spread across the whole floor with a trowel or, in some products, applied only at the seams. The adhesive holds the floor in place, so bond quality depends entirely on how well the subfloor was prepared beforehand.
Subfloor preparation matters more here than with any other method. Dust, grease, moisture, or an uneven surface can all weaken the bond, leading to lifting planks or visible ridges later.
How to Install Glue-Down Vinyl Plank Flooring
Glue-down installation moves at the pace of your adhesive, so read the product’s instructions in full before you start and work in sections you can comfortably finish.
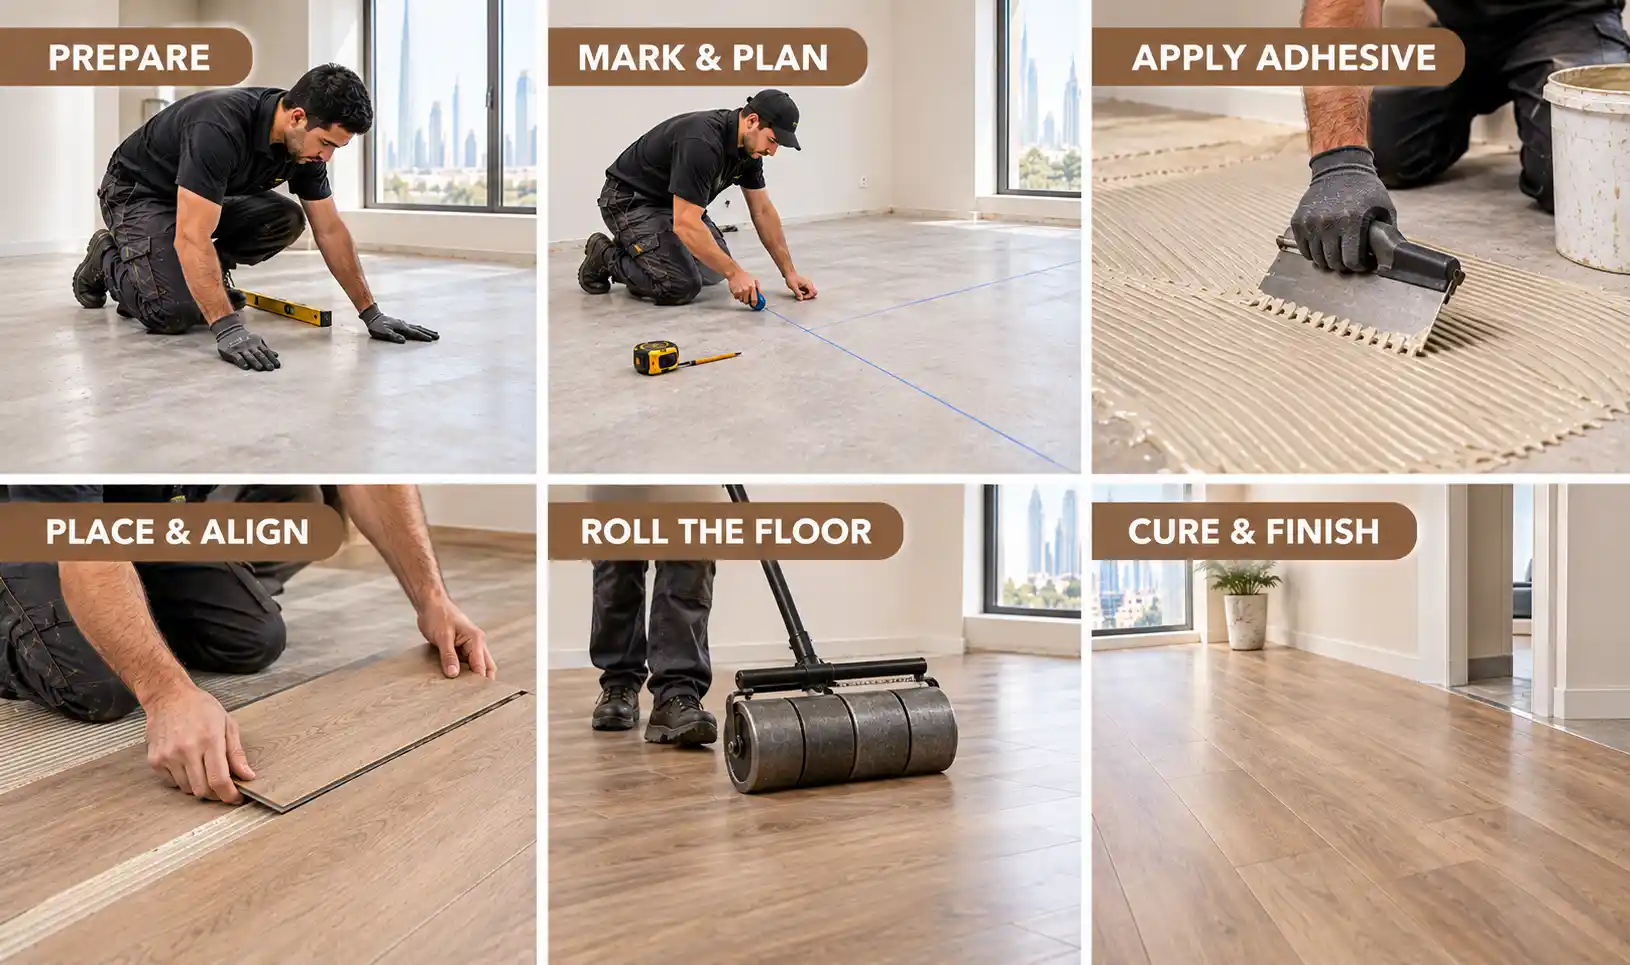
- Prepare and Inspect the Subfloor: Clean, level, and check the subfloor thoroughly. This matters more with glue-down flooring than with any other method, since the bond depends on it.
- Plan the Layout: Work out your starting wall, plank direction, and final row width as described in the layout section above.
- Mark Reference Lines: Snap chalk lines across the subfloor so you have a clear guide to keep rows straight as you work.
- Select the Correct Adhesive: Use the adhesive specified by your flooring manufacturer. Different vinyl plank products call for different adhesive types, and using the wrong one can affect the bond.
- Apply Adhesive According to Manufacturer Instructions: Spread adhesive with the recommended trowel notch size, following the coverage and open-time guidance on the product’s data sheet or instructions.
- Place the Planks: Set each plank into the adhesive along your reference lines, working from your starting point outward.
- Maintain Alignment: Check regularly that planks are staying straight and that joints are closing tightly, adjusting before the adhesive begins to set.
- Cut Planks Where Necessary: Measure and cut planks for edges, corners, and the final row as you reach them.
- Work Around Obstacles: Cut planks to fit around door frames, pipes, and fixed fittings, keeping the same care with alignment.
- Press or Roll the Flooring When Required: Use a floor roller across the installed area to improve adhesive contact and remove trapped air, if the manufacturer recommends this step.
- Allow the Adhesive to Cure According to Instructions: Keep foot traffic and furniture off the floor for the period specified by the adhesive manufacturer before returning the room to normal use.
- Complete the Edges and Transitions: Fit transition strips and reinstall baseboards once the adhesive has set enough to handle without disturbing the planks. Adhesive coverage rates, open times, and cure times vary widely between products. Always follow the specific instructions printed on your adhesive and flooring packaging rather than a generic timeframe.
Advantages: a firm, stable floor that resists shifting underfoot, and good performance in larger or heavily used spaces.
Limitations: adhesive application takes skill and working speed, individual planks are difficult to remove later, and the subfloor needs more thorough preparation than a floating install.
Where it suits: glue-down installation tends to suit larger open areas, commercial-style spaces, and situations where the flooring manufacturer specifically calls for a fully bonded floor.
Method No.3: Peel-and-Stick Installation
Peel-and-stick planks arrive with an adhesive backing already applied, protected by a release paper. You peel the paper away and press the plank onto the subfloor, so you don’t have to mix, spread, or manage open time.
Because the adhesive layer is thin and pressure-sensitive, the subfloor must be clean, dry, and smooth to grip properly. Any dust, grit, or unevenness sits directly under the plank and can weaken the bond or show through the surface.
How to Install Peel-and-Stick Vinyl Plank Flooring
Peel-and-stick installation is the most straightforward of the three methods, but it leaves little room for a poorly prepared subfloor.
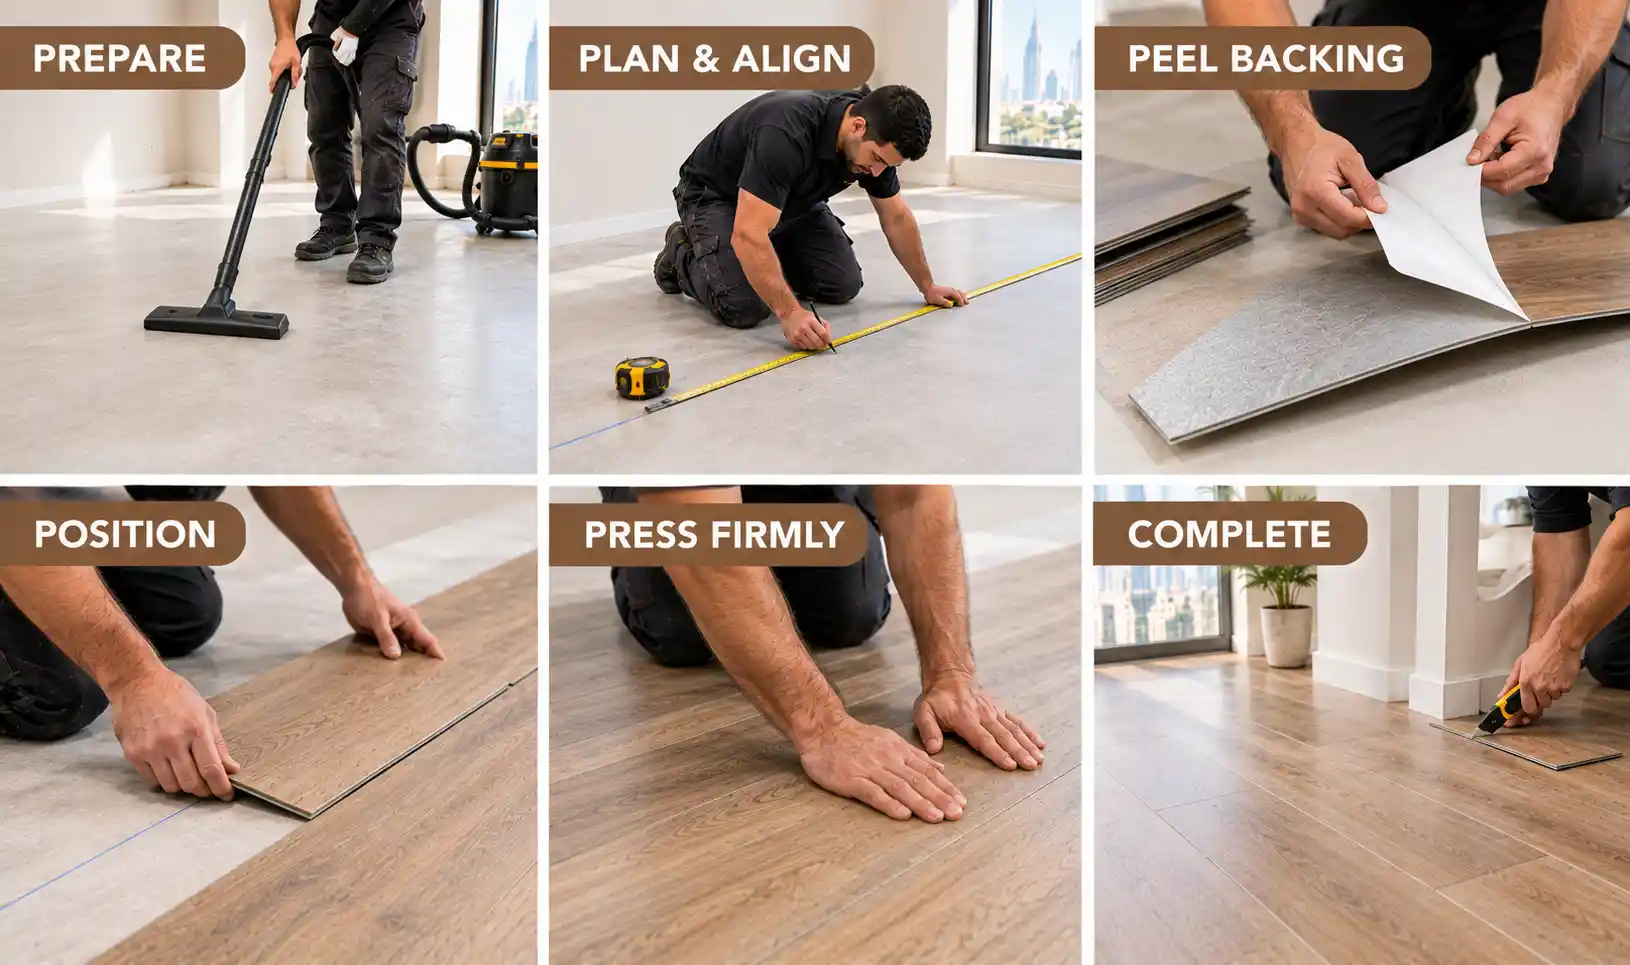
- Prepare the Subfloor: Repair, flatten, and inspect the subfloor following the general subfloor guidance above.
- Clean and Dry the Surface: Vacuum and wipe down the subfloor so it’s completely free of dust, grit, and any residue. Let it dry fully before continuing.
- Plan the Layout: Measure the room and decide on plank direction, starting wall, and final row width, as covered in the layout section.
- Mark Reference Lines If Needed: Snap a chalk line or use a straightedge to keep your first row straight.
- Remove the Protective Backing: Peel the release paper from the back of the plank just before positioning it, rather than in advance.
- Position the Plank Carefully: Line the plank up against your reference line and neighboring planks before letting it make contact, since the adhesive grips on first touch.
- Press the Plank Firmly: Press from the center outward to seat the plank evenly and avoid trapping air underneath.
- Continue Across the Room: Work plank by plank, keeping joints tight and checking alignment as you go.
- Cut Planks Around Obstacles: Trim planks to fit door frames, vents, and fixed fittings as you reach them.
- Complete the Final Row: Measure and cut the last row to fit, maintaining any gap called for by the manufacturer.
- Install Transitions and Trim: Fit transition strips at doorways and reinstall baseboards to finish the edges. Because the adhesive backing needs proper contact with the surface to hold long-term, don’t rush the cleaning step. A subfloor that looks clean can still carry a fine layer of dust that weakens the bond over the following weeks.
Advantages: the simplest installation of the three methods, with minimal tools and no adhesive to prepare.
Limitations: the bond is generally less durable over time than trowel-applied adhesive, and imperfections in the subfloor are more likely to show through the finished surface.
Where it suits: peel-and-stick works well for smaller rooms, budget-conscious projects, and situations where a quick, low-tool update is the priority.
How to Plan the Vinyl Plank Layout?
A few minutes of planning before you lay any planks prevents a lopsided-looking final row and cuts down on wasted material.
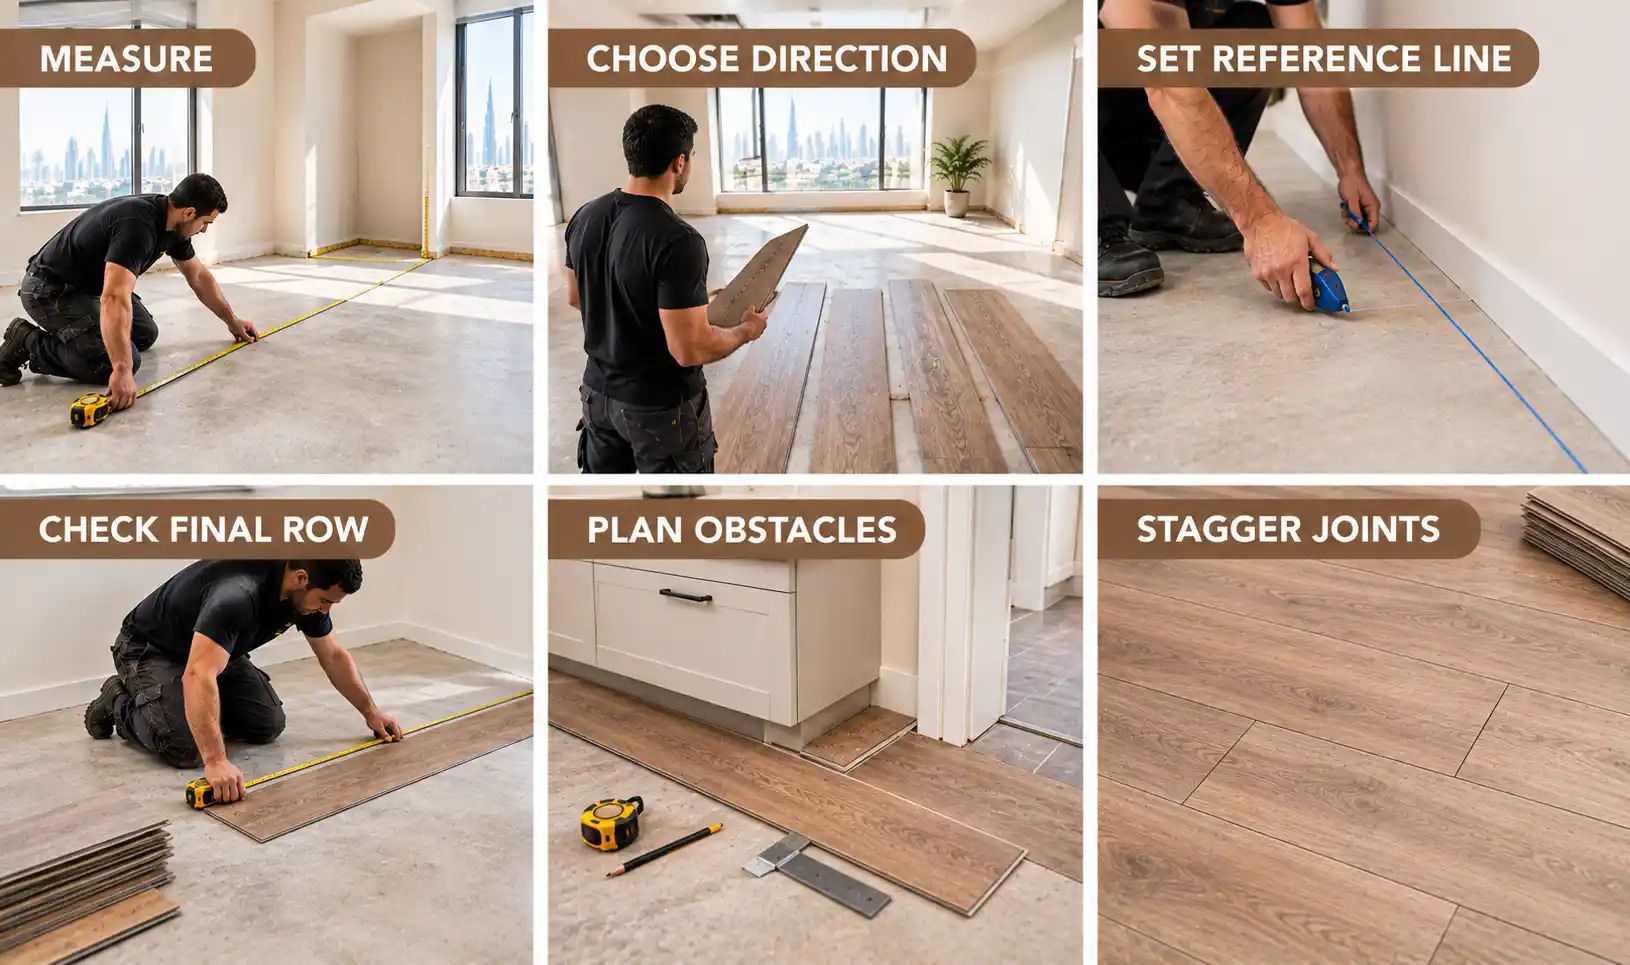
Measure the room’s length and width, including any alcoves, closets, or protrusions that will need flooring. Decide which direction the planks will run. Many installers run planks parallel to the longest wall or toward the main light source, though this is ultimately a visual choice. Choose a starting wall, usually the longest or straightest wall in the room, and establish a reference line to work from. Calculate the width of your final row before you start. If it will end up narrower than roughly half a plank, trim the first row instead so both the first and last rows are a similar, more balanced width.
Dry-lay a few rows, or measure carefully, around fixed obstacles like cabinets, fireplaces, or built-in units so you know where cuts will fall. Plan how planks will transition at doorways into other rooms or flooring types. Keep your layout consistent across the whole room rather than restarting your pattern partway through. Stagger the end joints between rows so seams don’t line up in a repeating pattern, which both looks better and adds strength to the floor.
Skipping this step is one of the most common reasons DIY installations end up with an oddly narrow strip of planks against the far wall, or with a pattern that doesn’t line up the way it looked in the box.
How to Cut Vinyl Plank Flooring
Accurate cuts keep joints tight and locking mechanisms working properly. Measure twice before cutting anything, since a plank cut too short usually can’t be reused.
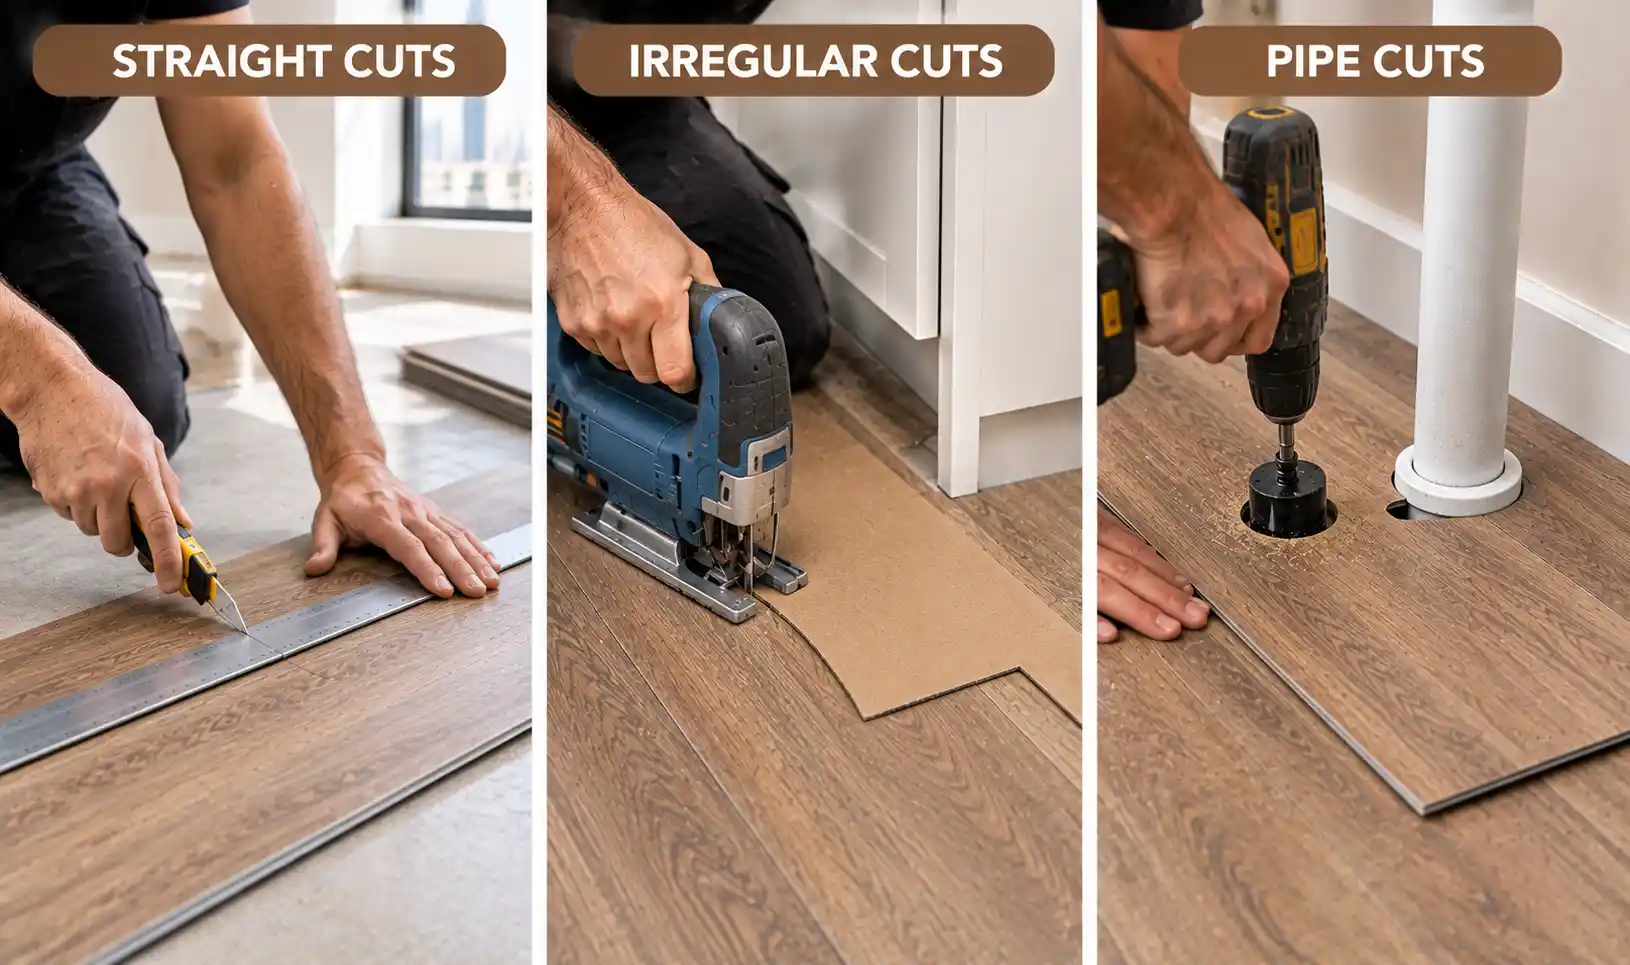
Straight and End Cuts
Mark your cut line clearly with a pencil and straightedge. For most vinyl planks, score along the line with a sharp utility knife, then bend the plank along the score to snap it cleanly. A few passes with the knife work better than trying to cut through in one stroke, which tends to drag the blade off line.
Notches and Irregular Cuts
For notches around corners, cabinets, or irregular walls, mark the shape carefully using a piece of cardboard or paper as a template, then transfer it to the plank. A jigsaw with a fine-toothed blade gives cleaner results than a utility knife on complex shapes.
Cuts Around Pipes
Mark the pipe’s position on the plank, then drill a hole slightly larger than the pipe’s diameter. Cut a straight line from the plank’s edge to the hole so the piece can be fitted around the pipe, and the cut line will be hidden once the pipe cover or trim is in place.
Thicker or rigid-core planks may need a jigsaw or a dedicated flooring cutter instead of a utility knife, since they don’t score and snap as easily as thinner, more flexible products. Check what your specific plank’s thickness and construction call for before committing to one cutting method for the whole job.
How to Install Vinyl Plank Flooring Around Doorways and Obstacles
Doorways, pipes, and fixed obstacles are where most installation mistakes happen, mainly because they require more precise measuring than a straight run of planks.
Door Frames and Jambs
Rather than cutting a plank to notch around a door jamb, many installers undercut the jamb instead. Use a handsaw or an oscillating tool laid flat against a scrap piece of the new flooring to trim the bottom of the jamb to the exact height needed. This lets the plank slide underneath for a cleaner finish than notching around it.
Pipes and Fixed Fittings
For radiator pipes or similar fixed obstacles, use the drill-and-cut technique described in the cutting section, and keep the cut piece’s grain or pattern direction consistent with the surrounding planks.
Corners and Irregular Walls
Older homes rarely have perfectly square corners. Scribe the wall’s actual shape onto a paper template before cutting the plank, rather than assuming a 90-degree angle.
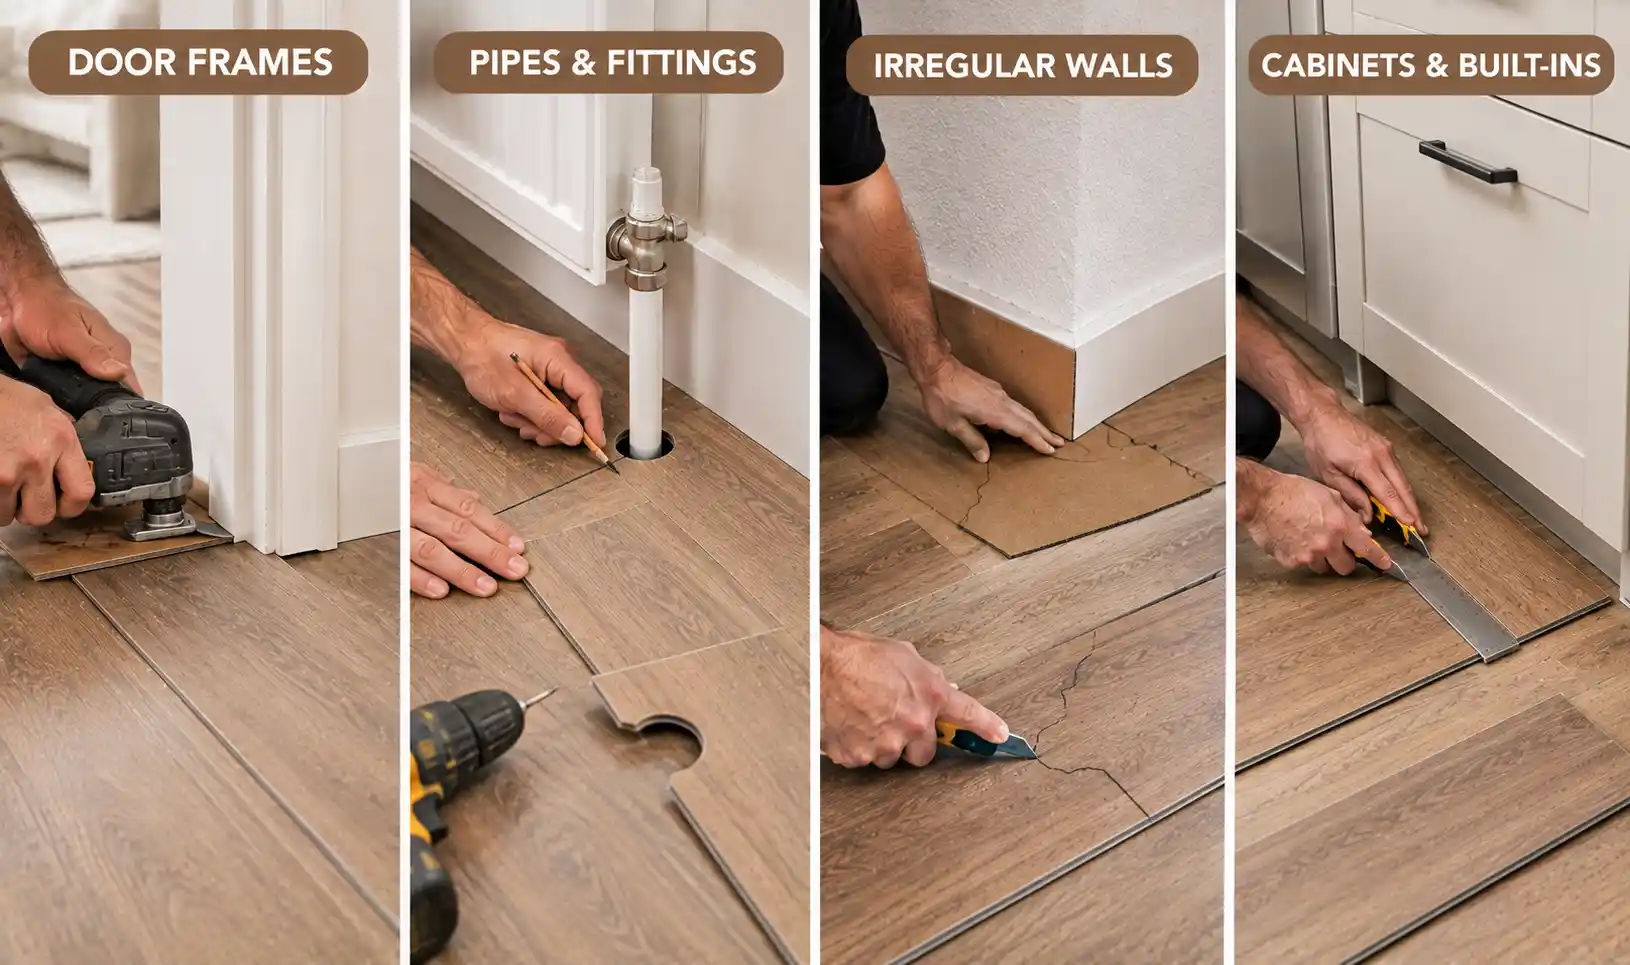
Cabinets and Permanent Obstacles
Measure fixed cabinets and built-ins carefully and cut planks to butt up against them. Avoid running floating flooring underneath cabinets or heavy fixed appliances, since it needs room to expand and contract.
Common Vinyl Plank Flooring Installation Mistakes & Solutions
Below is a list of the most common vinyl plank flooring installation mistakes and their solutions.
| Common Mistake | Solution |
| Installing over an unsuitable subfloor | Repair, level, and dry the subfloor before installation. |
| Ignoring moisture problems | Check for moisture and resolve the issue before installing. |
| Skipping layout planning | Plan the plank layout and starting point before cutting. |
| Starting with a very narrow final row | Adjust the first row so the final row has a practical width. |
| Failing to stagger joints | Offset end joints between rows according to the product instructions. |
| Making inaccurate cuts | Measure carefully and dry-fit each cut before installation. |
| Using the wrong adhesive | Use only the adhesive recommended for your specific vinyl plank. |
| Applying adhesive incorrectly | Follow the adhesive manufacturer’s trowel size, coverage, and drying instructions. |
| Failing to clean the subfloor | Remove dust, dirt, and debris before laying the planks. |
| Installing damaged planks | Inspect planks and replace damaged pieces before installation. |
| Ignoring manufacturer instructions | Follow the product-specific requirements for installation, gaps, acclimation, and underlayment. |
| Using the wrong underlayment | Check whether your flooring needs underlayment and use the specified type. |
| Incorrect spacing where required | Maintain the expansion gap recommended by the flooring manufacturer. |
How Long Does Vinyl Plank Flooring Take to Install?
No single timeframe applies to every project. Installation time depends on several factors working together, and any of them can add hours to a job that looks simple on paper.
- Room size: larger rooms take longer simply because there’s more flooring to lay.
- Room shape: irregular rooms with many corners need more cutting than a simple rectangle.
- Subfloor condition: a subfloor that needs repair or leveling adds time before installation even starts.
- Installation method: glue-down installations generally take longer than click-lock or peel-and-stick because of adhesive application and cure time.
- Number of cuts: rooms with lots of doorways, closets, or built-in features require more precise, time-consuming cuts.
- Furniture: rooms that can’t be fully cleared may need to be worked in sections.
- Doorways and obstacles: each one adds measuring and cutting time beyond a straightforward row of planks.
- Installer experience: a first-time DIYer will naturally work slower than someone who has installed flooring before.
Rather than aiming for a specific number of hours, it’s more useful to plan for the project to take longer than it looks, especially around cutting-heavy areas like doorways and obstacles.
Should You Install Vinyl Plank Flooring Yourself or Hire a Professional?
Both DIY and professional installation are reasonable choices, and the right one depends on your specific project, not a general rule.
| DIY Installation Works Well When | Professional Installation Makes More Sense When |
| Room has a simple, manageable layout | Subfloor needs major repair or leveling |
| Using click-lock or peel-and-stick planks | Installing glue-down flooring over a large area |
| Subfloor is clean, dry, and level | Room has complex cuts around cabinets or pipes |
| You have enough time to work carefully | Warranty requires professional installation |
| Project has minimal cutting and preparation | You want to save time and avoid physical work |
Final Words
Installing vinyl plank flooring can be a manageable DIY project when you choose the right installation method and start with a suitable subfloor. Click-lock, glue-down, and peel-and-stick planks each have different requirements, so the best option depends on the product, room conditions, and level of installation experience.
The quality of the finished floor comes down to accuracy. A well-planned layout, properly prepared subfloor, careful cuts, and correct installation technique can help prevent common problems such as gaps, uneven rows, lifting planks, and visible joints.
For straightforward rooms, DIY installation may be practical. Experienced flooring installers are better suited for larger spaces, complex layouts, extensive subfloor preparation, or manufacturer-specific installation requirements. Choosing the right approach from the start can save time, reduce material waste, and give you a more durable finished floor.
Frequently Asked Questions
Yes, particularly with click-lock or peel-and-stick products, which don’t require adhesive handling or specialized tools. A first attempt will usually take longer than an experienced installer would need, so plan extra time and start with a smaller or simpler room if possible.
Peel-and-stick installation is generally the simplest of the three methods, since it needs the fewest tools and no adhesive mixing or spreading. Its results still depend heavily on how well the subfloor is cleaned and prepared beforehand.
Some products require an acclimation period so the planks adjust to the room’s temperature and humidity before installation, while others don’t. Check your specific product’s instructions rather than assuming a standard timeframe applies.
It depends on the product. Some vinyl planks come with an attached underlayment and don’t need anything additional, while others require a separate underlayment layer. Adding an underlayment when the product already has one, or skipping one when it’s required, can cause problems.
Many click-lock products can be installed over sound, flat existing flooring such as tile or a single layer of vinyl, though this isn’t universal. Glue-down and peel-and-stick installations are more sensitive to what’s underneath, since the adhesive needs to bond to a suitable surface. Check the manufacturer’s guidance for your specific product.
There’s no single correct direction. Many installers run planks parallel to the longest wall or the main light source for a particular visual effect, but this is a design choice rather than a technical requirement.
Floating click-lock installations typically need a small expansion gap around the room’s perimeter to allow for natural movement, while glue-down installations may not need the same allowance. The exact gap size varies by product, so follow your specific manufacturer’s spacing instructions.
It depends on the room’s size and shape, the subfloor’s condition, the installation method, and the installer’s experience. A simple, small room with a good subfloor goes much faster than a large, obstacle-heavy space installed with glue-down planks.


