

How to Paint a Room: Tools, Steps & Painting Tips

To paint a room, empty and protect the space, clean and repair the walls, spot-prime any patched or bare areas, and then paint in a fixed order: ceiling first, walls second, trim last. On each surface, cut in the edges with an angled brush, fill the open areas with a roller, and apply two thin coats, waiting for the recoat time printed on the tin between them. A typical 12 m² (130 sq ft) bedroom takes a first-timer one to two days, with most of that time spent on preparation and drying rather than painting.
The rest of this guide by Floor Land explains each step in detail, why it matters, and how the method changes for bedrooms, two-color walls, one-day jobs, painting without tape, repainting over existing color, and ceilings.
Tools and Materials You Need for Painting a Room
Buying the right tools matters more than buying many of them for wall painting services. A quality brush and roller sleeve will produce a smoother finish with fewer coats than cheap equivalents, and both can be cleaned and reused for years.
- Paint and primer. Use a water-based (latex/acrylic) interior paint for the walls in your chosen sheen, and a dedicated flat ceiling paint if you are painting overhead, since it is thicker and spatters less. Keep a water-based all-purpose primer for repairs, plus a stain-blocking (shellac or oil-based) primer if there are water or smoke stains.
- Application tools. You need a 50–65 mm (2–2.5 in) angled sash brush with synthetic bristles for cutting in, a 230 mm (9 in) roller frame with a sleeve matched to your wall texture, an adjustable extension pole, and a roller tray with a disposable liner or a bucket with a grid.
- Preparation supplies. Gather low-tack painter’s tape, canvas drop cloths for the floor, plastic sheeting for luxury furniture, lightweight filler and a putty knife, sandpaper (120–150 grit for filler and 180–220 grit for scuffing glossy paint), mild detergent or sugar soap with a sponge, and a step ladder rated for your weight plus tools.
How to Paint a Room Step by Step
This sequence is what professional decorators follow on almost every painting job. Each step prevents a specific problem, which is explained alongside it.
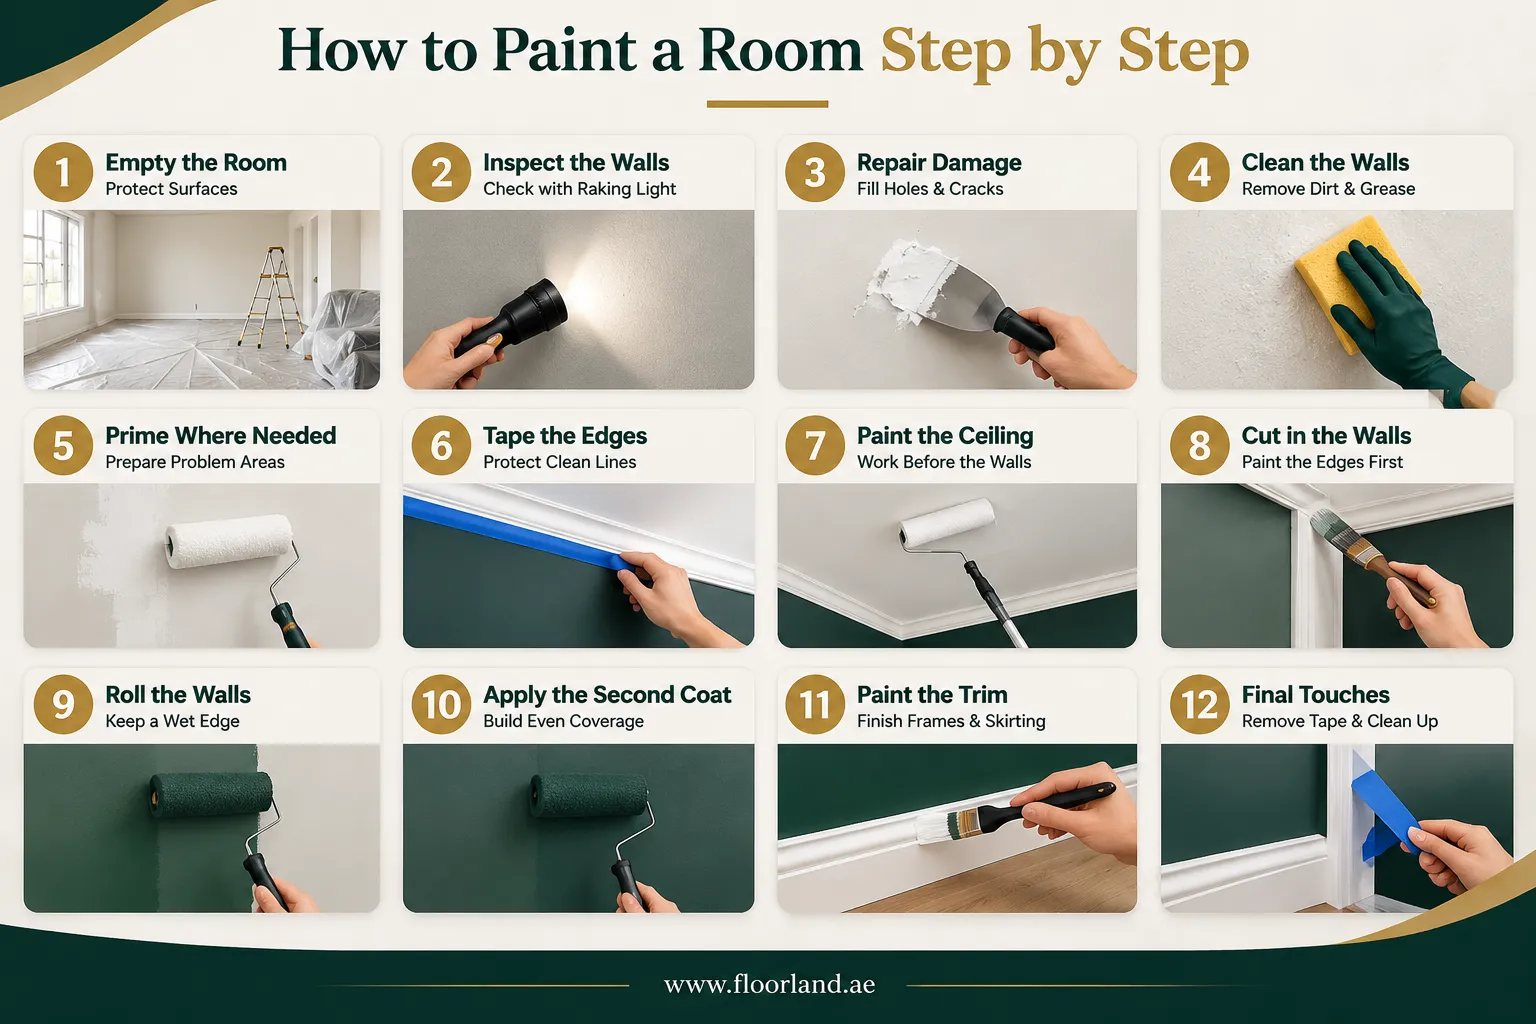
Step 1: Empty the Room and Protect Surfaces
Remove as much furniture as you can. Move anything that stays to the center of the room, at least a meter from the walls, and cover it with plastic sheeting. Take down custom curtains, rods, pictures, shelves, and wall-mounted items. Turn off power at the breaker if you plan to remove light switch and socket covers, and keep the screws in a labeled bag. Lay canvas drop cloths along every wall, overlapping the edges so no floor shows.
Step 2: Inspect the Walls with Raking Light
Hold a bright torch or work lamp flat against the wall so the light skims across the surface. This reveals dents, nail pops, cracks, and bumps that are invisible under normal room lighting. But become obvious once the wall has a fresh, uniform coat of paint. Lightly mark each defect with a pencil.
Step 3: Repair Holes, Cracks, and Damage
Fill small holes with lightweight filler, pressing it in with a putty knife and scraping it flush. Deep holes need two thin layers rather than one thick one, because thick filler shrinks and cracks as it dries. For hairline cracks at corners or where walls meet the ceiling, use a flexible, paintable decorator’s caulk rather than rigid filler, since these joints move with temperature and humidity. Once dry, sand repairs smooth with 120–150 grit paper and wipe away the dust.
Step 4: Clean the Walls
Wash walls with warm water and mild detergent or sugar soap, working from the bottom up to prevent streaks from running down dry, dirty areas, then rinse with clean water. Kitchens, hallways, and areas around light switches carry grease and skin oils that stop paint from bonding, which leads to peeling later. Let the walls dry completely before continuing. If you find mould, treat it with a mould cleaner and fix the moisture source before painting, or it will return through the new paint.
Step 5: Prime Where It Is Needed
Apply primer paint over every filled patch, any bare plaster or drywall, water or smoke stains, and glossy surfaces you have sanded. On sound, previously painted walls staying a similar color, primer is usually unnecessary. The primer section below includes a table showing exactly which situations need which type.
Step 6: Tape the Edges
Apply painter’s tape along skirting boards, door and window frames, and anywhere two different finishes meet. Press the tape edge firmly with a putty knife or plastic card. Unsealed tape lets paint creep underneath, which defeats the purpose. If you are painting the ceiling and walls in the same project, do not tape the ceiling line yet.
Step 7: Paint the Ceiling
Paint the ceiling first because drips and spatter fall downward onto walls you have not painted yet. Cut in a 50–75 mm band around the edge with a brush, then roll the ceiling in sections of roughly 1 m × 1 m using an extension pole. Finish each section with light passes in the same direction, running parallel to the main window so the light does not highlight roller lines. The ceiling and walls section later covers this in more detail.
Step 8: Cut in the Walls
Pour paint into a small handheld pot rather than working from the tin. Dip the brush about a third of the bristle length and tap off the excess against the side. Paint a band about 50 mm wide along the ceiling line, internal corners, above the skirting, and around frames and sockets.
Cut in one wall at a time, then roll that wall straight away. If you cut in the entire room first, the brushed band dries before you roll next to it, and the texture difference shows as a visible outline, often called “picture framing”.
Step 9: Roll the Walls
Load the roller by rolling it into the paint and then back over the tray’s ridged area until the sleeve is evenly saturated but not dripping. Start about 30 cm from a corner and apply paint in a large “W” or “N” pattern over an area roughly 1 m wide. Without reloading, fill in that area with parallel strokes, then finish with light top-to-bottom passes. Move to the next section and overlap slightly into the still-wet paint.
Why it matters: rolling into wet paint (keeping a “wet edge”) blends each section into the last. Rolling over paint that has started to dry leaves lap marks that stay visible in raking light.
Step 10: Apply the Second Coat
Wait for the recoat time listed on the tin, usually 2–4 hours for water-based paint. Touch-dry is not the same as ready to recoat; applying the second coat too early can drag and lift the first. Repeat the cutting-in and rolling process. The second coat evens out color depth and sheen, and it is almost always needed, even with paint marketed as one-coat.
Step 11: Paint the Trim
Once the walls are dry, paint skirting boards, door frames and window frames. Trim normally takes a harder-wearing satin or semi-gloss finish. Use a smaller brush (38–50 mm) and paint each board in long strokes. If the trim was previously coated in oil-based gloss, sand it and apply a bonding primer first, as covered in the repainting section.
Step 12: Final Touches
Remove tape while the final coat is still slightly soft, pulling it back on itself at a 45° angle. If the paint has fully dried, score along the tape edge with a sharp blade first so it does not tear the paint film. Clean brushes and rollers in warm, soapy water until the water runs clear. Refit switch plates once the paint is dry to the touch, but wait at least 24 hours before pushing furniture against walls and two to four weeks before scrubbing them, as the paint is still curing.
How Much Paint Do You Need for a Room?
Measure the width of each wall and multiply by the ceiling height. Add the walls together to get the total wall area, then subtract large openings such as doors (roughly 2 m² each) and windows. Divide the result by the coverage rate on the tin, which is usually 10–14 m² per liter (about 350–400 sq ft per US gallon) for one coat. Multiply by two for two coats.
Rough, porous, or freshly patched surfaces absorb more paint, so round up, not down. Leftover paint is useful for touch-ups later, and buying one extra tin avoids a mid-project shortage when the new batch doesn’t match perfectly.
| Worked example: 4 m × 3.5 m room, 2.5 m ceiling | Calculation | Result |
| Total wall area | (4 + 3.5 + 4 + 3.5) × 2.5 | 37.5 m² |
| Subtract one door and one window | 37.5 − 2 − 1.5 | 34 m² |
| Paint for two coats at 12 m²/L | (34 ÷ 12) × 2 | ≈ 5.7 L, so buy 6 L or more |
| Ceiling area | 4 × 3.5 | 14 m² |
| Ceiling paint for two coats | (14 ÷ 12) × 2 | ≈ 2.3 L, so buy 2.5–3 L |
Choosing the Right Paint and Finish for the Room
Sheen affects durability, how easy the wall is to clean, and how visible imperfections are. Higher sheen is tougher and more washable but reflects more light, so it highlights every dent and roller mark.
| Finish | Appearance | Durability | Best for |
| Flat / matte | No shine, hides flaws well | Lowest; marks can be hard to wash | Ceilings, adult bedrooms, low-traffic living areas |
| Eggshell | Very low sheen | Moderate; wipeable | Living rooms, bedrooms, hallways |
| Satin | Soft, pearl-like sheen | High; washable | Kitchens, children’s rooms, bathrooms, trim |
| Semi-gloss | Noticeable shine | Very high; scrub-able | Trim, doors, cabinets, bathrooms |
| Gloss | Mirror-like | Highest | Doors, trim, furniture accents |
For quality, the difference between budget and mid-range paint is usually in the pigment and binder content. Higher-quality paint covers in fewer coats, levels out brush and roller marks better, and resists scuffing. Check the coverage rate and wash-ability rating on the label rather than relying on price alone.
Primer Paint: When You Need It and Which Type to Use
Primer bonds to the surface and gives the topcoat a uniform base. It is not always required, but skipping it in the wrong situation causes patchy sheen, stains bleeding through, or peeling.
| Situation | Primer needed? | Recommended type |
| Sound, clean, previously painted wall in a similar color | Usually no | Go straight to topcoat |
| Filled holes or patched areas | Yes (spot-prime) | Water-based all-purpose primer |
| New plaster or new drywall | Yes | Mist coat (diluted emulsion) on new plaster, or drywall primer-sealer |
| Dark color to light color | Yes | High-hide primer, ideally tinted grey or towards the new color |
| Water stains, smoke or nicotine marks | Yes | Stain-blocking primer (shellac or oil-based) |
| Glossy or oil-based existing paint | Yes, after sanding | Bonding primer |
| Bare wood trim or knots | Yes | Wood primer; knotting solution or shellac over knots |
| Bathroom or damp-prone walls | Often | Mold-resistant primer |
Tip: New plaster must be completely dry before priming. It turns from dark pink or grey to an even pale color with no dark patches. Depending on thickness and ventilation, this can take one to several weeks.
How to Paint a Room with a Roller
A roller covers large areas quickly and leaves an even texture, but only if the sleeve suits the surface. The “nap” or “pile” is the length of the fibers: short nap leaves a smoother finish, and longer nap carries more paint into texture.
| Surface | Nap/pile length | Notes |
| Smooth walls, doors, cabinets | 6–10 mm (1/4–3/8 in) | Smoothest finish; best with satin and gloss |
| Standard walls and ceilings (light texture) | 10–13 mm (3/8–1/2 in) | The all-round choice for most rooms |
| Textured walls, popcorn or rough ceilings | 18–20 mm (3/4 in) | Pushes paint into crevices |
| Brick, block, heavy stucco | 25 mm (1 in) or more | High paint consumption |
Before first use, wrap masking tape around a new sleeve and peel it off to remove loose fibers. With water-based paint, dampen the sleeve with water and spin or blot it nearly dry; this helps it absorb paint evenly from the first stroke.
Keep the roller loaded. A nearly dry roller leaves a thin, streaky film and tempts you to press harder, which creates ridges (called “tram lines”) at the roller edges. Use light, even pressure and let the paint do the work. When a wall is complete, run the roller lightly from ceiling to floor in one continuous pass per strip to “lay off” the finish so the texture is uniform.
Between coats on the same day, wrap the roller and brush tightly in cling film or a plastic bag instead of washing them. This keeps them usable for several hours without drying out.
How to Paint a Room and Ceiling
When you paint both, paint the ceiling first, then the walls, then the trim. Use a flat ceiling paint, formulated to spatter less and hide the roller marks that raking light from windows would otherwise expose.

Cut in the ceiling first, letting the brush run slightly onto the top of the walls (5 mm or so). This overlap is covered when you cut in the walls later, and it ensures no gap at the junction. Roll the ceiling with an extension pole rather than from a ladder; you apply more even pressure, you can see the wet sheen to spot misses, and you do not have to keep moving the ladder.
Work in strips across the room’s shortest dimension so each strip stays wet when you start the next one. Wear safety glasses and a cap, since ceiling paint inevitably flicks downward. If the ceiling has stains from old leaks, confirm the leak is fixed and seal the stain with stain-blocking primer first, or it will bleed through ordinary ceiling paint.
How to Paint a Bedroom
A bedroom follows the standard process, with a few adjustments because you’ll be sleeping in it soon after painting.
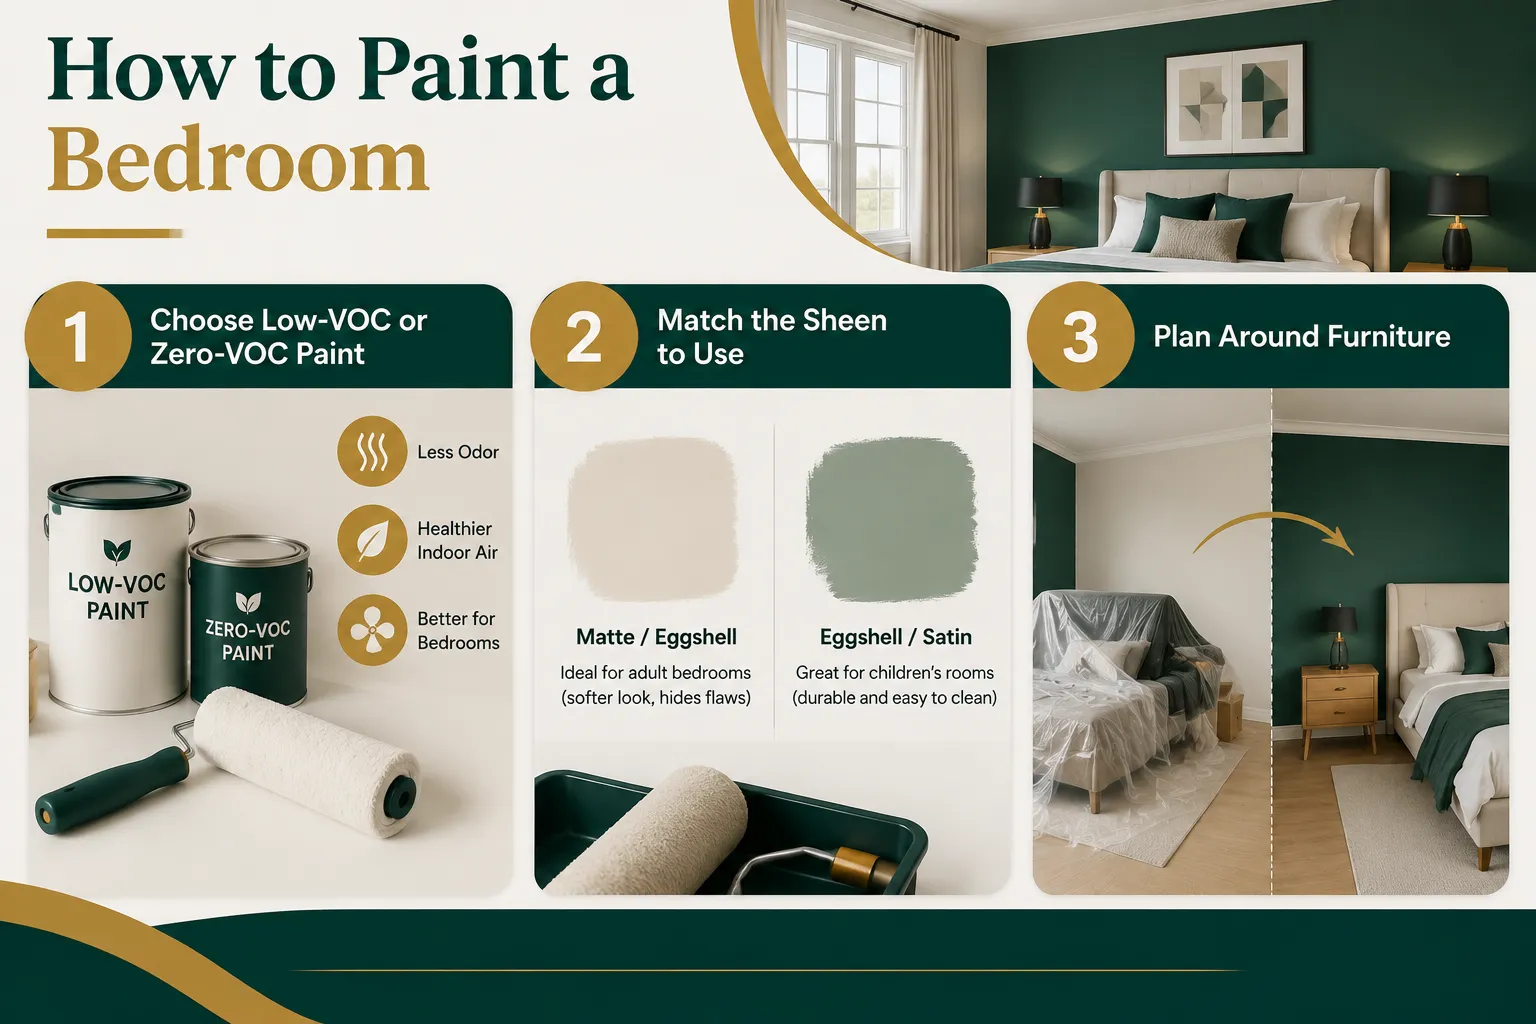
- Choose low-VOC or zero-VOC paint. Volatile organic compounds are released as paint dries and cause the strong smell associated with fresh paint. Low-VOC products reduce odor and are the better choice for bedrooms, nurseries, and poorly ventilated rooms. Keep windows open and run a fan to move air outward during and after painting. If possible, sleep in another room for the first night.
- Match the sheen to use. Matte or eggshell suits adult bedrooms because it softens light and hides flaws. Children’s rooms benefit from eggshell or satin, which withstands wiping.
- Plan around furniture. Beds and wardrobes are heavy, so it is often practical to paint the room in two halves: move furniture to one side, paint the opposite walls, let them dry, then swap. Pay particular attention to the wall behind the headboard, as it tends to be the focal wall and shows the most scuffing.
How to Paint a Room with Two Colors?
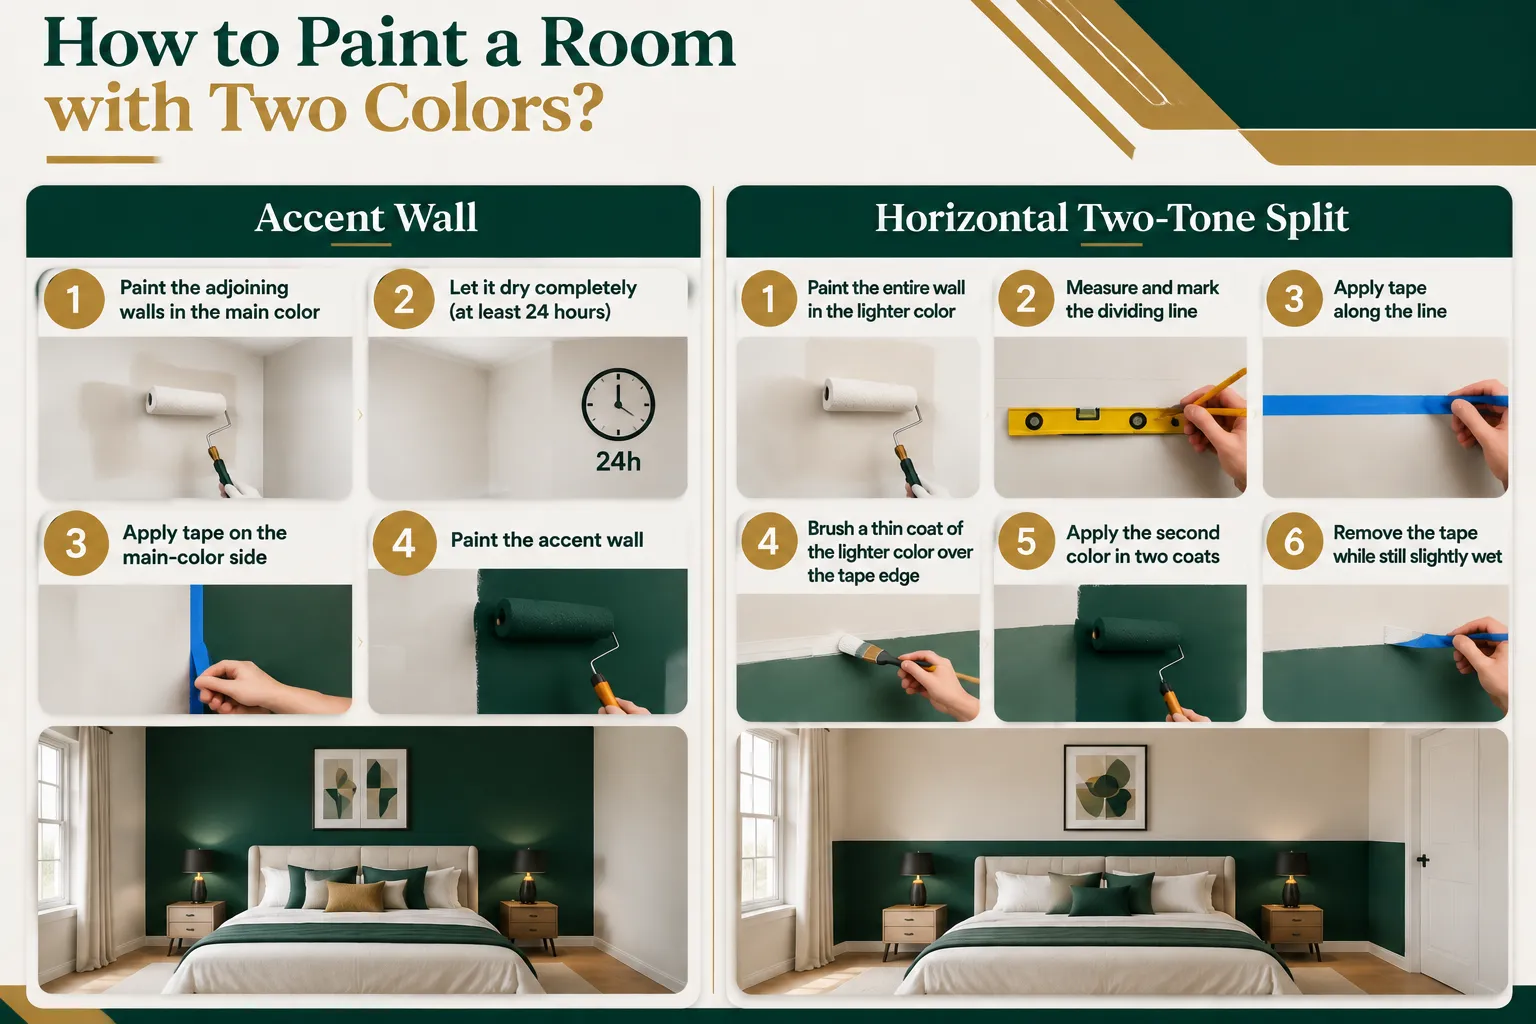
There are two common layouts: an accent wall, where one wall is a different color, and a horizontal split, where the lower and upper parts of the wall differ. Both rely on the same principle: paint the lighter color first, because a dark color covers a light one far more easily than the reverse.
Accent Wall
Paint the adjoining walls in the main color, letting the brush wrap slightly into the corner of the accent wall. Once completely dry (at least 24 hours for the sharpest tape line), apply tape to the main-color side of the corner, then paint the accent wall. Internal corners are rarely perfectly straight, so check the tape line by eye from across the room and adjust it before painting.
Horizontal Two-Tone Split
Paint the entire wall in the lighter color and let it dry. Measure the height of your dividing line from the floor at several points. A common proportion places the line about one third of the way up the wall, often 90–100 cm (36–40 in), which is typical chair-rail height. Floors and ceilings are often not level, so draw the line with a spirit level or laser level rather than measuring from the floor alone.
Apply tape along the line, then brush a thin coat of the base (lighter) color over the tape edge. Any paint that seeps under the tape is now the same color as the wall beneath it, and it seals the edge. Once that dries, apply the second color in two coats, and remove the tape while the final coat is still slightly wet for a crisp line.
How to Paint a Room in One Day
Painting a room in one day is realistic for a small to medium room with walls in good condition and a color change that will cover in two coats. It is not realistic if the walls need significant repairs, a dark color must be covered with a light one, or new plaster is involved. The key is moving slow-drying work to the evening before.
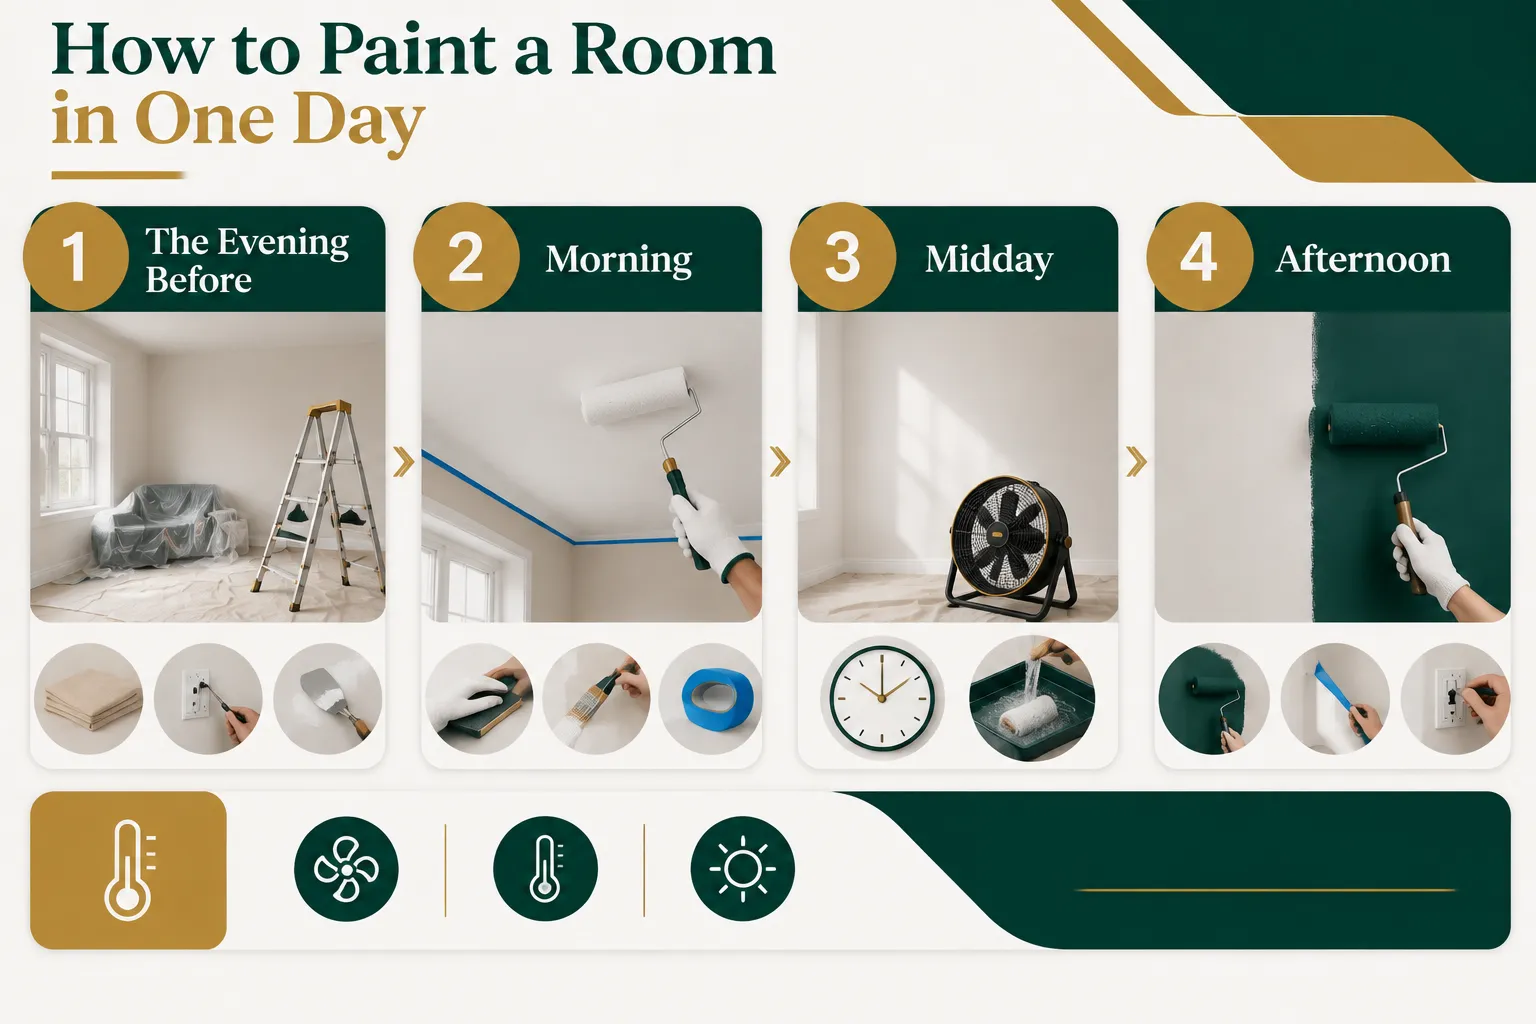
- The evening before: clear the room, lay drop cloths, remove switch and socket covers, and fill holes so the filler dries overnight.
- Morning: start around 8:00 by sanding repairs, wiping away dust, and washing greasy areas. Spot-prime the repairs with a fast-drying primer and tape the trim. If you are painting the ceiling, cut in and roll it by mid-morning, then move on to the first coat on the walls, finishing one wall at a time.
- Midday: allow two to four hours to dry, as stated on the tin. Use this window to clean the ceiling tools and take a break.
- Afternoon: apply the second coat to the walls, then remove the tape, clean your tools, and refit covers once the paint is touch-dry.
Speed up drying by keeping air moving with a fan and keeping the room between roughly 15°C and 25°C (60–77°F). Very hot, dry rooms can make paint dry too fast and show lap marks, while cold or humid rooms slow drying considerably. Never apply the second coat to paint that is still tacky; the time saved is lost fixing drag marks and peeling.
How to Paint a Room Without Taping
Many professional painters rarely use tape, because a practiced cutting-in technique is faster than taping and removing. It takes some practice, but the method is straightforward.
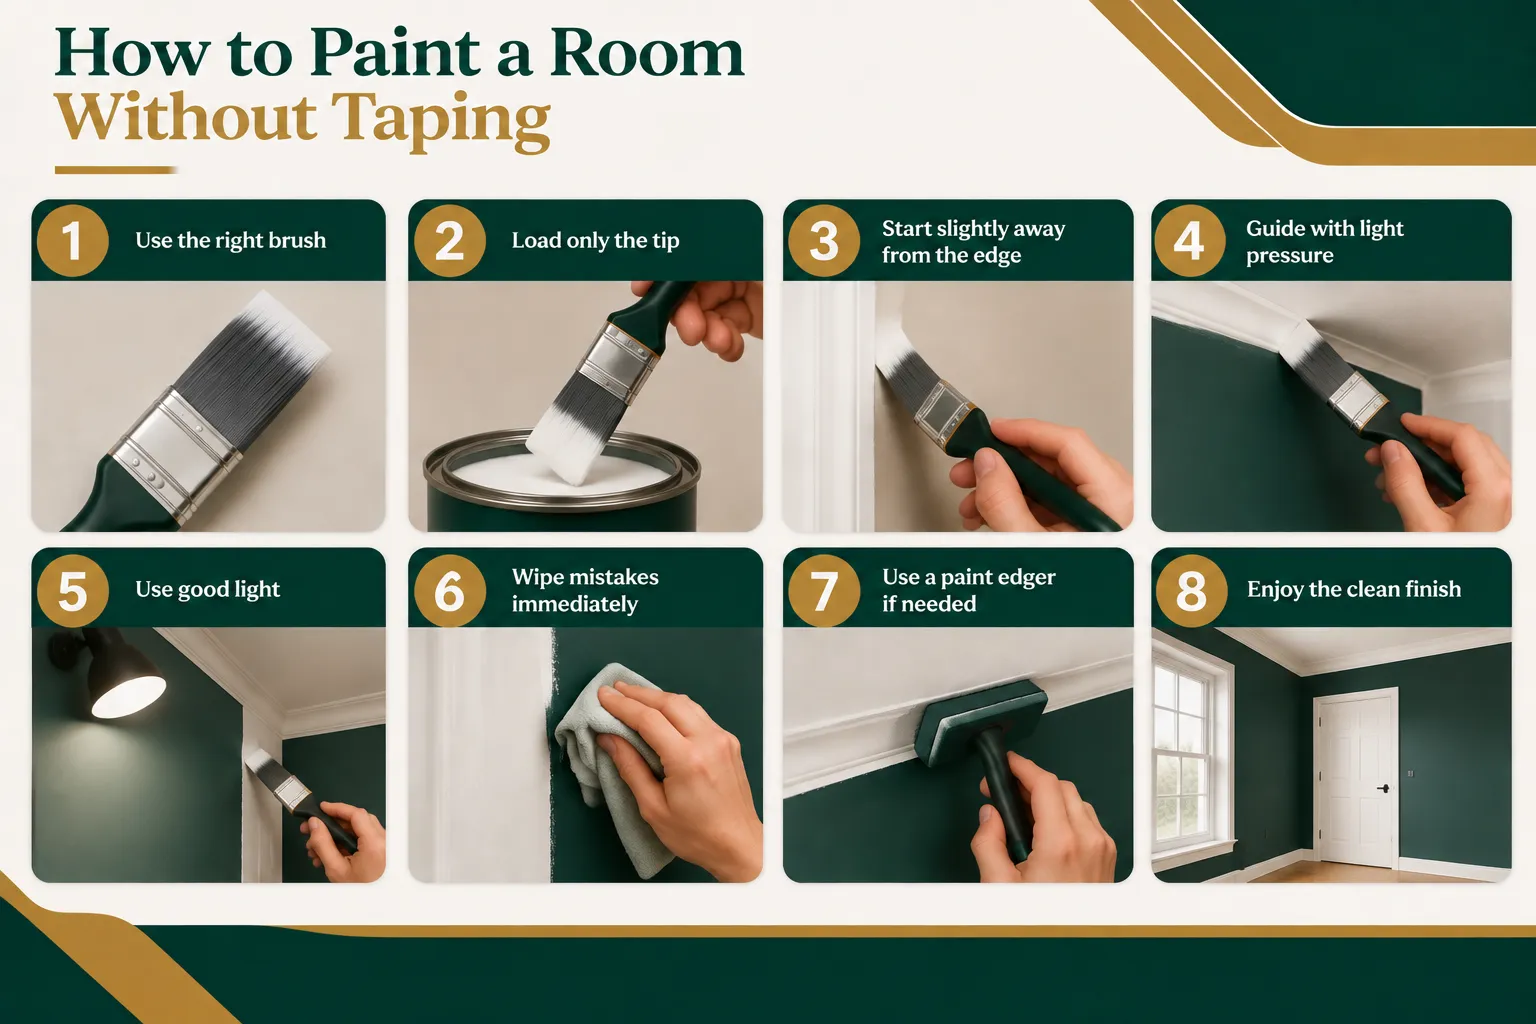
Use a quality angled sash brush, 50–65 mm wide, with fine synthetic bristles. Load only the tip of the brush and tap it against the inside of the pot instead of wiping it on the rim, which strips paint unevenly. Start by placing the brush on the wall about 10 mm from the edge you are aiming for and brush a short section to unload most of the paint. Then return and, with light pressure, let the bristles fan out and slowly guide the paint up to the edge in one long, steady stroke. Keep your wrist locked and move from the shoulder for straighter lines.
Work with good light, keep a damp cloth wrapped around a finger to wipe mistakes immediately, and do not try to cut in with a nearly empty brush, which leaves a ragged edge. A paint edger pad is a useful middle ground for ceiling lines and skirting if your hand isn’t steady yet.
How to Paint a Room That Is Already Painted
Most repainting jobs go over existing paint, and the main question is whether the new paint will bond. Start by checking the condition and type of the current finish.
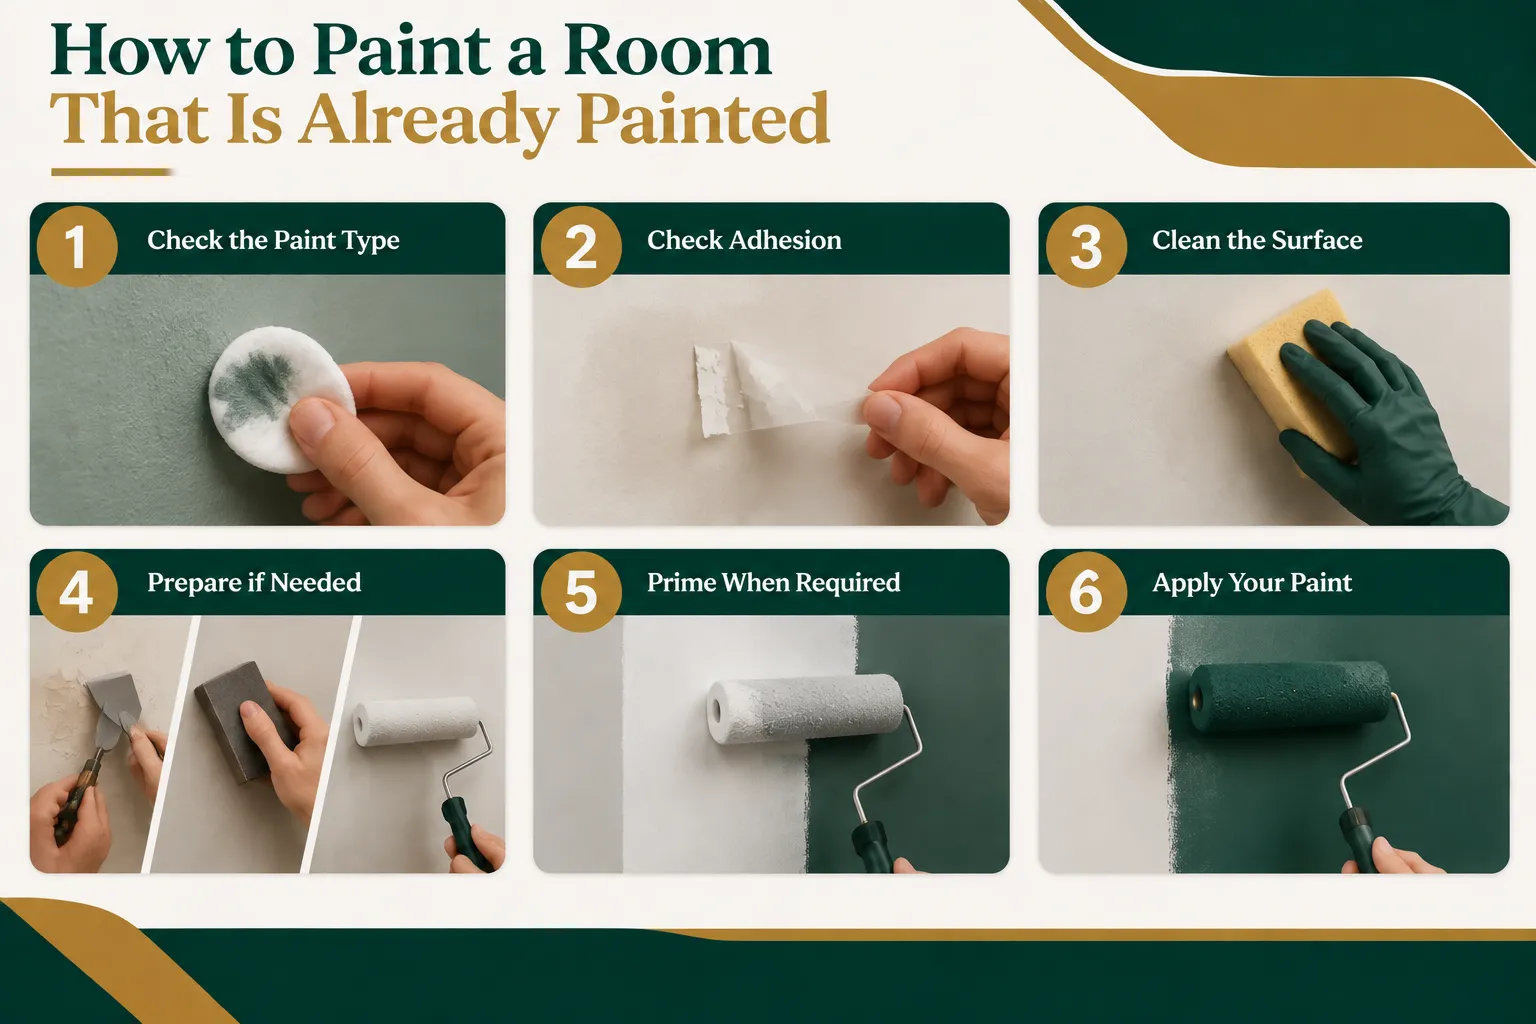
Check the paint type. Rub a small, hidden area with a cotton pad dampened with rubbing alcohol or methylated spirits. If paint transfers to the pad or the surface softens, it is water-based. If nothing happens, it is likely oil-based (alkyd). Water-based paint does not bond reliably to oil-based paint without preparation.
Check adhesion. Press a strip of tape firmly onto the wall and pull it off quickly. If flakes of paint come away, the existing paint is failing, and you must scrape, sand, and prime those areas.
Preparing by situation. Sound water-based paint only needs cleaning, filling and spot-priming. If you are moving from a dark to a light color, apply a high-hide primer across the whole wall. Oil-based or glossy paint must be sanded with 180–220 grit paper or treated with a liquid deglosser, then coated with a bonding primer. Scrape and feather peeling areas with sandpaper before priming, and use a stain-blocking primer for stains. In very old homes, test for lead before sanding anything (see the safety section).
If you are staying with a similar color on sound, clean, water-based paint, you can usually apply two coats directly with no primer beyond spot repairs.
Common Painting Problems and How to Fix Them
| Problem | Likely cause | Fix |
| Lap marks or stripes | Rolling over paint that had started to dry | Let dry, lightly sand if ridged, apply another coat keeping a wet edge |
| Visible outline around edges (picture framing) | Cut-in band dried before rolling | Recoat, rolling as close to edges as possible immediately after cutting in |
| Patchy dull spots | Unprimed filler or porous areas absorbing paint | Spot-prime the spots, then apply a full coat |
| Paint peeling | Dirty, greasy, or glossy surface; wet wall | Scrape, clean, sand, prime and repaint |
| Stains showing through | Water, smoke or tannin stains not sealed | Stain-blocking primer, then topcoat |
| Drips and runs | Overloaded brush or roller | Wipe while wet; once dry, sand flat and touch up |
| Paint bleeding under tape | Tape edge not sealed | Touch up with a fine brush; next time seal tape with base color |
| Roller fluff in paint | Cheap or new unprepared sleeve | Sand out once dry; pre-tape new sleeves; use quality sleeves |
| Color looks different between walls | Different batches or uneven coverage | Box paint; apply a further even coat |
Safety Considerations While Painting a Room
Take a look at some tips and tricks that you must consider while painting a room:
- Ventilation. Keep windows open and use a fan to push air out of the room while painting and during drying, even with low-VOC paint.
- Lead paint in older homes. Homes built before lead paint was restricted may contain it under newer layers. In the United States, this applies to homes built before 1978; other countries phased lead paint out at different times. Sanding or scraping lead paint creates hazardous dust. Use a lead test kit or a certified inspector before disturbing old paint, and follow local regulations if you find lead.
- Ladders. Keep three points of contact, never stand on the top step, and move the ladder rather than overreaching.
- Electrics. Switch off power at the breaker before removing switch and socket covers, and never paint inside electrical boxes.
- Disposal. Do not pour paint down drains. Let small amounts of water-based paint dry out in the tin before disposal, and take larger quantities or oil-based paint to a local recycling or hazardous waste facility, according to your local rules.
Final Words
A good room painting result comes down to preparation, the right products, and careful application rather than simply getting paint onto the walls. Repairing defects, cleaning the surface, using primer where needed, and allowing each coat to dry properly can prevent many common problems, from patchy coverage to peeling and visible roller marks.
The techniques also change depending on the project. A bedroom may need different ventilation and finish considerations, while two-color walls require more precise planning. If the walls have extensive damage, stubborn stains, moisture issues, or an incompatible existing coating, professional preparation can save time and prevent costly rework.
Take your time with the preparation, follow the paint manufacturer’s instructions, and inspect the finish under the room’s normal lighting before considering the job complete.
Frequently Asked Questions
How do you paint a room?
Clear and protect the room, clean and repair the walls, prime repairs and bare surfaces, then paint the ceiling, walls, and trim in that order. Cut in the edges with a brush, roll the open areas, and apply two coats with the correct drying time between them.
What order should you paint a room in?
Ceiling first, then walls, then trim and doors. This keeps drips from landing on finished surfaces and lets you cut the trim cleanly against dry walls.
Do I need to prime before painting?
Only in specific situations: over repairs, bare plaster or drywall, stains, glossy or oil-based paint, and dark-to-light color changes. Clean, sound walls in a similar color can usually be painted directly.
How many coats of paint does a room need?
Two coats of topcoat are standard for even color and sheen. Add a primer coat where needed. Very strong color changes may need a third coat.
Should I use a brush or a roller?
Both. Use a brush for edges, corners, and trim, and a roller for the main wall and ceiling areas. Rolling is faster and gives a more uniform texture on large surfaces.
How long should I wait between coats?
For most water-based paints, 2–4 hours. Oil-based paints usually need 16–24 hours. The tin will state the exact recoat time for that product.
Can I paint over dark walls with a light color?
Yes. Apply a high-hide primer first, ideally tinted grey or toward the new color, then two topcoats. Without primer, you may need three or four coats of the new color.