
How to Install Curtain Rod? 7 Different Methods Explained
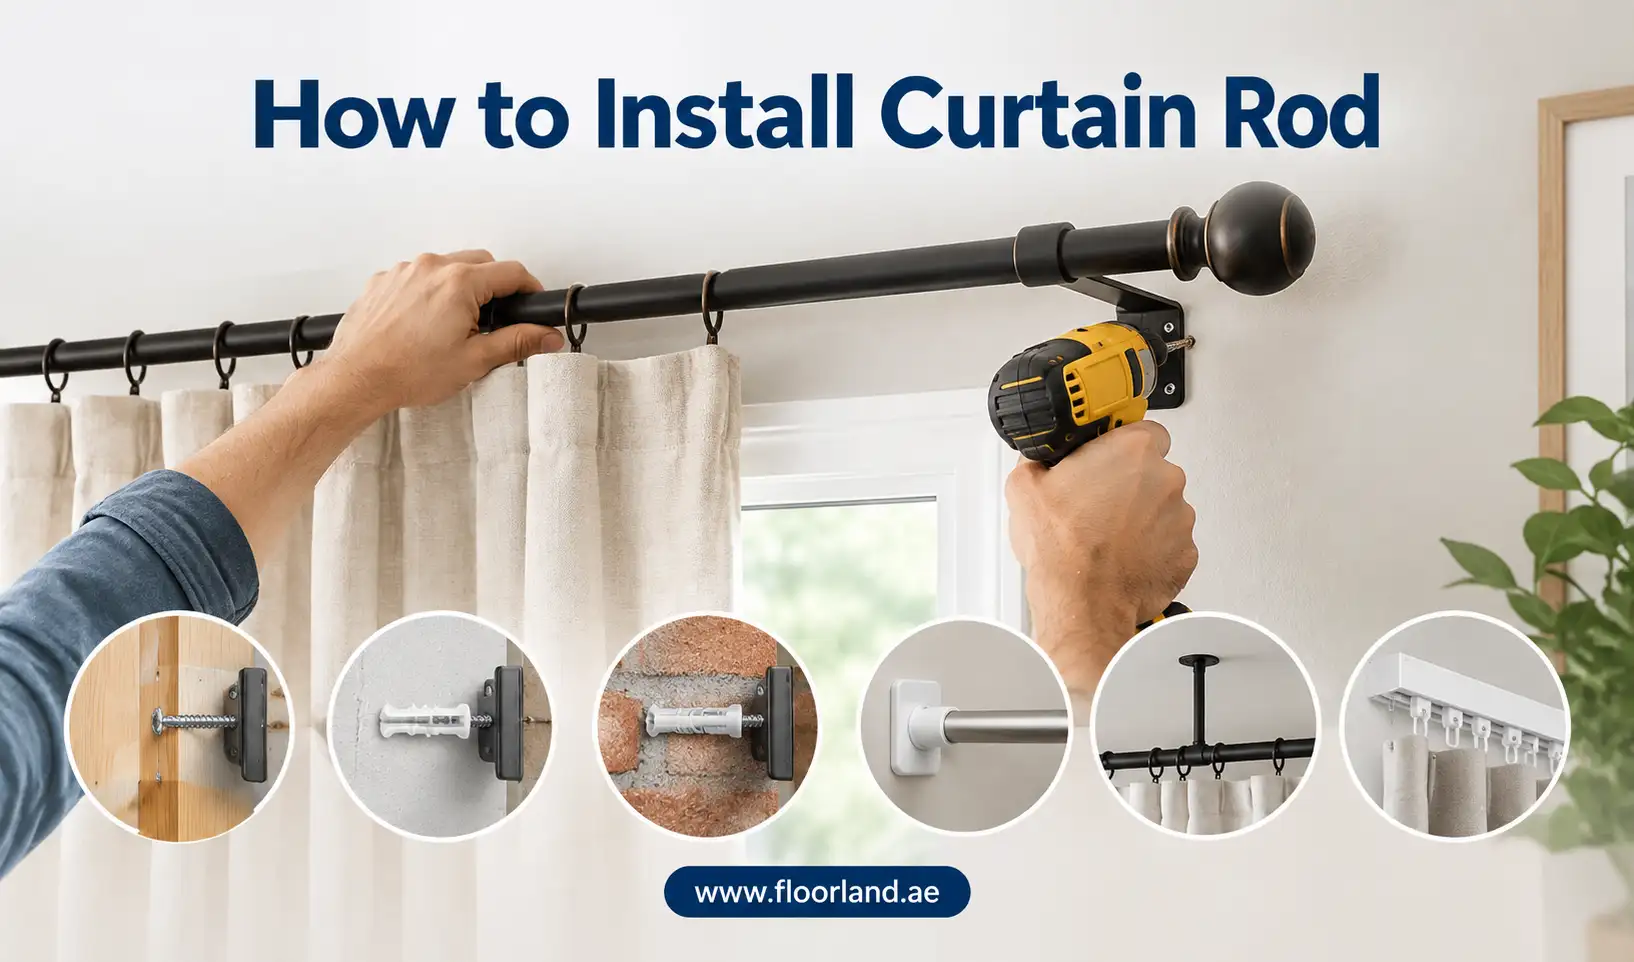
To install the curtain rod, measure 4–6 inches above and outside the window frame. Mark bracket holes, drill, insert wall anchors if needed, screw brackets tightly, mount the rod with curtains, and secure with set screws. There isn’t one single way to install a curtain rod. The right method depends on your wall (stud, drywall, brick, or concrete), whether you’re allowed to drill, and how heavy your curtains are.
This guide by Floor Land walks through seven distinct installation methods in full detail: mounting into a stud, mounting into drywall with anchors, mounting into masonry, two no-drill options, adding a center support for long or heavy rods, and installing a curtain track with gliders. Each method includes the tools, the steps, and the situations it does and doesn’t suit, so you can pick the one that matches your wall and curtains rather than following a generic process that assumes everyone’s setup is the same.
Tools and Materials You’ll Need
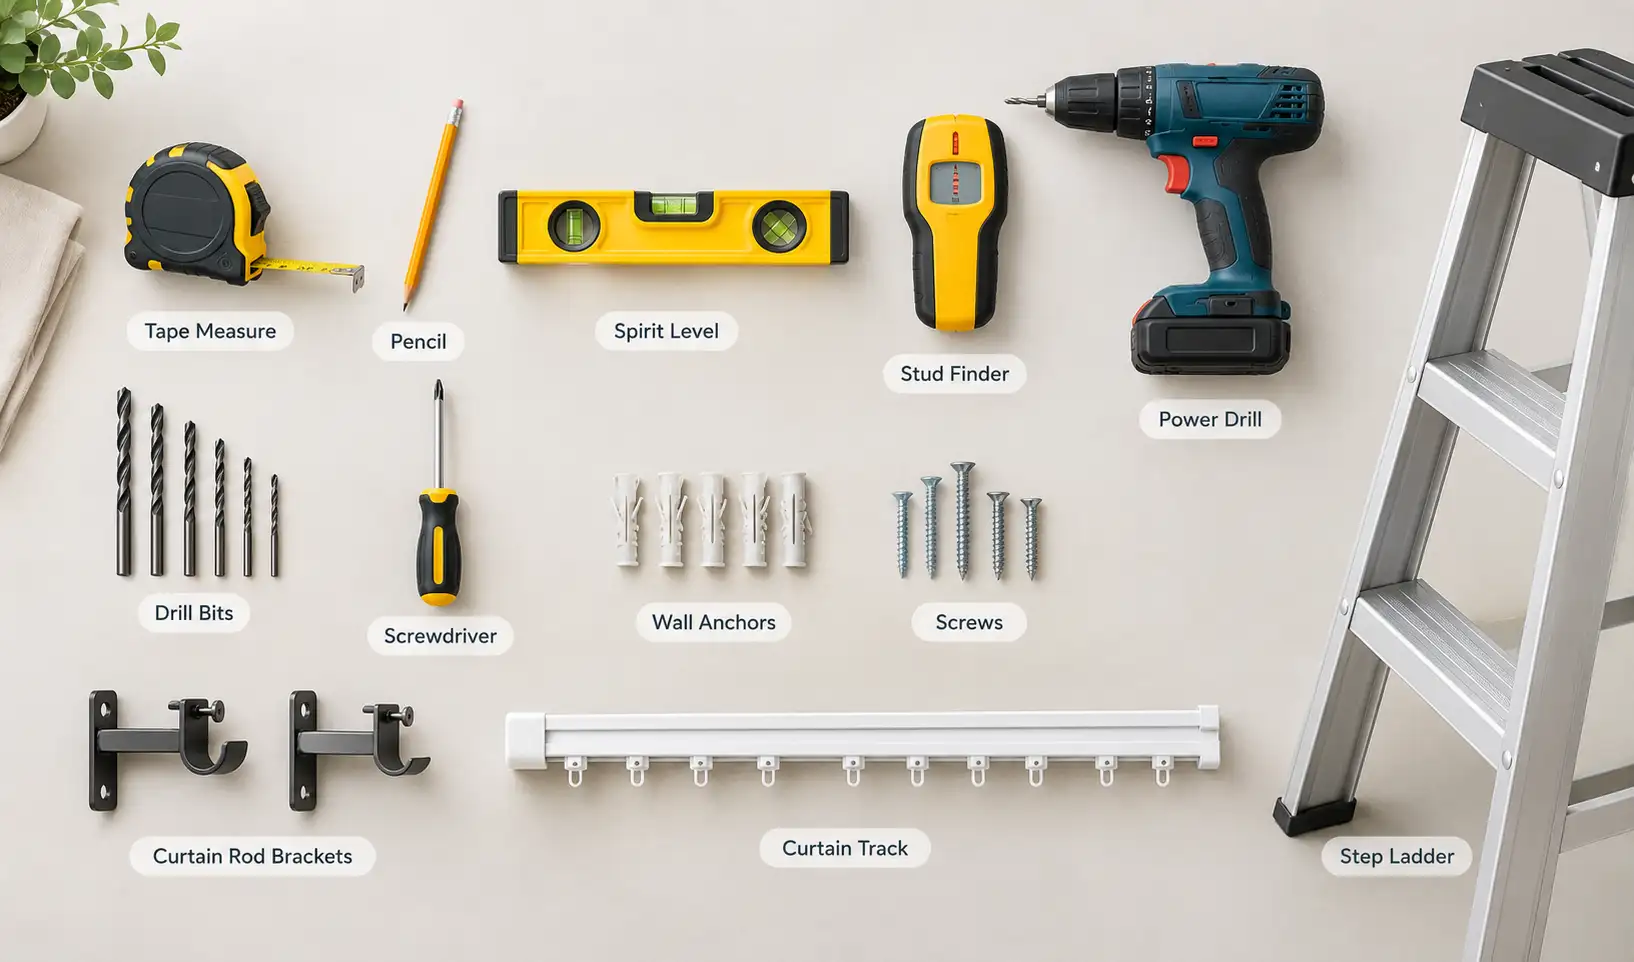
The exact list depends on which method you’re using, but most projects draw from this same core kit. Method-specific extras are called out within each section.
- Tape measure: for window dimensions and bracket spacing. A metal tape holds its shape better than curtain fabric when measuring vertically.
- Pencil: for marking drill points or bracket positions. Use a light mark you can wipe away if you need to adjust.
- Spirit level (or laser level): to confirm your marks are level before fixing anything. This is the single tool most likely to save you from a crooked rod.
- Stud finder: to locate timber or metal studs behind drywall, and to flag areas where wiring might run. Needed for Methods 1, 2, and 6.
- Power drill: for pilot holes and driving screws. Needed for Methods 1, 2, 3, 6, and 7.
- Drill bits: a standard bit for timber or drywall, a masonry bit for brick or concrete. Match the bit size to the anchor packaging.
- Screwdriver: gives better control than a drill for the final turns, especially with plastic anchors.
- Wall anchors: needed for Method 2 (drywall) and Method 3 (masonry, as wall plugs). Not needed for Method 1.
- Screws: usually supplied with the rod kit. Match size to the bracket holes and anchor being used.
- Curtain rod brackets or track: including a center support bracket if your rod is long or heavy.
- Step ladder: for most window heights, across every method.
Method 1: Standard Bracket Installation Into a Stud Wall
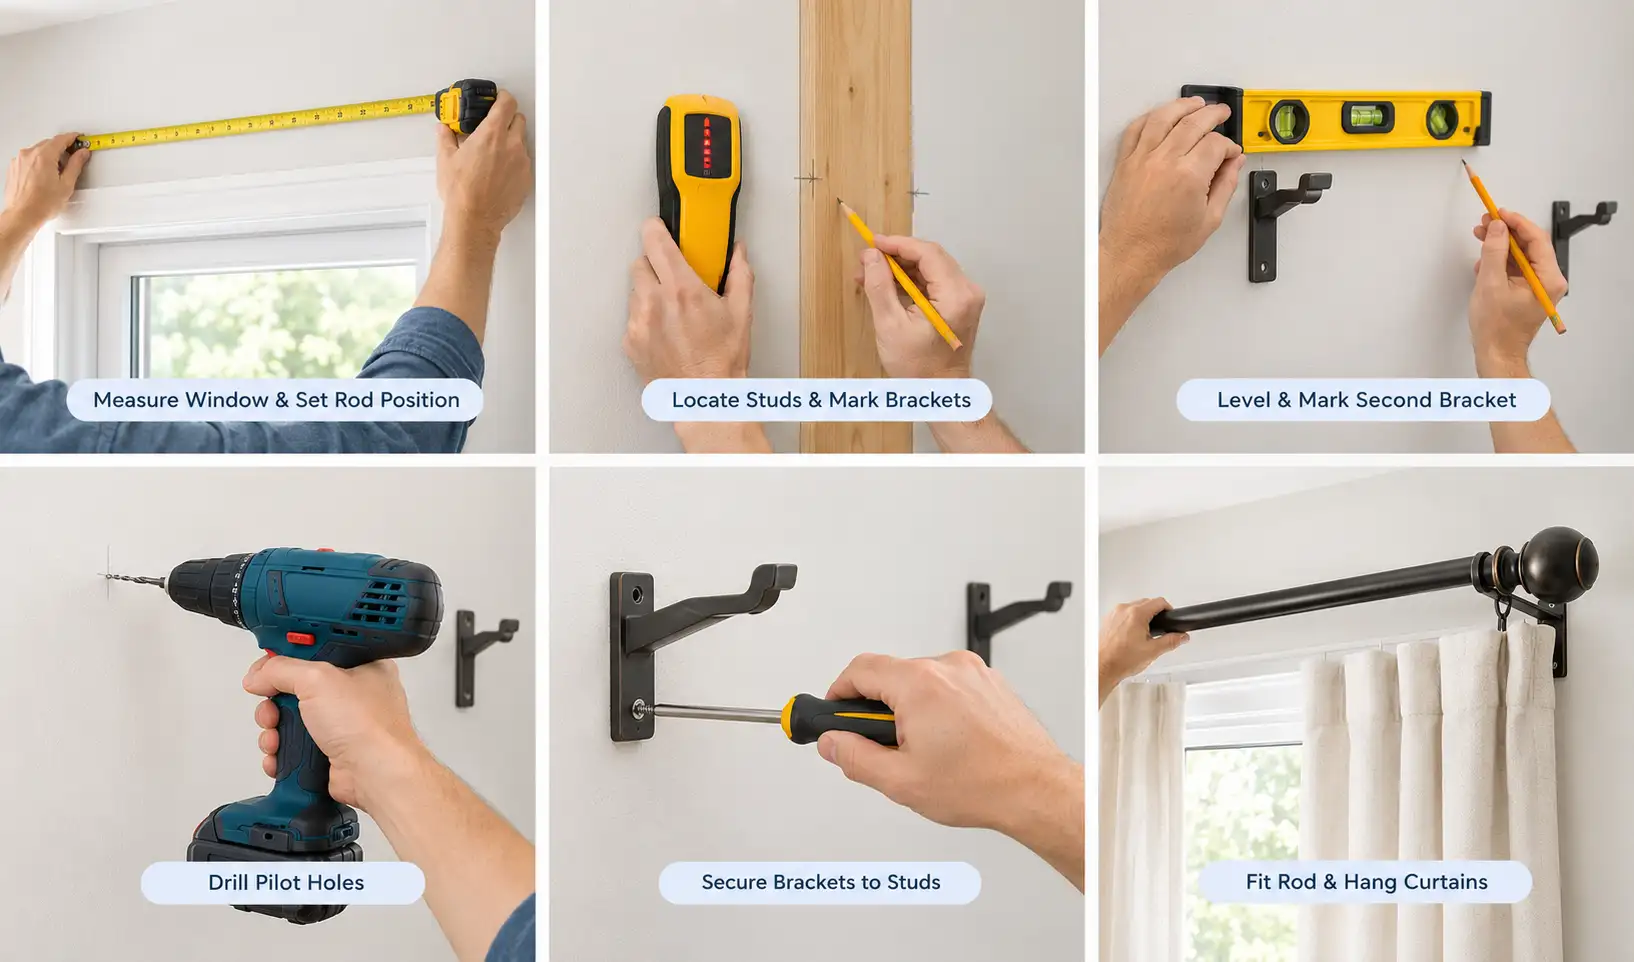
This is the most straightforward method also explained by Imperial Curtains. If your bracket lines up with a solid wood or metal stud, fastening it directly to the stud is usually the stronger option. In this case, you can secure the bracket with the appropriate screw without using a wall anchor.
- Measure the window and decide on rod height and width. Mount the rod 10 to 15 cm (4 to 6 in) above the top of the window frame, and extend it 15 to 20 cm (6 to 8 in) beyond each side so sheer curtains can stack fully off the glass when open.
- Mark the position for one end bracket, then use a stud finder to check whether a stud sits behind that mark. If it doesn’t, shift the bracket a few centimeters to one side until it lines up with solid framing, provided this doesn’t distort your width or symmetry too much.
- Level a line across from the first mark to set the second bracket’s height, then check that position for a stud as well. Studs are usually spaced at regular intervals, so if one bracket lands on a stud, the other often will too.
- Drill a pilot hole directly into the stud at each mark. You’ll feel noticeably firmer resistance than drilling into an open drywall cavity, which confirms you’ve hit solid timber.
- Drive the bracket screws straight into the pilot holes with a screwdriver or a drill on a low-torque setting. No anchor is needed here since the stud itself is doing the holding.
- Fit the rod onto the brackets, hang your curtains, and do a final level check and a firm push test on each bracket.
The only real limitation of this method is that studs don’t always line up exactly where you want your brackets. If your ideal bracket position misses every stud by a wide margin, move to Method 2 instead of stretching your layout to chase a stud.
Method 2: Bracket Installation Into Drywall or Plasterboard With Wall Anchors
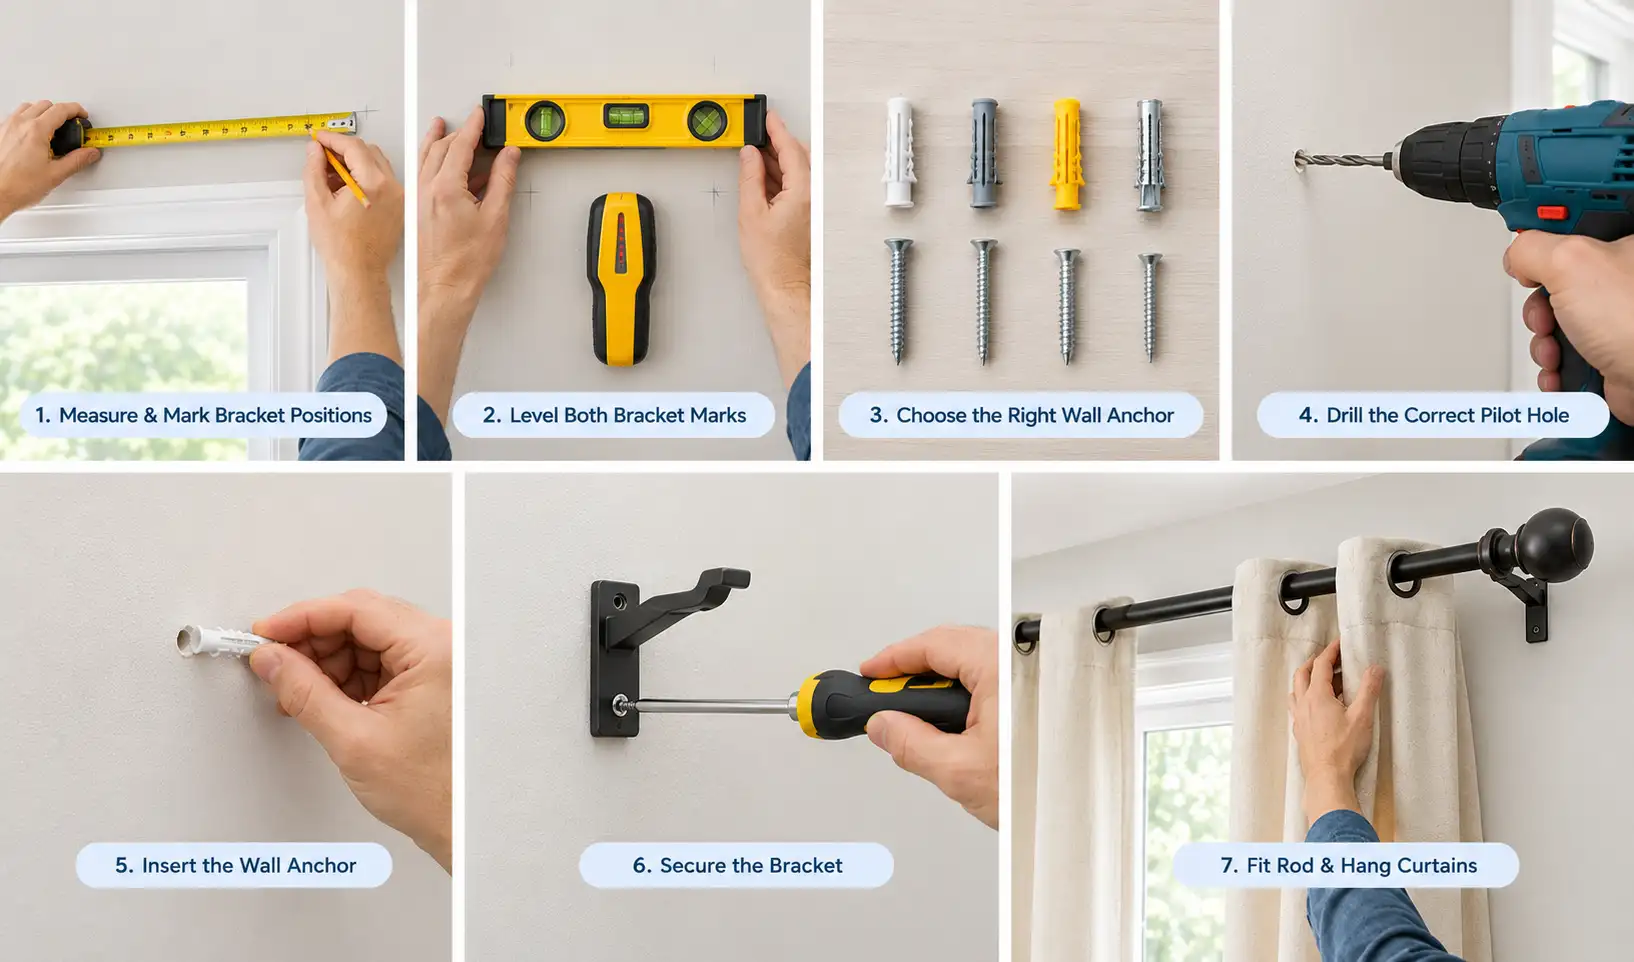
This is the method most homeowners actually need, since bracket positions rarely land perfectly on a stud. Drywall and plasterboard are gypsum boards that hold a bare screw poorly, because the material is soft and thin. A wall anchor expands or grips behind the board, spreading the load over a wider area so the drywall itself isn’t taking the full strain.
- Measure and mark bracket positions exactly as in Method 1, then confirm with a stud finder that there’s no stud behind either mark.
- Level a line across from your first mark so both bracket positions sit at the same height.
- Choose an anchor rated for your curtain weight. Light curtains under about 5 kg (10 lb) suit a standard plastic expansion or self-drilling threaded anchor; medium curtains in the 7 to 11 kg (15 to 25 lb) range do better with a metal molly bolt; heavy blakout curtains over about 11 kg (25 lb), such as lined or velvet drapes, call for a toggle bolt, which spreads load over the widest area.
- Drill a pilot hole matching the exact bit size stated on the anchor packaging. A hole that’s even slightly too large will let the anchor spin instead of gripping.
- Insert the anchor and tap it gently until it sits flush with the wall surface. Avoid hammering it hard enough to crack the surrounding drywall.
- Line up the bracket with the anchor and drive the screw in, finishing by hand or on a low-torque drill setting. Stop as soon as the bracket sits flush and solid; overtightening is what strips plastic anchors.
- Fit the rod, hang the curtains, and check level and firmness as before.
If a hole ends up oversized or an anchor strips, patch it with a small amount of spackle, let it dry, and redrill a fresh hole a centimeter or two to one side with the correct bit.
Method 3: Bracket Installation Into Brick or Concrete
Masonry walls need a completely different fixing approach from drywall, since the wall itself is dense and load-bearing rather than a thin board over a cavity. Done correctly, masonry anchors offer some of the strongest holding power of any method.
- Mark and level your bracket positions as usual. If the wall is brick, aim your marks at the brick itself rather than the mortar joint between bricks, since mortar holds anchors less reliably over time.
- Fit a masonry bit to your drill, sized to match the wall plug or masonry anchor you’re using, and switch the drill to hammer or impact mode if it has one.
- Drill slowly and steadily, pausing periodically to clear dust from the hole. Masonry drilling is noticeably slower than drywall or timber, and forcing the pace can overheat the bit or crack surrounding material.
- Insert the wall plug or masonry anchor fully into the hole, tapping it in with a hammer if needed until it’s flush with the surface.
- Position the bracket, drive the screw into the anchor, and tighten until the bracket sits solidly with no wobble.
- Fit the rod and curtains, then check level and firmness on each bracket.
A common mistake here is using a drywall-style plastic anchor in masonry, or a bit that’s undersized for the anchor. Both will undermine holding strength regardless of how solid the wall is, so match anchor and bit size to the packaging every time.
Method 4: No-Drill Installation With a Tension Rod
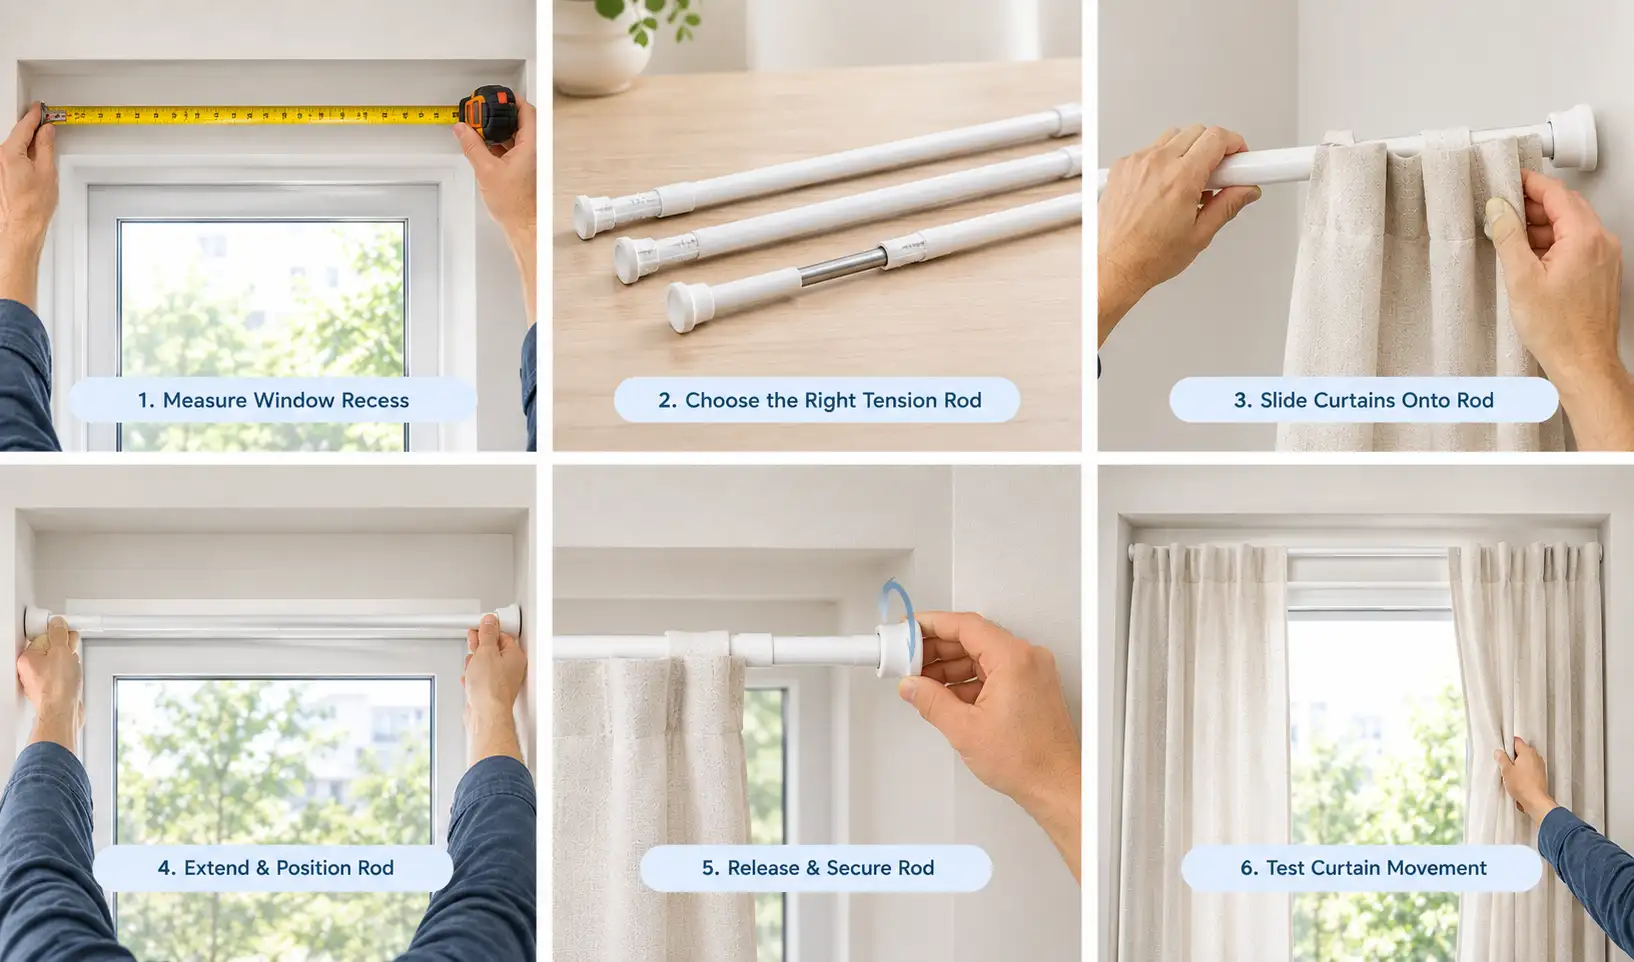
A spring-loaded tension rod wedges between the two sides of a window recess or frame using outward pressure rather than screws or anchors. It’s the most reliable no-drill option, but only within a recess, not across an open wall span.
- Measure the inside width of your window recess or the gap between the two points you want the rod to press against.
- Choose a tension rod rated for a width slightly larger than that measurement, since most extend within a range and need enough compression to grip firmly.
- Slide your curtain onto the rod first, since there are no brackets to work around afterward.
- Extend the rod to slightly beyond the recess width, then compress it as you position it between the two sides.
- Release slowly and let the spring tension press each end against the wall or frame. Check that it sits level and doesn’t tilt under the curtain’s weight.
- Test by gently pulling the curtain open and closed. If the rod shifts or slips, it isn’t compressed enough for the width, or the curtain is too heavy for this method.
Tension rods work well for café curtains, closets, and lightweight sheers, but they’re not designed to span a width wider than the recess itself, and heavier curtains or frequent opening and closing can work them loose over time.
Method 5: No-Drill Installation With Adhesive Brackets
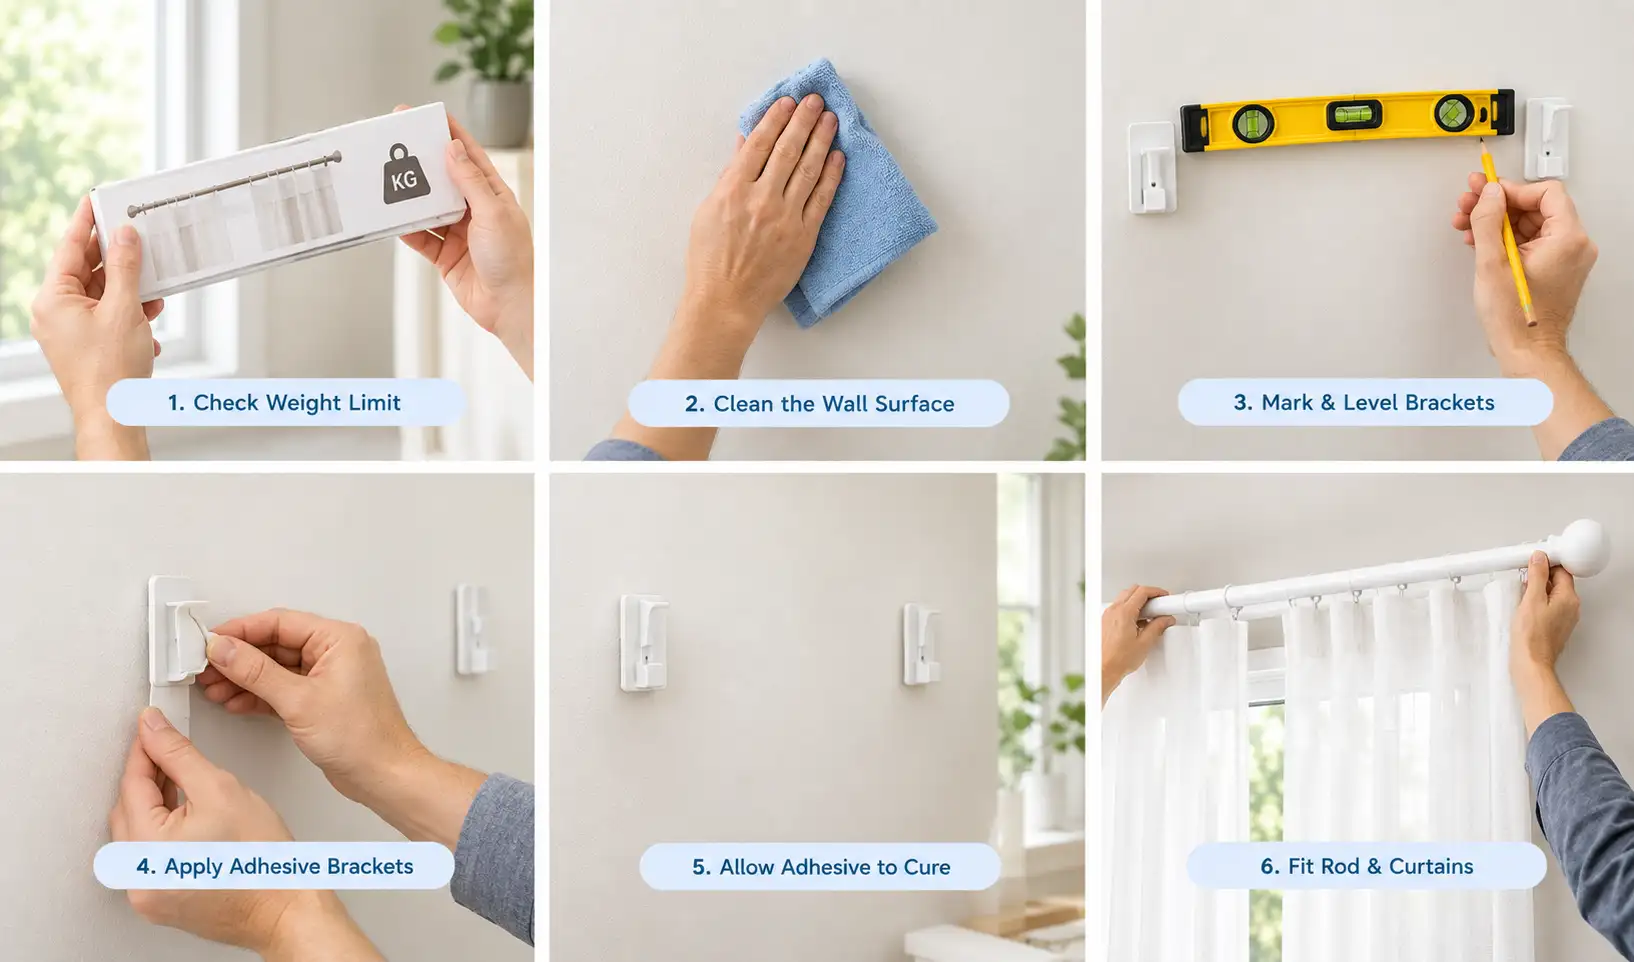
Adhesive-mounted brackets use a strong bonding pad or mounting tape instead of screws, letting you hang a rod across an open wall span without drilling. They’re suitable for light curtains on the right surface, but not a substitute for a drilled fixing on anything heavier.
- Check the adhesive bracket’s stated weight limit and compare it against your actual curtain weight, including the rod itself, not just the fabric.
- Clean the wall surface thoroughly where each bracket will sit. Adhesive needs a smooth, dry, non-textured, non-wallpapered surface to bond properly; grease, dust, or texture will significantly reduce holding power.
- Mark and level bracket positions exactly as you would for a drilled installation.
- Remove the backing from the adhesive pad and press the bracket firmly against the wall at each mark, holding steady pressure for the time stated on the packaging, often 30 to 60 seconds.
- Leave the adhesive to cure fully before hanging anything, typically several hours to a full day depending on the product. Hanging curtains too soon is a common cause of early failure.
- Fit the rod and curtains once cured, and monitor the brackets over the first week, since adhesive bonds that are going to fail usually show early signs like slight sagging.
Reserve this method for sheers, short café panels, or other genuinely lightweight curtains. Anything lined, blackout, or wide enough to need a center support puts more mechanical stress on the bond, through repeated opening and closing, than adhesive is designed to handle long-term.
Method 6: Adding a Center Support for Long or Heavy Rods
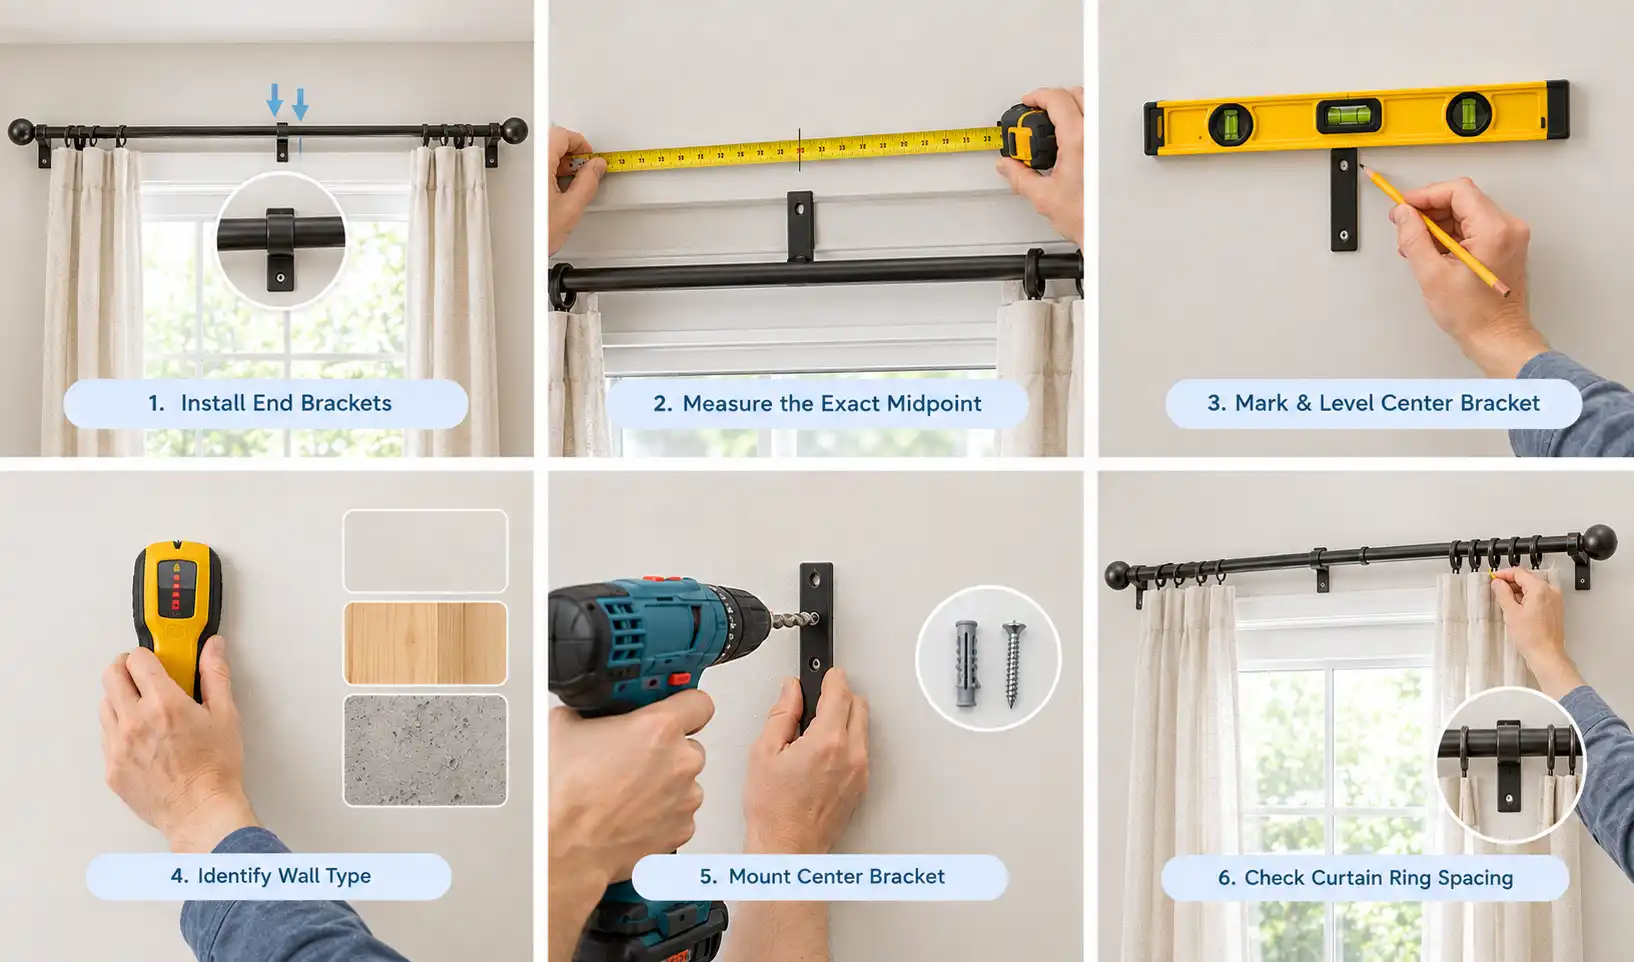
This method isn’t a standalone installation but an addition to Methods 1, 2, or 3, used whenever a rod exceeds about 1.2 m (48 in) or carries heavy curtains. Without it, the middle of even a sturdy rod will bow downward over time under the combined weight of the rod and fabric, straining the two end brackets more than they’re built to handle alone.
- Complete your end bracket installation first, using whichever of Methods 1 through 3 matches your wall.
- Measure the exact midpoint between the two end brackets rather than estimating it by eye; a support that’s off-center by even a few centimeters won’t fully correct a sag.
- Mark the center bracket position at that midpoint, at the same height as the end brackets, and confirm with your level.
- Identify the wall type at that specific spot, since it may differ from your end bracket positions, and follow the matching method (stud, anchor, or masonry) for that fixing.
- Mount the center bracket so its depth matches your end brackets, keeping the rod in a straight line rather than stepped up or down in the middle.
- If you’re using curtain rings, plan the spacing so a ring doesn’t land directly on the center bracket, which would cause the curtain to snag every time it’s drawn open or closed.
This is a detail worth checking twice: a ring should slide past the center support smoothly, not need to be lifted over it. Getting this right the first time saves you from adjusting ring spacing after the curtains are already hung.
Method 7: Installing a Curtain Track With Gliders
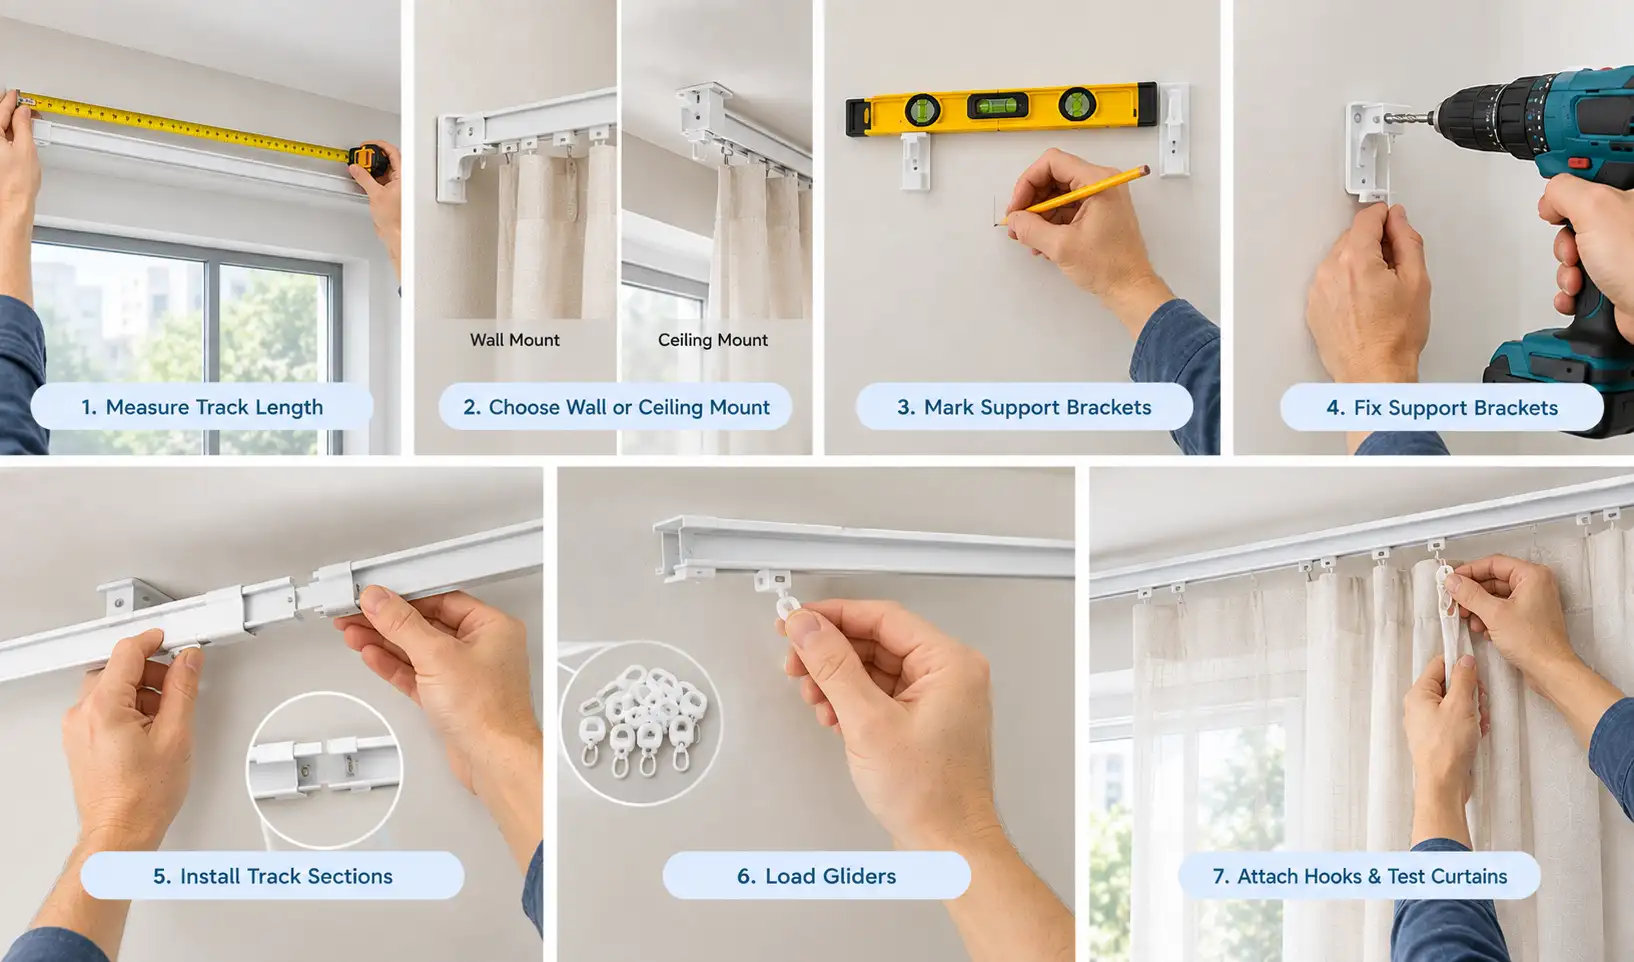
A curtain track is a different hardware system from a rod: instead of resting curtain rings or fabric directly on a round bar, the curtain hooks attach to gliders (small runners) that move along a track. Tracks are common for wide windows, bay windows, ceiling mounts, and motorized or corded curtain systems, since gliders move more smoothly under load than rings on a rod, especially with heavy or frequently drawn curtains.
- Measure the full length of track needed, including any curve for a bay or angled window. Tracks usually come in straight lengths that can be joined with connectors, or pre-bent for specific bay configurations.
- Decide between wall mounting and ceiling mounting. Ceiling mounting is common when you want curtains to run the full height of a tall window or start right at the ceiling line for a taller visual effect.
- Mark bracket positions along the planned track line, spacing support brackets every 50 to 60 cm (20 to 24 in) for a wall-mounted track, or as specified by the manufacturer, since a track needs more frequent support points than a rod on two or three brackets.
- Fix each support bracket using the method matching your wall or ceiling structure: into a joist or stud where possible, or with anchors rated for the track and curtain weight where it isn’t.
- Clip or screw the track sections into the mounted brackets, joining sections with connectors if the window width needs more than one length, and check the full run is level and, for a bay window, correctly angled at each joint.
- Load the gliders onto the track before or after mounting depending on the track design, following the manufacturer’s instructions, since some tracks load gliders from an end cap and others from a removable section along the length.
- Attach curtain hooks to the gliders, then test the full range of motion by drawing the curtain completely open and closed, checking for any glider that sticks or a bracket that flexes under the weight.
Because tracks distribute curtain weight across many gliders and support brackets rather than two or three fixed points, they’re often the better choice for heavy, wide, or ceiling-mounted curtain setups where a standard rod and bracket combination would need an unusually robust center support to cope.
How to Hang Curtain Rods With Rings
Curtain rings change how a curtain moves and looks compared with threading the rod directly through a rod pocket or grommets sewn into the fabric. Rings sit on the rod and either clip onto the top of the curtain or hold it via a sewn-in loop, letting the fabric hang just below the rod rather than bunching around it.
Ring Clips Versus Sewn-In Loops
Clip rings are the more flexible option: a metal clip pinches the top edge of the curtain and a separate ring slides onto the rod, so you can use clips with almost any flat-topped curtain without altering the fabric. Sewn-in ring-top curtains have loops built into the header and offer a slightly cleaner look with less visible hardware, but they only work with curtains made for that style.
Ring Spacing and Curtain Movement
Space rings evenly, typically one every 10 to 15 cm (4 to 6 in) along the top of the curtain, with a ring positioned close to each outer edge so the fabric doesn’t sag at the sides. Too few rings create uneven, heavy-looking folds and put more strain on each individual ring; too many can make the curtain bunch and resist sliding smoothly.
Matching Rings to Curtain Weight
Lightweight rings work fine for sheers and unlined cottons, but heavier curtains, particularly lined or blackout fabric, benefit from rings with a wider gliding surface or a small nylon or plastic insert where the ring contacts the rod. This reduces friction so the curtain draws smoothly instead of sticking, which matters more than it sounds, especially on rods you plan to open and close daily rather than leave static.
How to Hang Curtain Rods in a Living Room
Living rooms usually have the widest windows in the house and see the most daily use, so getting the placement right matters more here than in a bedroom or bathroom.
Mounting the rod higher above the window frame than in a smaller room, closer to the ceiling or cornice line where the ceiling height allows, tends to work well in living rooms because it draws the eye upward and makes the whole wall feel taller. Extending the rod well beyond the window frame, sometimes 20 to 30 cm (8 to 12 in) on each side if wall space allows, lets the curtains stack back almost entirely off the glass, which keeps the room brighter during the day and avoids the boxed-in look that comes from curtains hovering right at the frame’s edge.
Before finalizing bracket position, check what’s directly below and beside the planned rod. A rod mounted too low can interfere with the top of a sofa back, a bookshelf, or a window that opens outward or tilts in. If the window has a crank handle or opens inward, make sure the curtain’s stack-back position, where it sits when fully open, doesn’t block the mechanism.
Because living room curtains tend to be wider and often heavier (thermal or blackout fabric is common here for both comfort and energy reasons), this is exactly the situation where a center support and stronger brackets are worth the extra step rather than an optional upgrade. A wide rod carrying heavy drapes on two end brackets alone is one of the more common setups that ends up sagging within the first year.
Curtain Rod Brackets: Types and How to Choose
The bracket does the structural work of holding your rod, so it’s worth understanding the differences between types rather than treating them as interchangeable.
Standard Brackets
Standard brackets have a fixed projection and are the simplest, most common type, typically included with off-the-shelf curtain rod kits. They work well for most standard window widths and curtain weights, provided the wall fixing behind them is appropriate.
Adjustable Brackets
Adjustable brackets let you change the projection, how far the rod sits from the wall, which is useful when you need extra clearance for a thick curtain lining, a window handle, or a radiator beneath the window. They typically assemble in two pieces, and it’s easier to set the projection and tighten the adjustment screw before mounting the bracket to the wall rather than after.
Center Supports
As covered above, these are additional mid-span brackets used on long or heavily loaded rods. They’re not a substitute for adequate end brackets, but an addition that shares the load.
Single Versus Double Brackets
Single brackets hold one rod. Double brackets hold two parallel rods at slightly different projections, letting you layer a sheer curtain on the inner rod with a heavier curtain or blackout panel on the outer rod. If you’re installing a double bracket, pay attention to the gap between the two rod positions: too narrow and the curtains will rub against each other constantly; too wide and the layered look won’t sit flush.
Bracket Placement and Weight Considerations
Beyond the two or three bracket positions along the rod, the bracket’s material and rating matter. Lightweight plastic or thin metal brackets are fine for sheers and short café curtains but aren’t built for heavier fabric spanning a wide window. For anything heavier, look for brackets described as heavy-duty or rated for a specific weight, and match that rating, along with the anchor behind it, to the actual weight of your curtains rather than assuming the brackets that came in the box will handle whatever you hang on them.
Common Curtain Rod Installation Mistakes (and How to Avoid Them)
There are some certain mistakes that you must avoid while installing the curtain rods.
Measuring Incorrectly
Measuring the window opening but forgetting to account for how far you want the rod to extend beyond it leads to brackets that need repositioning. Measure the full planned span, including the extension on each side, before marking anything.
Installing Brackets at Different Heights
This usually happens when you eyeball a second mark instead of transferring a level line from the first bracket. Always mark one bracket, level a line across, then mark the second bracket from that line.
Skipping the Level Check
Even experienced installers can misjudge level by eye, especially over a wide window. A level check takes seconds and prevents a rod that’s visibly tilted once curtains are hanging and their weight exaggerates any lean.
Using Unsuitable Anchors
Grabbing whatever anchor is in the kit without checking it’s rated for your wall type and curtain weight is a common cause of early failure. Match the anchor to both factors, not just one.
Choosing Weak Brackets for Heavy Curtains
Lightweight plastic brackets designed for sheers will flex or crack under lined or blackout fabric. Upgrade the bracket, not just the anchor, when your curtains are heavy.
Placing the Rod Too Close to the Window
A rod mounted right at the frame edge leaves curtains covering part of the glass even when fully open, cutting natural light and making the window look smaller. Extend the rod outward as covered in the measuring step.
Forgetting the Center Support
Wide or heavy rods installed with only two end brackets are prone to visible sagging within months. If your rod exceeds roughly 1.2 m or carries heavy fabric, plan for a center support from the start.
Installing into Unsupported Drywall Without an Anchor
A screw driven straight into drywall, with no stud and no anchor behind it, will eventually work loose under the repeated stress of opening and closing curtains, even if it feels solid on day one.
Making the Rod Too Short
A rod that’s only as wide as the window frame, or narrower, forces curtains to overlap the glass when open. Extend it beyond the frame as described earlier.
Ignoring The Curtain’s Final Drop and Fullness
Mounting the rod before confirming curtain length can leave curtains puddling awkwardly on the floor or hovering short of the sill. Where possible, hang the curtains on the rod and hold the assembly up to the window before finalizing the exact bracket height, particularly with curtains you haven’t hung before.
Final Words
Installing a curtain rod is a simple job when you get the measurements, brackets, and wall fixings right. Start by checking the window size and deciding where you want the rod to sit. Use a level before drilling, and choose anchors or screws that match your wall type and curtain weight. Long rods may also need a center support to prevent sagging. If drilling is not suitable, adhesive brackets can work for lighter curtains when the surface is clean and suitable. Take your time with the installation, check that the brackets are secure, and make sure the curtains move freely. A properly installed rod will look neat and provide reliable support for years.
Frequently Asked Questions
You can drive a screw directly into drywall, but without a stud behind it, that screw is relying on soft gypsum board to hold the full weight of the rod and curtains. For anything beyond the lightest sheer panel, use a wall anchor rated for your curtain weight rather than screwing straight into unsupported drywall.
They do whenever the bracket isn’t landing on a stud or solid masonry that can grip a screw on its own. If a stud finder confirms solid timber framing directly behind your bracket position, you can typically skip the anchor and screw straight into the stud.
A common approach is 15 to 20 cm (6 to 8 in) beyond each side of the window frame, extending further if wall space allows, so curtains can stack fully open without covering the glass. In living rooms with more wall space, 20 to 30 cm is common.
Roughly 10 to 15 cm (4 to 6 in) above the top of the window frame is a reliable starting point. Mounting closer to the ceiling in rooms with standard ceiling height creates a taller, more spacious feel, provided the curtain length is adjusted to suit.
Generally yes, once a rod exceeds about 1.2 m (48 in) or carries heavier fabric like blackout or lined curtains. Without one, the middle of the rod is likely to sag over time as gravity and daily use take their toll.
Yes, for lightweight curtains. Tension rods work well inside a window recess, and rated adhesive brackets can hold light sheers or short panels on a clean, smooth surface. Neither is a reliable option for heavy or wide curtains, which need a mechanical fixing.
Use the screws supplied with your curtain rod kit where possible, since they’re sized to match the bracket holes. If you’re replacing them, match the screw diameter and length to both the bracket and the anchor you’re using, checking the anchor packaging for its recommended screw size.
Yes, using a masonry drill bit to create the pilot hole and a masonry-rated anchor or wall plug to hold the screw. Concrete generally offers strong holding power once the hole is drilled to the correct diameter and depth for the anchor you’re using.


