
How to Clean Vinyl Flooring: 10 Proven Methods That Actually Work
To clean vinyl flooring, sweep or vacuum up grit first, then damp-mop with a pH-neutral cleaner using a well-wrung microfiber mop. Never soak the floor, and skip ammonia, bleach, wax, oil soaps, and steam mops. Treat stains and scuffs as spot jobs, not full-floor washes.
Vinyl looks tough, and it is. But most vinyl floors are not damaged by hard use. It happens with bad cleaning habits, too much water, the wrong chemical, or a steam mop that seems harmless.
This blog post by Floor Land covers ten methods, each built for a specific job. Some run daily. Some you will use twice a year. A few solve problems that a normal mop will never touch. So, let’s get started.
Identify Your Vinyl Floor Before Cleaning
The method you choose depends on what you actually have underfoot. Three minutes here saves you an expensive mistake.
| Type | How to spot it | What it changes |
| Luxury vinyl plank or tile (LVP/LVT) | Individual planks or tiles, wood or stone look, visible seams | Seams let water reach the subfloor. Use minimum liquid |
| Sheet vinyl | One continuous roll, seams only at room edges | Most forgiving with moisture, but edges can curl if flooded |
| Vinyl composition tile (VCT) | Hard, matte squares, common in commercial spaces | Often needs a finish coat, unlike residential vinyl |
| Peel-and-stick tiles | Thin, glued individually, budget installs | Adhesive softens with heat and water. Be gentlest here |
Two rules apply to all four:
- Check your manufacturer’s care sheet before you use anything new. Cleaning advice varies by brand, and warranty coverage follows those instructions.
- Test any new product in a hidden corner first. Behind a door, under the fridge, inside a closet.
Also worth knowing: the clear wear layer on top does all the protecting. It is thin. Once you scratch or dull it, you cannot sand or refinish vinyl the way you can refinish hardwood. Every method below exists to protect that layer.
Method 1: The Daily Dry Clean (Sweep, Dust Mop or Vacuum)
This method matters most, and it involves no liquid at all. Grit is the real enemy. Sand, dust, and driveway grit sit on the surface, and every footstep grinds them into the wear layer like sandpaper. Weeks of this produce the dull, cloudy look people mistake for “worn out” flooring.
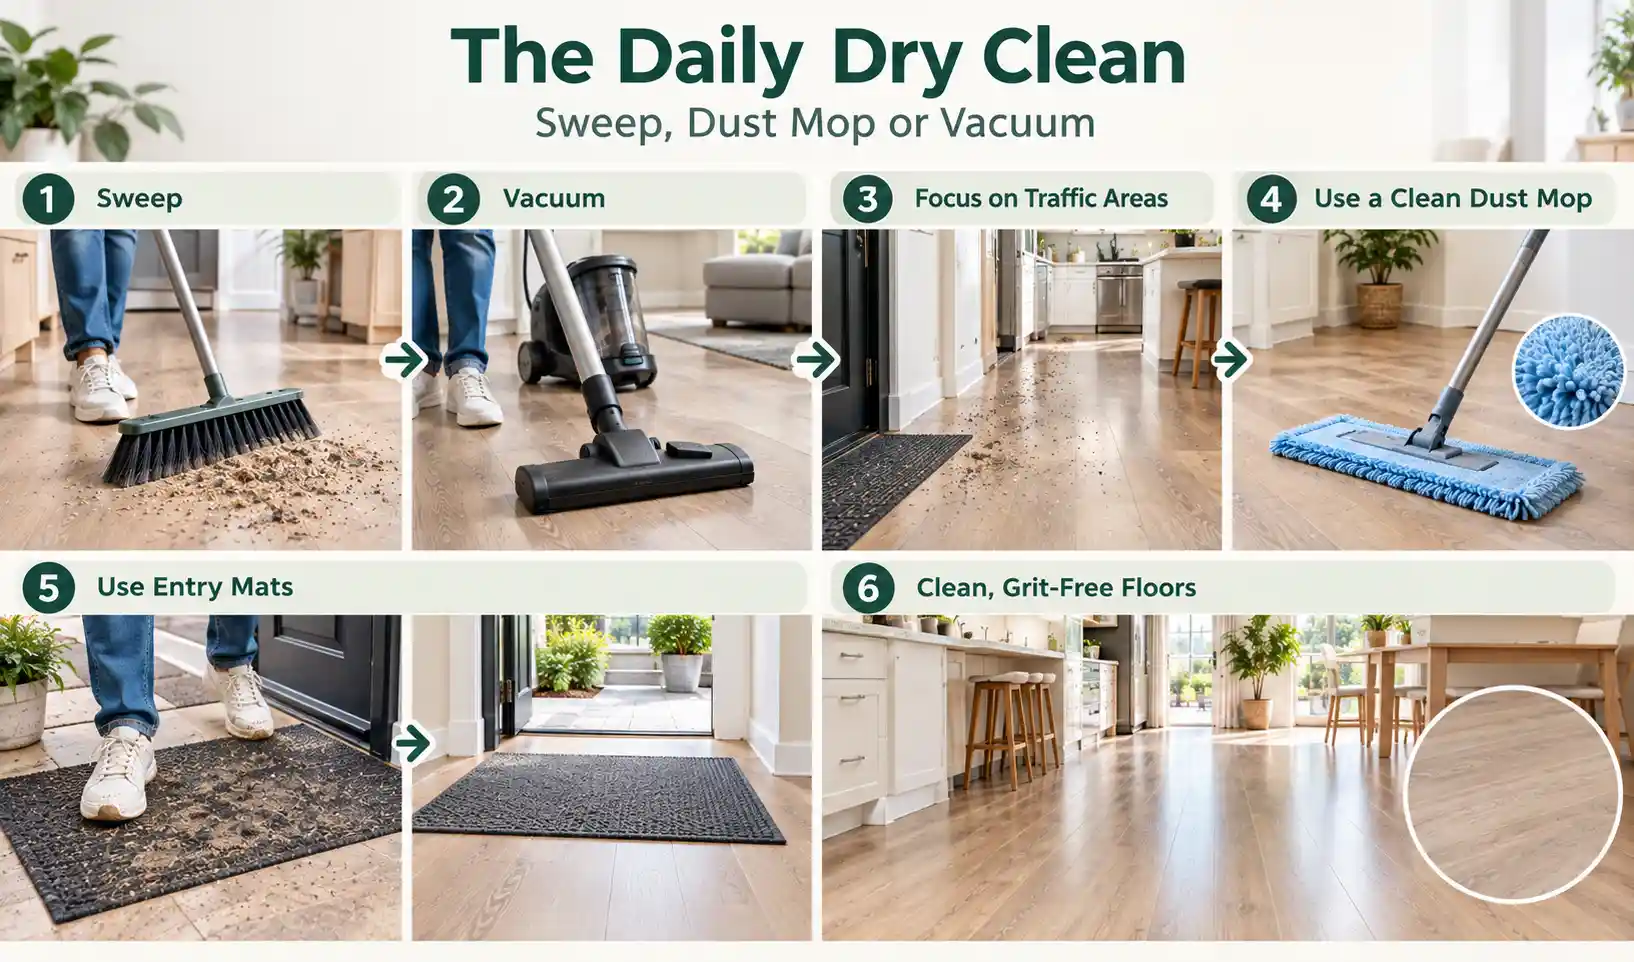
How to do it:
- Sweep with a soft-bristle broom or a microfiber dust mop, working toward a single collection point.
- For vacuuming, switch off the beater bar or use a hard-floor setting. Rotating brush rolls scratch vinyl.
- Pay attention to entryways, kitchen work zones, and hallway traffic lanes, where grit concentrates.
- Skip treated or oiled dust mops. They leave a residue that dulls the surface over time.
Frequency: Daily in busy homes, every other day otherwise. Weekly at absolute minimum.
Pro tip: Put a mat outside and inside every exterior door. Most tracked-in dirt arrives from outside, so mats cut your cleaning workload more than any product you can buy.
Method 2: The Weekly Damp Mop With a pH-Neutral Cleaner
This is your core maintenance clean, and manufacturers endorse it almost universally. “pH-neutral” means the cleaner sits near 7 on the pH scale, so it lifts dirt without attacking the wear layer. Strongly acidic or strongly alkaline products strip gloss and leave a permanent haze.
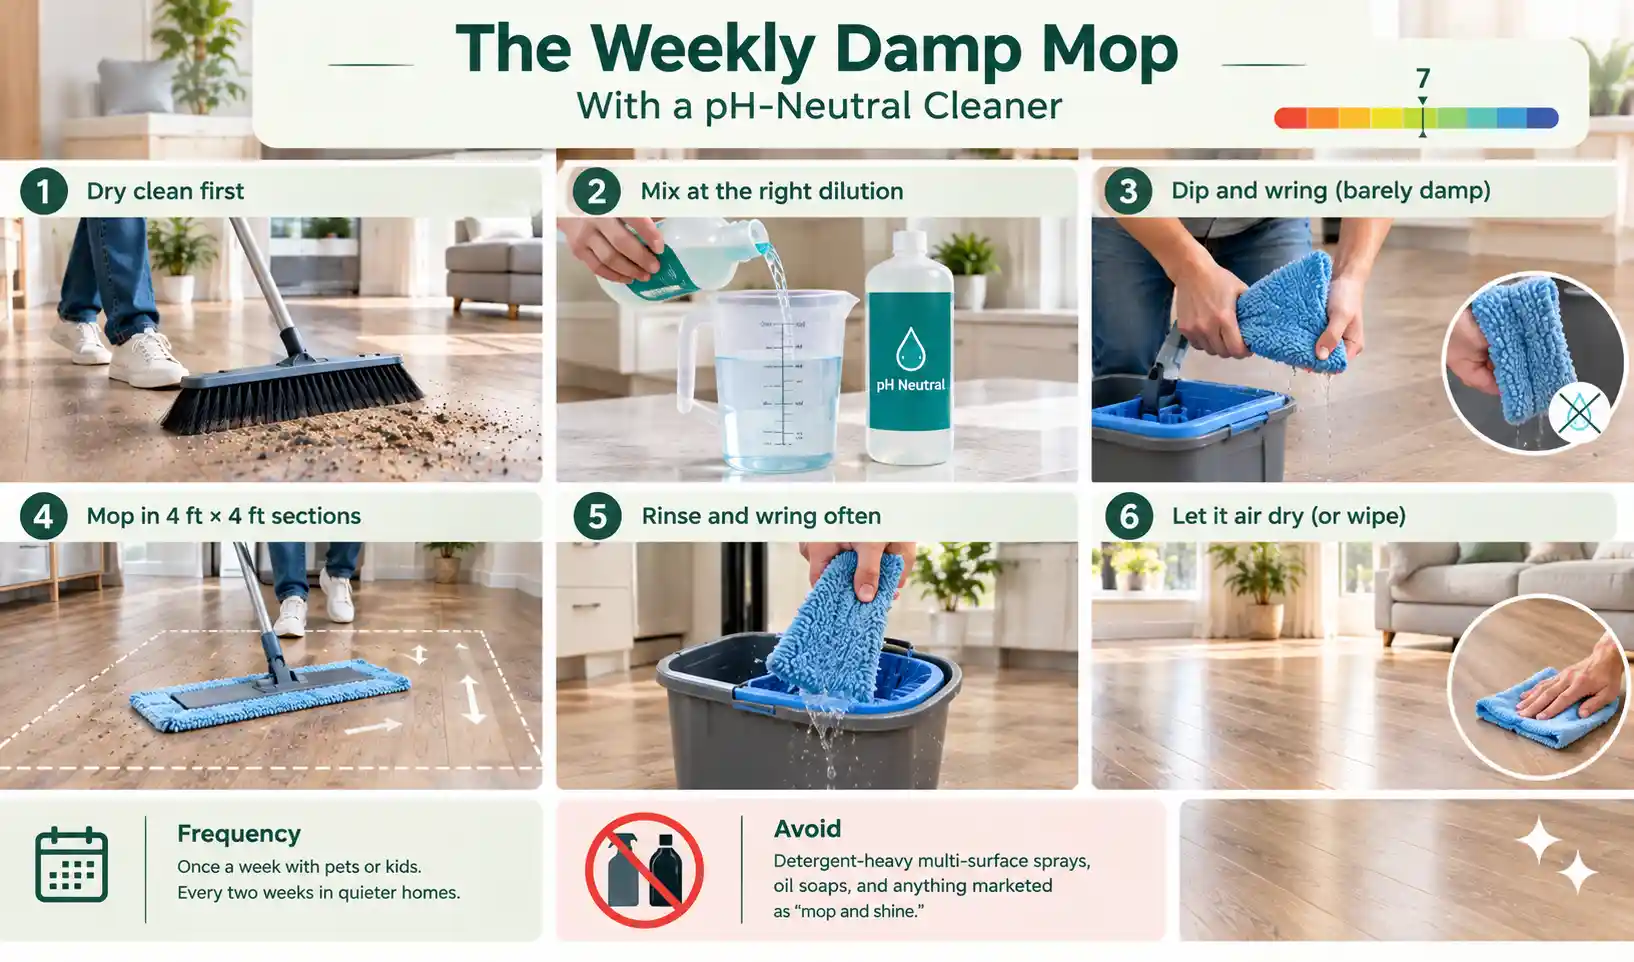
How to do it:
- Dry clean the floor first. Mopping over grit just makes muddy sandpaper.
- Mix the cleaner with warm water at the dilution printed on the label. Resist the urge to add extra. More cleaner means more residue, not more clean.
- Dip a microfiber flat mop, then wring it until it feels barely damp. If it drips, wring again.
- Mop in sections of roughly 4 feet by 4 feet, following the direction of the planks.
- Rinse and wring the pad often. A dirty pad redeposits grime and creates haze.
- Let each section air dry, or wipe it with a dry microfiber cloth.
Frequency: Once a week with pets or kids. Every two weeks in quieter homes.
What to avoid: Detergent-heavy multi-surface sprays, oil soaps, and anything marketed as “mop and shine.” These leave a film that dulls the floor and attracts dirt within days.
Method 3: Mild Dish Soap and Warm Water
This is the budget version of Method 2, and a legitimately good one when you measure properly. Dish soap is a surfactant, so it lifts grease and food film well. The catch is that almost everyone uses far too much. Excess suds never rinse away and dry into a tacky film.
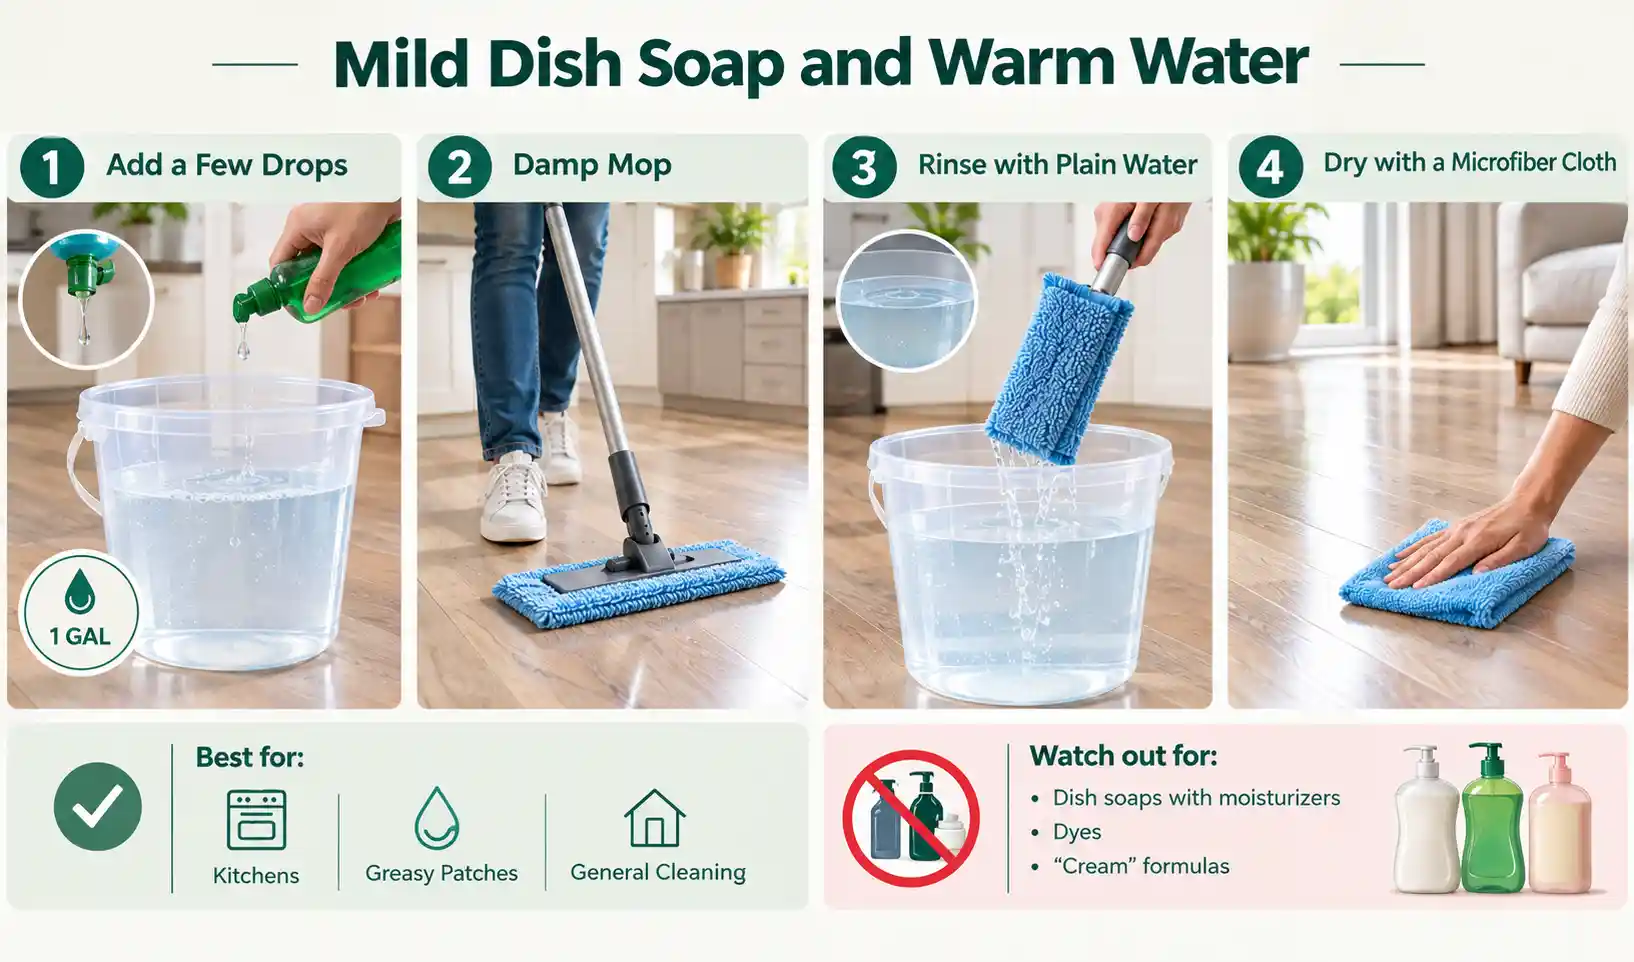
How to do it:
- Add a few drops of clear, mild dish soap to a gallon of warm water. Not a squirt. Drops.
- Damp mop as described above.
- Rinse with a second pass of plain warm water. This step is non-negotiable with soap.
- Dry with a microfiber cloth.
Best for: Kitchens, greasy patches, general cleaning when you have run out of dedicated cleaners.
Watch out for: Dish soaps with added moisturizers, dyes, or “cream” formulas. Those leave the worst residue. Pick the plainest bottle on the shelf.
Method 4: Diluted Vinegar (With an Important Warning)
Vinegar is the most repeated vinyl cleaning tip online. It also carries a genuine risk that most articles ignore.
Diluted vinegar cuts grease, dissolves soap film, and leaves no buildup, which makes it useful for resetting a floor that has gone sticky. Several major manufacturers tell owners not to use it.
Even diluted, vinegar is acidic, and repeated use can slowly dull a gloss finish. Home Depot itself qualifies the tip with the phrase “if your manufacturer permits it.”
So make sure to check your care sheet. If your brand permits it, use vinegar as an occasional reset rather than your weekly routine.
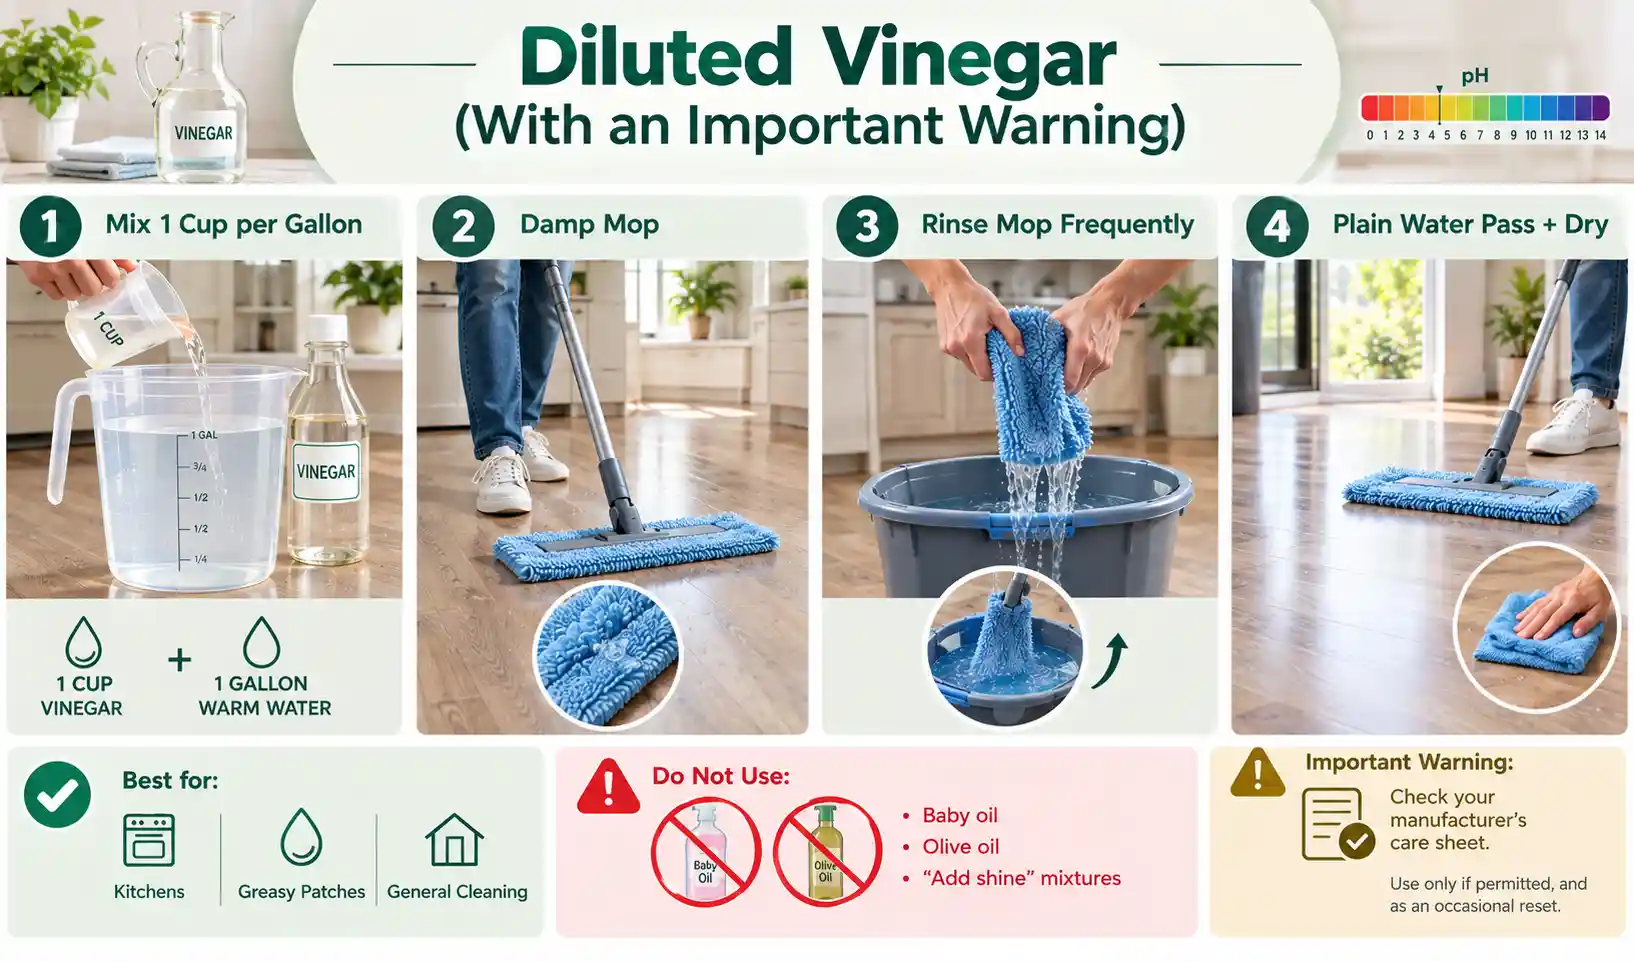
How to do it, if approved:
- Mix 1 cup of white or apple cider vinegar per gallon of warm water. Never use it at full strength.
- Damp mop with a well-wrung microfiber mop.
- Rinse the mop frequently in clean water.
- Finish with a plain-water pass, then dry.
Do not add baby oil or olive oil to “add shine,” despite what you may have read. Oil creates a slip hazard and a grime-collecting film that gets harder to remove each time.
Method 5: The Two-Bucket Deep Clean
Use this every two or three months, or any time the floor looks clean but feels wrong underfoot. The problem with one bucket is simple. You dip a dirty mop into your cleaning solution, turn it into dirt soup, then spread it across the floor. Two buckets solve it.
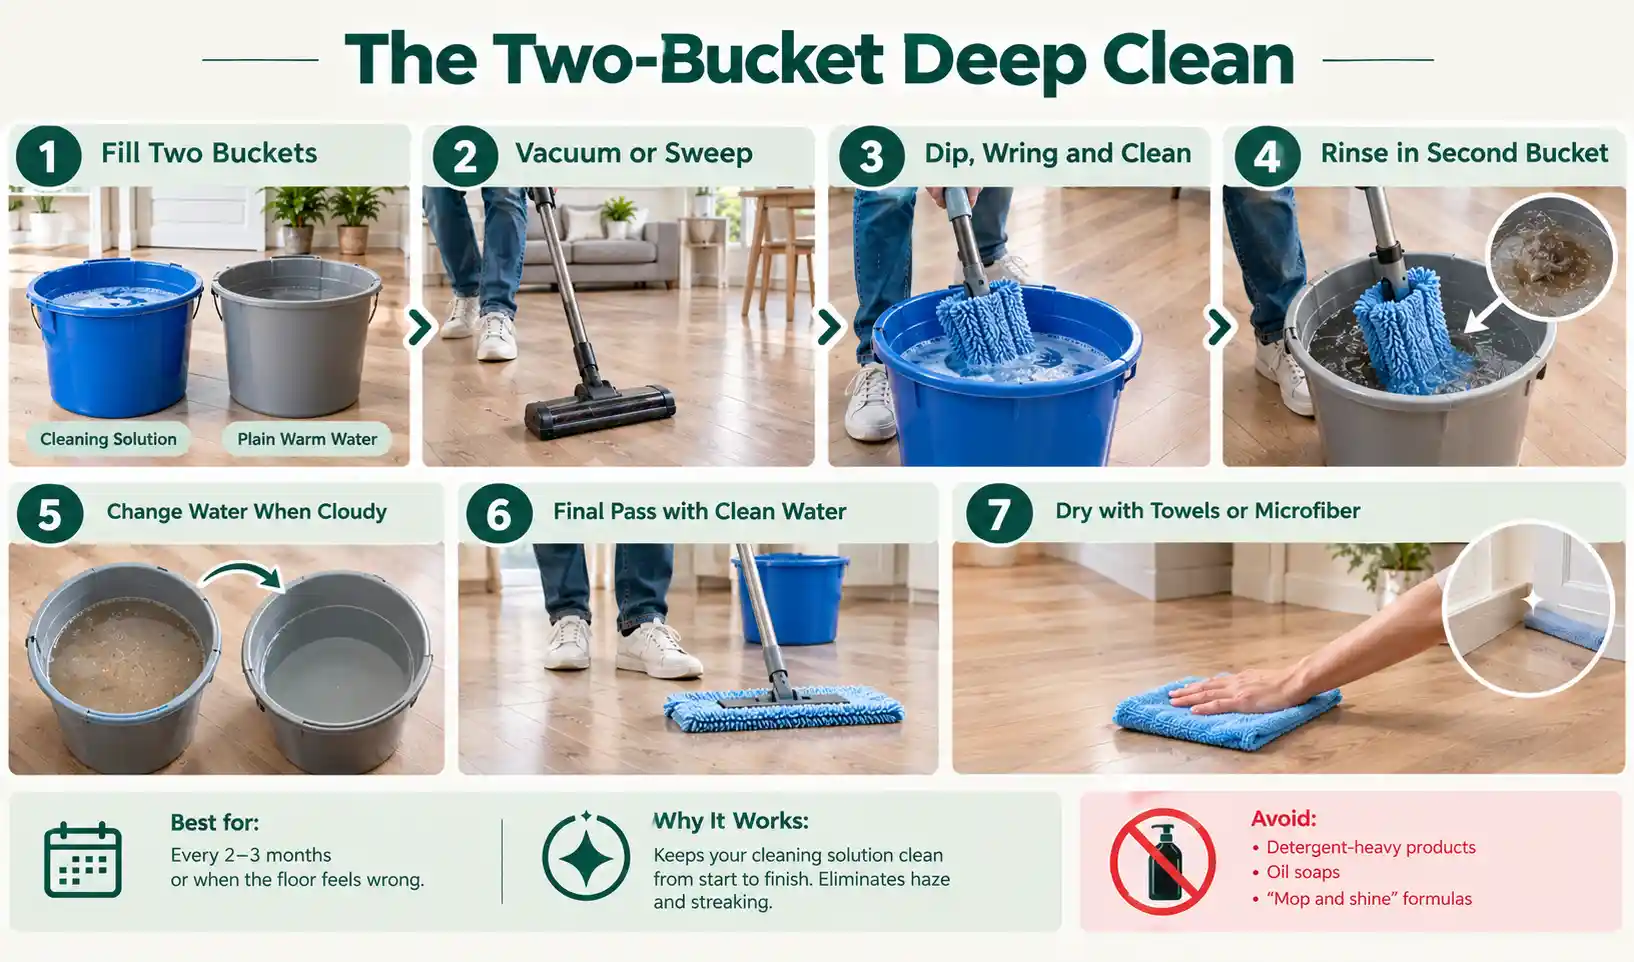
How to do it:
- Fill bucket one with your cleaning solution. Fill bucket two with plain warm water.
- Vacuum or sweep the whole floor, and move light custom furniture out of the way.
- Dip the mop in bucket one, wring it out, and clean one section.
- Rinse the dirty mop in bucket two, wring it, then return to bucket one for a fresh solution.
- Change the rinse water as soon as it turns cloudy.
- When you finish, do a final pass with clean water only.
- Dry the floor with towels or a dry microfiber pad, working along seams and room edges where moisture collects.
Why it works: Your cleaning solution stays clean from the first section to the last. This single change eliminates most haze and streaking complaints.
Method 6: Baking Soda Paste for Food and Drink Stains
Wine, coffee, tomato sauce, fruit juice, berries, and sauces all leave pigment behind. Baking soda lifts them without harsh chemicals. Baking soda is very mildly abrasive, so technique matters more than pressure here.
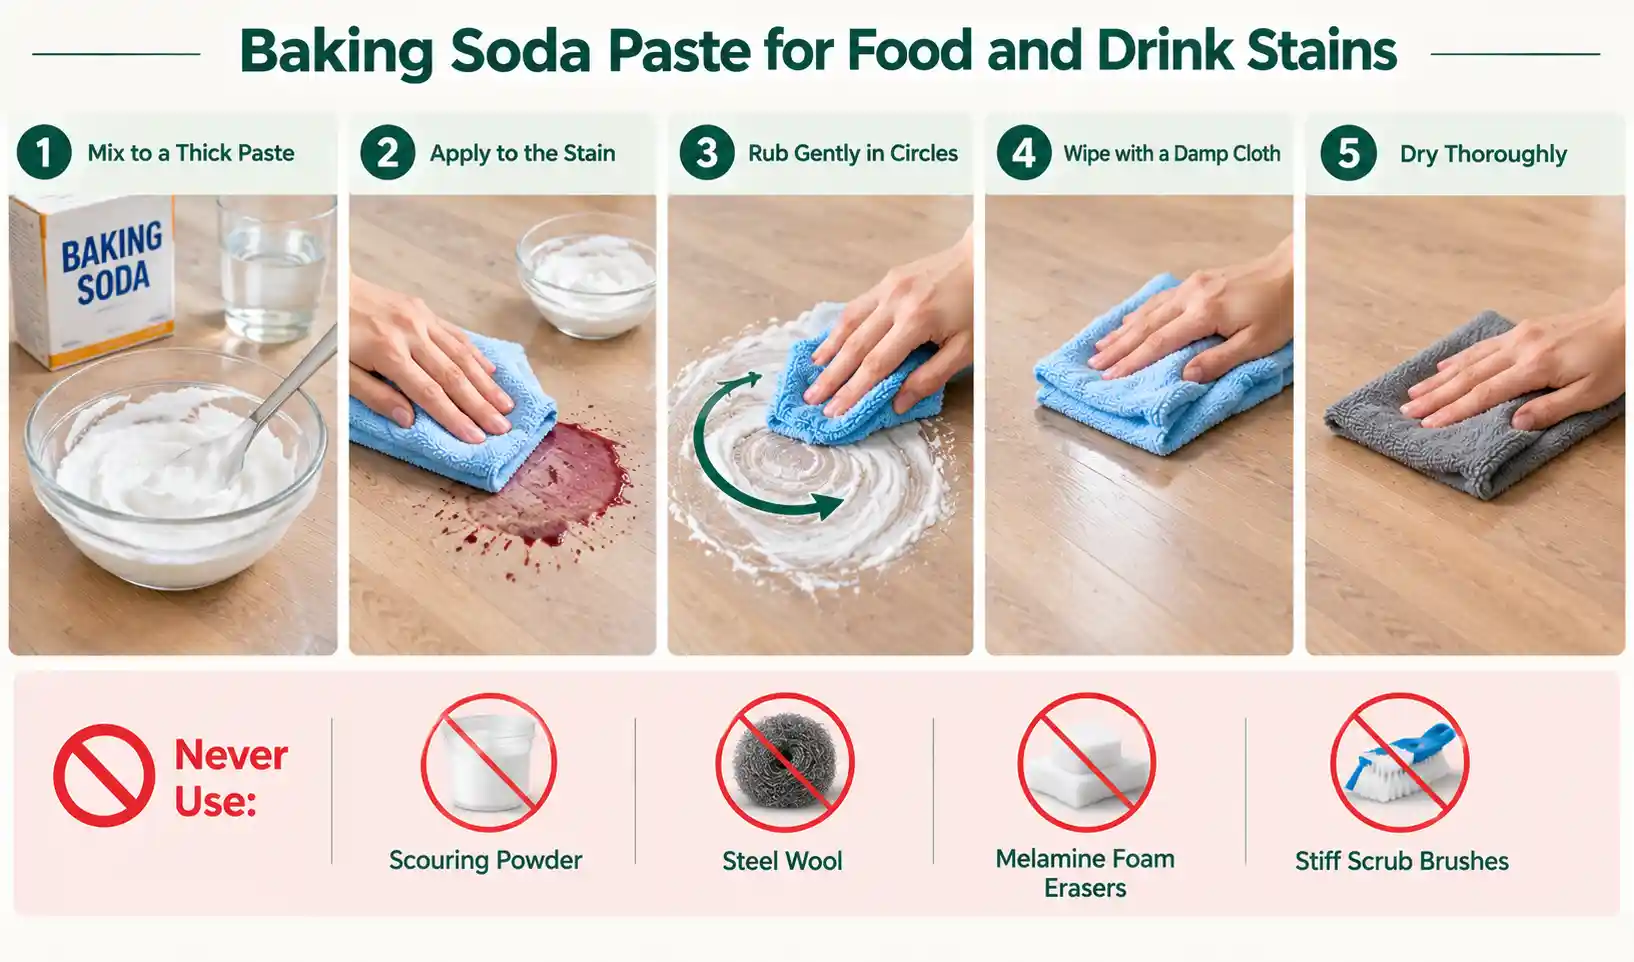
How to do it:
- Mix baking soda with a little water to make a thick paste, roughly the texture of toothpaste. A runny paste does nothing.
- Apply it to the stain with a soft cloth.
- Rub gently in small circles. Let the paste do the work, not your arm. Hard scrubbing permanently dulls the wear layer.
- Wipe the area with a clean, damp cloth.
- Dry thoroughly.
Never use: Scouring powder, steel wool, melamine foam erasers on glossy finishes, or stiff scrub brushes. All of them sand down your wear layer, and the damage doesn’t come back.
Method 7: Isopropyl Alcohol for Ink, Dye and Cosmetic Stains
Some stains are chemical problems, not dirt problems. Water and soap will never move them, because the pigment needs a solvent.
Isopropyl alcohol, sold as rubbing alcohol, dissolves the binders in ink, marker, lipstick, and hair dye. Manufacturers including Kährs recommend it for stubborn stains, with one crucial instruction: use it sparingly, wipe quickly, and do not scrub, because scrubbing dulls the surface.
How to do it:
- Dampen a white cloth with isopropyl alcohol. Never pour it directly onto the floor.
- Blot the stain, then wipe with light pressure. Blot, do not grind.
- Turn to a clean section of cloth as the pigment transfers.
- Wipe the area with plain water to remove any residue.
- Dry it.
For paint, varnish, or nail polish: Peel off whatever has dried, then use a small amount of mineral spirits on a cloth. Ventilate the room, keep it away from open flame, and test in a hidden spot first. Do not use acetone-based removers on glossy vinyl.
Also Read: How to Get Nail Polish Off Carpet
Method 8: Removing Black Scuff Marks
Scuffs are not stains. A black heel mark is rubber deposited on top of your floor, which is why the cleaner alone rarely shifts it. You need friction, not chemistry. Work through these in order, stopping at the first one that works.
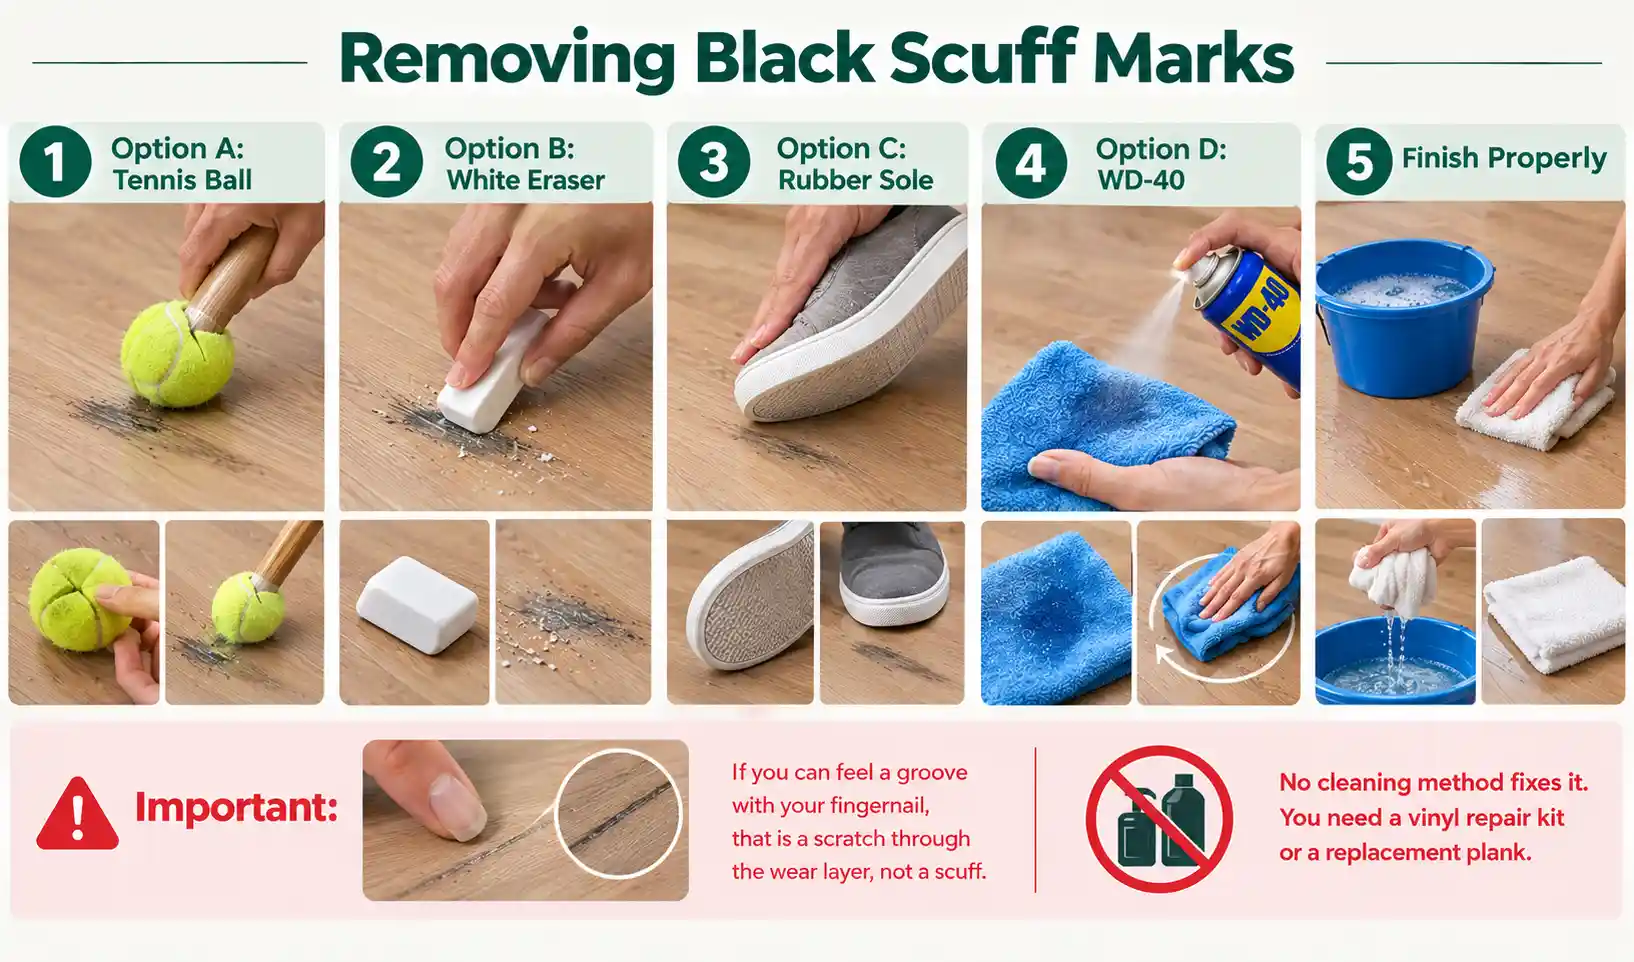
Option A, the tennis ball. Cut a small X in a clean, light-colored tennis ball, push a broom handle into it, and rub the scuff. The felt is abrasive enough to lift rubber and soft enough to leave the finish alone.
Option B, a white eraser. For small marks, rub gently with a plain white pencil eraser. Use white only, since colored erasers can deposit their own pigment. Sweep the crumbs afterward.
Option C, a rubber sole. Put your hand inside a clean rubber-soled shoe and rub the mark. Rubber lifts rubber surprisingly well.
Option D, WD-40. For stubborn marks, spray a small amount onto a microfiber cloth (not onto the floor) and buff in circles. Then wash the spot with soapy water and dry it completely. Skipping this leaves a slick patch. Test in a hidden area first.
Important: If you can feel a groove with your fingernail, that is a scratch through the wear layer, not a scuff. No cleaning method fixes it. You need a vinyl repair kit or a replacement plank.
Method 9: Deep Cleaning Textured and Embossed Vinyl
Modern LVP often carries embossed wood grain, hand-scraped texture, and beveled edges. Those details look convincing and trap dirt beautifully. A flat mop glides right over the top and leaves the grooves loaded. If your floor looks grey in traffic lanes even after mopping, this is the method for you.
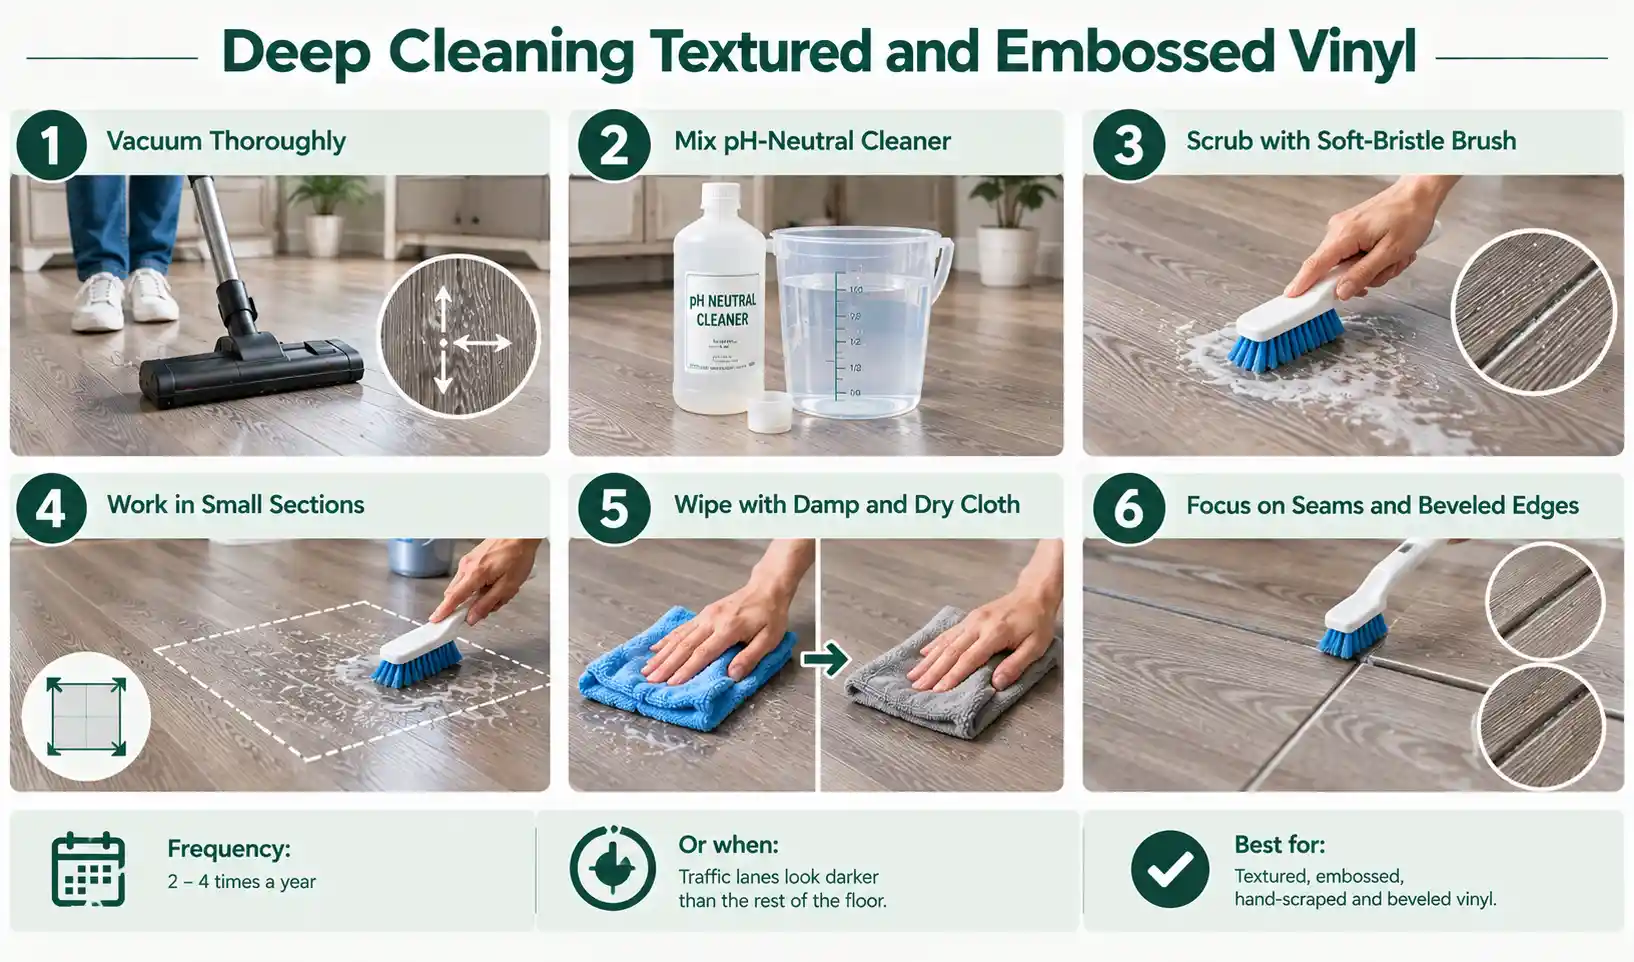
How to do it:
- Vacuum thoroughly, running the nozzle along the grain, then across it.
- Mix a pH-neutral cleaner at normal strength.
- Dip a soft-bristle brush, a grout brush, or an old toothbrush, and work along the grain in the texture. Light pressure only.
- Work in small sections so the solution never sits and dries.
- Wipe each section immediately with a damp microfiber cloth, then a dry one.
- Pay extra attention to seams and beveled edges, where dirt lines show up most.
Frequency: Two to four times a year, or whenever traffic lanes look darker than the rest of the floor.
Method 10: Cleaning Pet Accidents and Removing Odor
Vinyl handles pet accidents well on the surface. The problem is what soaks into the seams and stays there. Regular cleaner masks the smell. It does not remove the source.
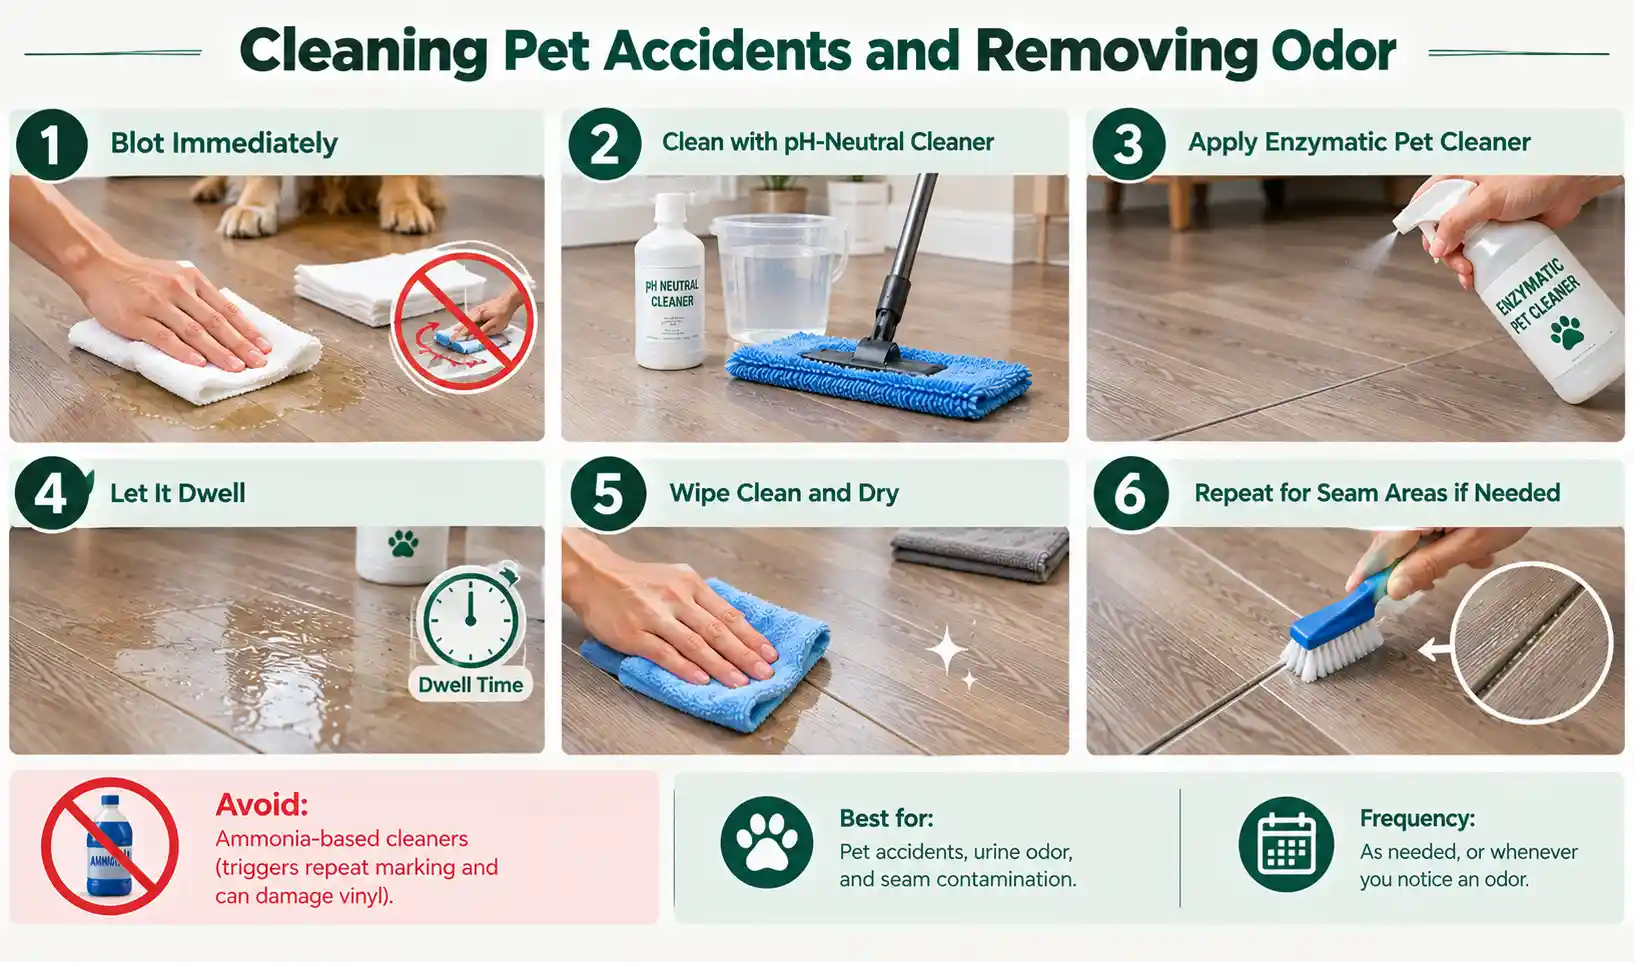
How to do it:
- Blot immediately with paper towels or a cloth. Press down and absorb. Do not wipe, because wiping spreads urine into a wider area and more seams.
- Clean the area with a pH-neutral cleaner and warm water.
- Apply an enzymatic pet cleaner rated for hard floors. Enzymes break down the uric acid crystals that cause lingering odor, which soap cannot do.
- Let it dwell for the time on the label. Enzymes need contact time to work.
- Wipe clean and dry thoroughly.
- For odor near seams, repeat the enzyme treatment.
Avoid ammonia-based cleaners entirely. Ammonia smells like urine to a dog and encourages repeat marking in the same spot, and manufacturers list it among the chemicals that damage vinyl anyway.
Bonus Method: Restoring Shine Without Wax
If your floor has gone flat and dull despite clean habits, you have two options and one trap.
The trap: Paste wax. Vinyl is a no-wax flooring product. Wax cannot bond to it, so it builds up, yellows, traps dirt, and eventually needs stripping.
Option 1: Strip the buildup. Most dullness isn’t worn vinyl; it’s residue from over-concentrated cleaners. Run Method 5 using plain warm water only, with fresh pads, and see how much gloss comes back. This fixes the problem surprisingly often.
Option 2: Apply an acrylic floor finish. Unlike wax, an acrylic finish is a liquid you apply with a mop, designed for resilient flooring. Use one approved by your manufacturer, apply thin coats on a spotlessly clean, dry floor, and let each coat cure fully.
Can You Use Pine-Sol on Vinyl Floors?
Yes, but with great care. Pine-Sol is a concentrated multi-surface cleaner with pine oil. This oil can damage the vinyl finish if you don’t use it properly. You can use it for occasional cleaning of the flooring.
For the safest use, add ¼ cup of Pine-Sol to at least a gallon of water. Damp the mop in this solution and wring it properly. Use this method for cleaning the vinyl sheets. Due to the thin LVP layer, this method is not recommended.
What Never to Use on Vinyl Flooring
| Do not use | Why |
| Steam mops | Heat and pressure warp planks, soften adhesive, and lift edges. |
| Ammonia | Breaks down the wear layer and causes cracking over time |
| Bleach | Can discolor and degrade the surface. Use only if your manufacturer specifies a dilution for a specific stain |
| Paste wax and solvent polishes | Cannot bond, so they build up and yellow |
| “Mop and shine” products | Leave a dull film that gets worse with every application |
| Oil soaps and oily “shine” tricks | Slippery, sticky, and a magnet for dirt |
| Abrasive pads, scouring powder, steel wool | Permanently scratch the wear layer |
| Vacuum beater bars | Rotating brushes scratch the finish |
| Flood mopping | Water in the seams reaches the subfloor and causes swelling and lifting |
| Very hot water | Can soften adhesive, especially under peel-and-stick tiles |
Fixing the Three Most Common Problems of Vinyl Floors
You may encounter these three problems even after cleaning the vinyl flooring. Check these problems and their solutions below:
- Your floor feels sticky after mopping. You used too much cleaner. Mop the whole floor with plain warm water and a clean pad, changing the water as soon as it clouds, then dry it. Next time, measure the dilution and finish every clean with a plain-water pass.
- Your floor looks streaky or hazy. Usually a dirty mop pad or dirty mop water. Switch to a fresh microfiber pad partway through, use the two-bucket method, and dry the floor instead of letting it air dry. Hard water leaves mineral spots, so drying matters more in hard-water areas.
- Traffic lanes look permanently grey. Grit has micro-scratched the wear layer in those lanes. Method 9 with a soft brush will pull out embedded dirt. If the dullness remains, the finish is worn, and a manufacturer-approved acrylic finish is the only real fix. Prevention is mats plus daily sweeping.
Effective Vinyl Floor Cleaning Schedule
| How often | What to do |
| Daily | Sweep or dust mop traffic areas. Wipe spills right away |
| Weekly | Damp mop with a pH-neutral cleaner. Vacuum edges and corners |
| Monthly | Move light furniture and clean underneath. Check and clean felt pads |
| Every 2 to 3 months | Two-bucket deep clean with a plain-water rinse |
| Twice a year | Soft-brush deep clean on textured floors. Inspect seams and edges |
| As needed | Spot-treat stains and scuffs the day they appear |
Final Words
Vinyl flooring rewards restraint. Sweep more than you mop, use less cleaner than you think you need, keep your mop barely damp, and rinse with plain water. Match the method to the mess instead of attacking everything with the same bucket. Follow these steps to keep your floor’s protective wear layer intact for years. Heat or harsh chemicals will strip that protective layer almost instantly.
Frequently Asked Questions
Can I use a steam mop on vinyl flooring?
No. Steam forces heat and moisture into the seams, softens adhesive, and can warp planks. A damp microfiber mop cleans just as well without the risk.
Is vinegar safe on vinyl floors?
Sometimes. Diluted at 1 cup per gallon of water, it cleans well and leaves no residue. But it is acidic, and many well-known brands tell owners to avoid it entirely. Check your manufacturer’s care sheet, and treat it as an occasional reset rather than a weekly routine.
How often should I mop vinyl flooring?
Once a week if you have pets or children, every two weeks otherwise. Kitchens and entryways often need more. Sweeping daily reduces how often you need to mop.
Why is my vinyl floor still dirty after mopping?
Almost always, dirty mop water or a saturated pad. You are moving grime around instead of lifting it. Use two buckets, change the rinse water when it clouds, and swap to a clean pad partway through a large floor.
Can I use a Magic Eraser on vinyl?
Be careful. Melamine foam works by very fine abrasion, so it can dull glossy finishes and leave a visible matte patch. Try a tennis ball or white eraser first, and test melamine foam in a hidden spot if you use it at all.
Does vinyl flooring need waxing?
No. Vinyl is a no-wax product, and wax cannot bond to it. If you want gloss back, strip existing residue with hot water first, then use an acrylic floor finish approved for your flooring.
Is vinyl plank flooring waterproof?
The planks resist water, but the installation isn’t sealed. Liquid runs into the seams and reaches the subfloor, where it causes swelling and lifting. Always damp mop, never flood mop.
What is the best cleaner for luxury vinyl plank?
A pH-neutral cleaner formulated for vinyl or resilient flooring. Check whether your manufacturer names a specific product, since using their recommended cleaner keeps your warranty intact.


