
How to Remove Tile Floor: Tools, Techniques & Safety Tips
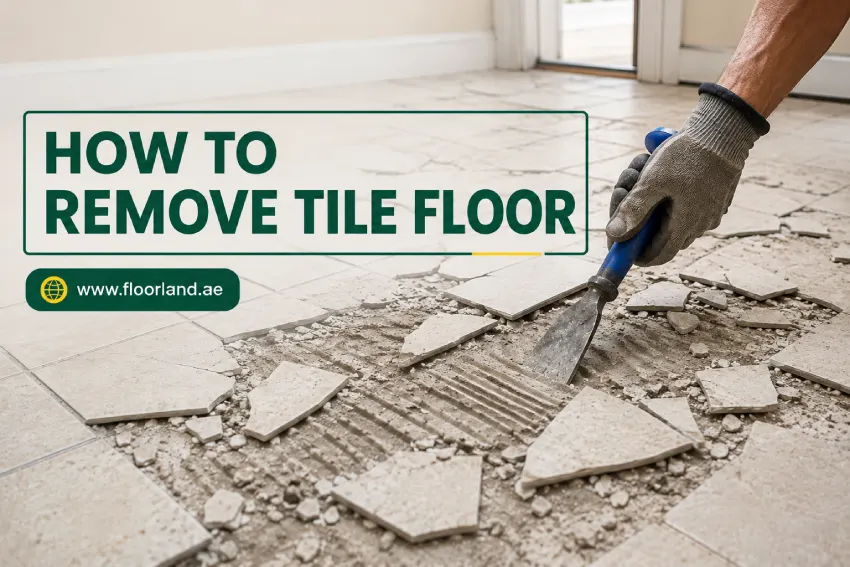
Removing a tile floor is a messy, physical job, but it becomes much more manageable when you use the right tools and understand what is underneath the tiles. The basic process is to prepare the room, create a starting point, and break and lift the tiles. Then remove the adhesive or thinset, and inspect the subfloor before installing new flooring.
The method can vary considerably depending on whether the tiles are installed over concrete, plywood, cement board, or a mortar bed. Tile bonded directly to concrete can usually withstand more aggressive removal, while a wood subfloor requires more care to avoid gouging or damaging the surface.
This guide by Floor Land explains how to remove a tile floor, including the tools to use, how to handle stubborn tiles and adhesive, and how to prepare the floor for whatever comes next.
Is Removing a Tile Floor Difficult?
Removing floor tiles is not usually complicated, but it can be physically demanding and time-consuming. The difficulty depends on several factors:
- How firmly the tiles are bonded
- Whether the tiles are ceramic, porcelain, or another material
- What is underneath the tile
- Whether adhesive or cement-based thinset was used
- The size of the room
- Whether you need to preserve the subfloor
- How much adhesive remains after the tiles are removed
A small bathroom may be manageable with hand tools, while a large tiled room can justify renting a rotary hammer, demolition hammer, or power floor scraper.
The important point is that removing the tile is only part of the job. In many installations, stubborn adhesive or thinset remains attached to the surface underneath and must also be removed or flattened before new flooring can be installed.
What You Need Before Removing Floor Tiles
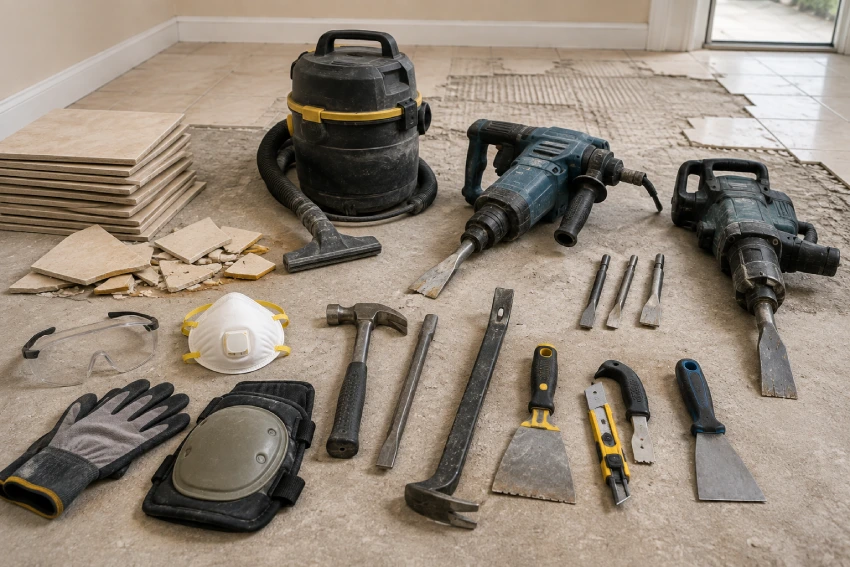
Do not pick tools based on the tile material. Pick tools based on how the tile attaches to the floor. A porcelain tile glued to a slab with a three-millimeter bed of thin-set behaves nothing like the same tile sitting on a 40 mm mortar bed. Spend ten minutes working out which system you have before you spend money on hire equipment.
| Safety Gear | Hand Tools | Power Tools Worth Having |
| Impact-rated safety glasses or goggles | Claw hammer / 1 kg club hammer | Rotary hammer |
| Cut-resistant or leather gloves | Cold or masonry chisel | Demolition hammer |
| N95 or P2 respirator | Wide flat pry bar / wrecking bar | Oscillating multi-tool |
| Ear muffs or earplugs | Long-handled floor scraper | Circular saw |
| Knee pads | Utility knife | Floor tile removal machine |
| Sturdy closed footwear | Grout saw / carbide grout blade | — |
| Long sleeves | Stiff putty knife | — |
Cleanup and Disposal
Underrating this part is the most common planning mistake. Ceramic and porcelain, plus mortar, make heavy rubble, and it fills containers fast.
- Shop vacuum with a fine-dust or HEPA filter and a drywall dust bag
- Contractor buckets, filled no more than halfway, and heavy-duty rubble sacks
- Dust sheets, plastic sheeting and painter’s tape for doorways and vents
- A garden sprayer or misting bottle to keep dust down
- Stiff broom, shovel and dustpan
If you’re hiring, a rotary hammer with two or three chisels is usually a day rate and pays for itself before lunch on a room-sized floor.
Identify the Installation First
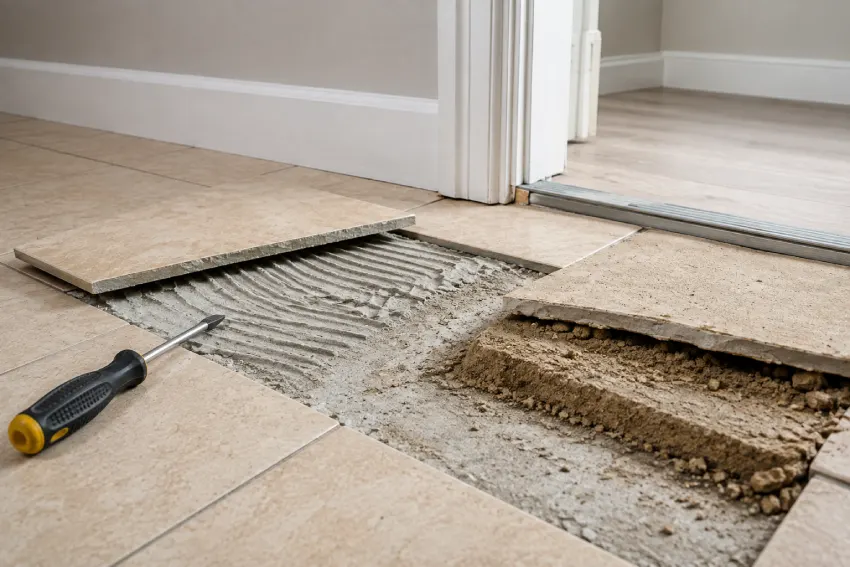
Lift one tile somewhere forgiving. Like inside a closet, under where a vanity sits, or at a doorway you’ll be trimming anyway. What’s stuck to the back tells you most of what you need to know.
- Thin grey or white ridges on bare concrete: a thin-set installation over a slab, typical of modern builds.
- Thin-set with grey fibrous board attached: cement backer board over a timber subfloor. The board usually comes up with the tile.
- A thick sandy bed, sometimes with wire mesh: a traditional mortar bed. Heaviest and slowest to remove.
- Tan or black gummy adhesive over plywood: organic mastic, common in older installations. It softens with heat.
- An orange or grey plastic sheet: an uncoupling or waterproofing membrane. Tile tends to release in larger pieces.
Then tap across the floor with a screwdriver handle. A hollow ring means the bond has already failed in that area, and those tiles will lift with a fraction of the effort. Finish by measuring the total build-up at a doorway threshold, because that number decides how much height you get back and whether your new floor will still clear the doors.
Step-By-Step Guide For Removing the Floor Tile
To easily remove the tiles from the floor, you can follow the below mentioned steps:
1. Clear and Protect the Room
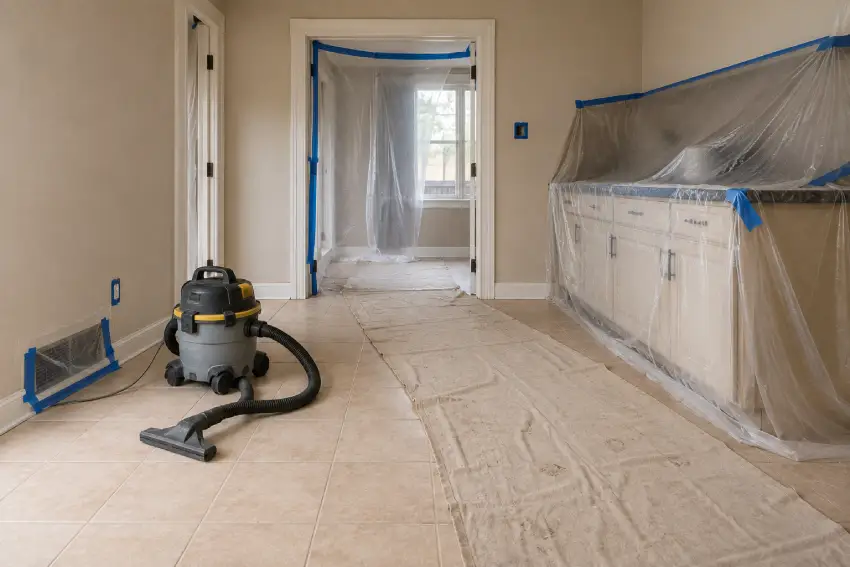
Empty the room completely and lift doors off their hinges so they don’t take a hit. Seal every air vent with plastic and tape. After that, hang sheeting across doorways with a generous overlap, and lay dust sheets along the route from the room to your skip or bin. Make sure to cover anything fixed in place, such as cabinets, a bath or a countertop, with a tarp taped down at the edges.
Set the shop vacuum up in the room before you start rather than after. Airborne dust quickly spreads everywhere. It is much easier to contain the dust now than to clean it up later.
2. Remove Trim and Edge Sealants
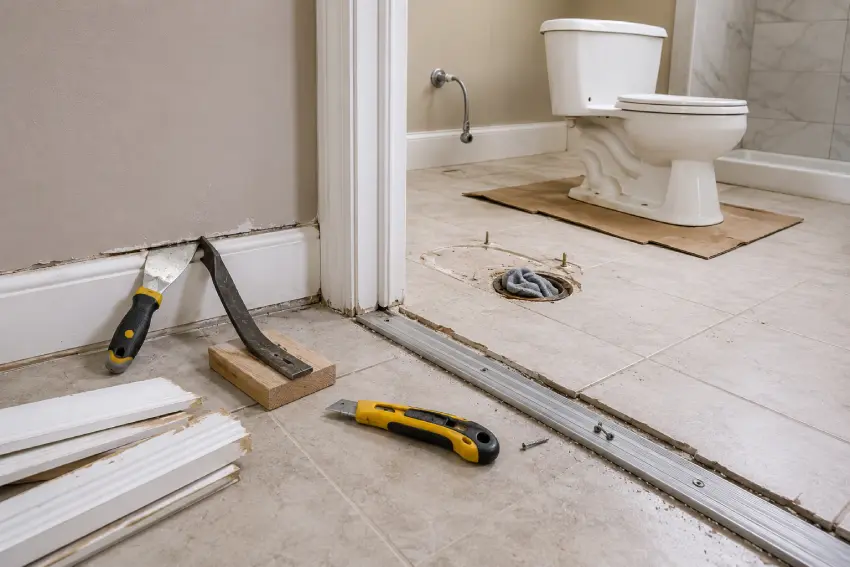
Score the paint line along the top of the baseboard with a utility knife. Then work a stiff putty knife behind it. Lever with a flat bar over a scrap of timber so you don’t crush the plaster. Number the back of each length if you plan to refit it. Cut through any silicone where the tile meets a bath, shower tray or kickboard, and pull doorway transition strips. These are frequently screwed straight through the tile.
In a bathroom, take the toilet out at this stage. Close the isolating valve, flush, sponge the tank and bowl dry. Also, disconnect the supply line, undo the closet bolts, and lift the pan straight up onto a sheet of cardboard. Push a rag into the open drain to block debris and sewer gas. If the shutoff won’t hold, call a plumber rather than working around a live supply.
3. Find a Starting Point
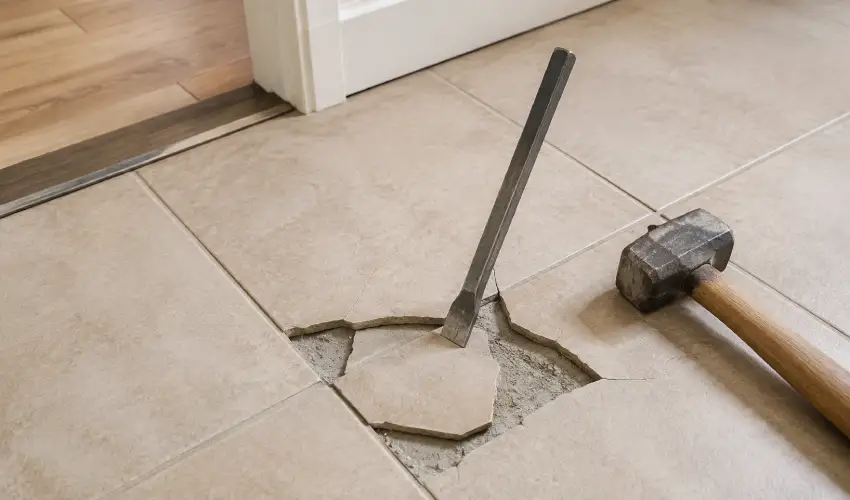
A tiled floor is strong as an unbroken field and weak at an edge. So your whole job depends on creating that first edge cleanly. Look for a natural break. It will be somewhere near a doorway threshold, the gap where a fixture used to sit, or a cracked tile. Plus, it can be one of the hollow-sounding tiles you found earlier.
If the floor really is wall to wall with no weak spot, sacrifice one tile in the middle of a run. Hold the cold chisel near the center of that tile at a steep angle. Strike firmly until it fractures, then clear the pieces out to expose the edges of its neighbors. Over plywood, angle the chisel flatter and let the tile crack under the blow instead of driving the tool down into the wood.
4. Break or Lift the First Tile
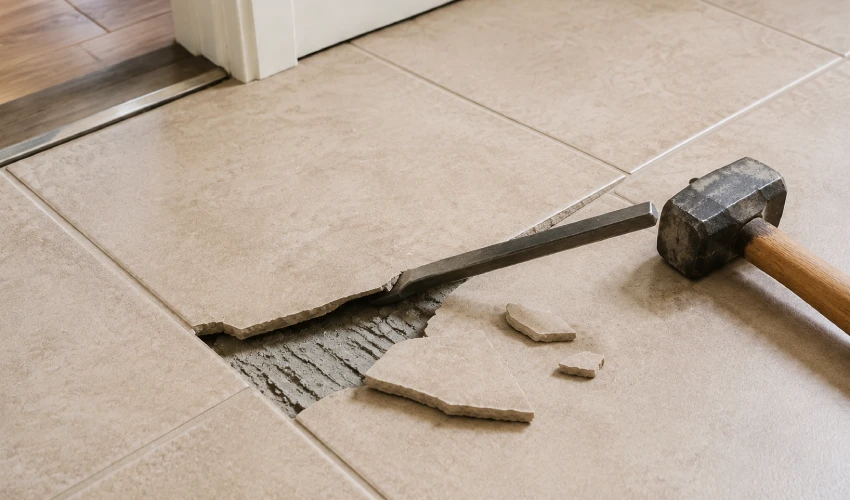
Once you have an open edge, change the angle completely. Drop the chisel to roughly 30 to 45 degrees. Place the tip on the joint between the tile and the substrate. Tap steadily with the hammer to drive it underneath. As the tile begins to move, work around its edges and lever rather than hammer. Well-bonded tiles come away in pieces; poorly bonded ones pop up whole and give you an easy run.
5. Remove the Remaining Tiles
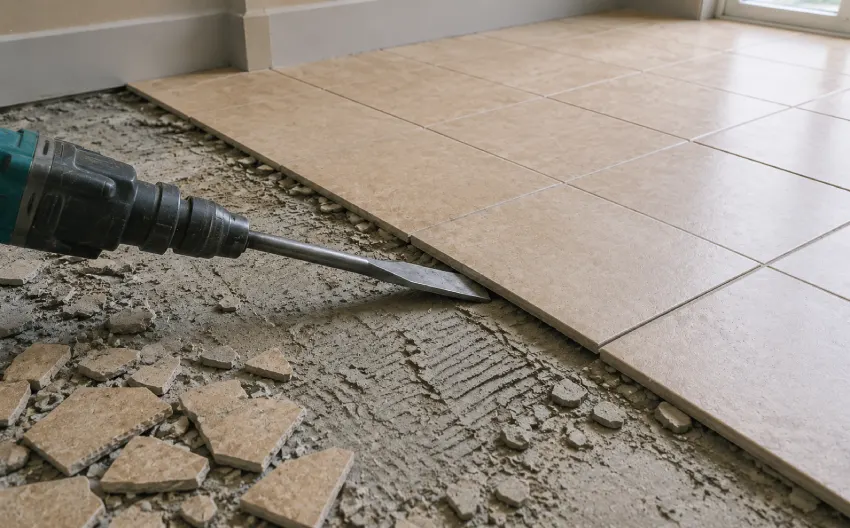
Work in rows, always attacking from the exposed edge into the intact field. Keep the chisel low, let the tool do the work, and clear the debris regularly. You cannot see the chisel edge under a pile of shards, and loose tile underfoot is how ankles get rolled.
- On concrete: once you have a meter or so open, switch to a rotary hammer with a wide tile chisel. Hold it at a shallow angle, around 20 to 30 degrees, and push it forward under the tile. Steeper angles bite into the slab and cost you time later.
- On plywood or backer board: stay with hand tools, or use the rotary hammer on its lowest setting with a wide chisel held nearly flat. In many cases, the faster and tidier option is to remove the underlayment along with the tile, which is covered below.
- On a mortar bed: break the bed into manageable squares first with a demolition hammer, or score it with a diamond blade, then lift the sections. Cut them smaller than looks necessary, because a mortar bed section is far heavier than it appears and the embedded wire mesh will slice gloves.
6. Remove Stubborn Adhesive or Mortar
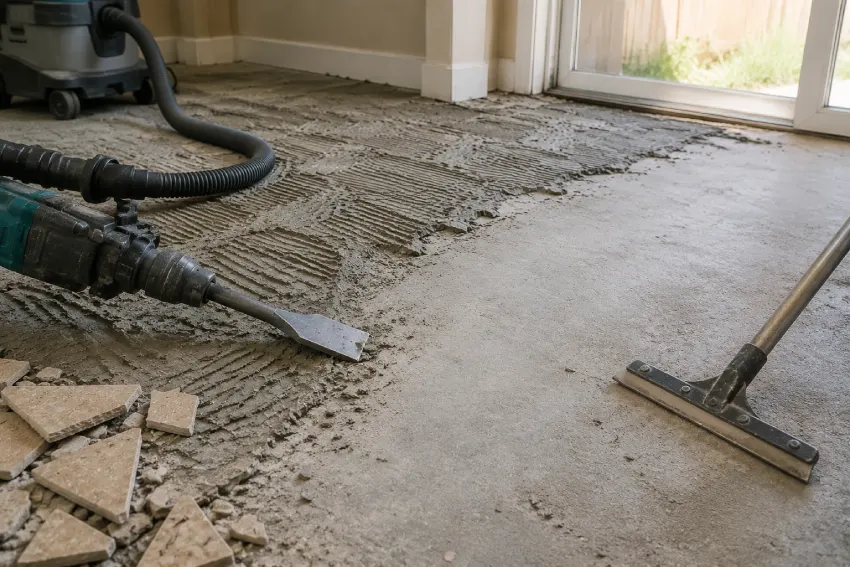
Whatever goes down next has to sit on a flat, sound surface. Leftover thin-set ridges telegraph straight through vinyl and stop new tile from bedding evenly. So this step is not optional even though it’s the least satisfying part of the job.
- Thin-set on concrete: use the rotary hammer with a wide scaling or scraping chisel held almost flat, working in overlapping passes. For a thin skim, a long-handled floor scraper or a diamond cup wheel with a dust shroud and vacuum attached will finish it.
- Thin-set on cement backer board: don’t waste hours scraping it. Unscrew and remove the board instead.
- Mastic on plywood: never sand it. Warm small patches with a heat gun and scrape while soft, or use a citrus or soy-based adhesive remover, then wash the surface and let it dry fully. If the adhesive is old, black and brittle, leave it alone and have it tested first.
- Mortar bed remnants: a demolition hammer with a spade chisel driven into the bed itself, rather than at the tile face, breaks it up fastest.
7. Clean the Subfloor
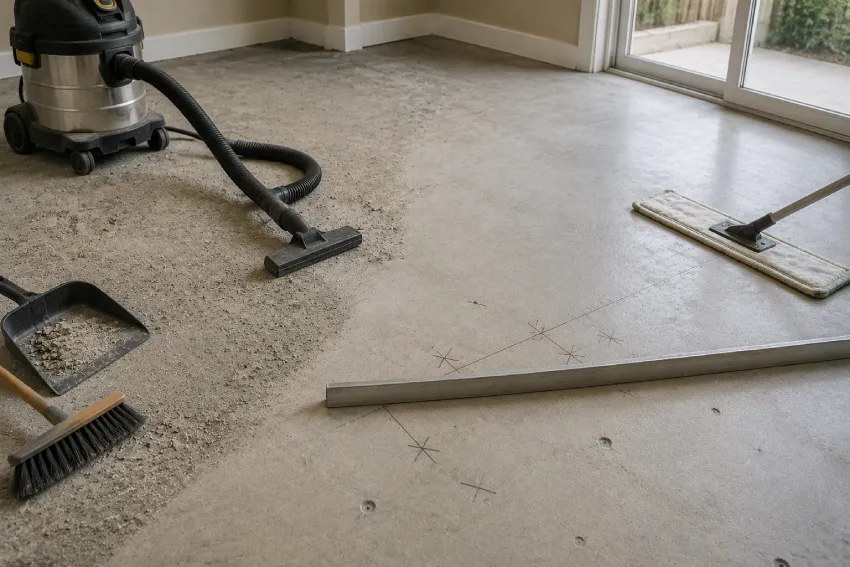
Shovel the large debris out, sweep, then vacuum with a fine-dust filter. Vacuum a second time, because that pass always picks up more than you expect and any grit left behind will sit under your new floor. Damp-mop concrete and let it dry properly. Don’t soak a timber subfloor. Finish by pulling or punching every protruding nail, screw and staple flush, then run a straightedge over the floor and pencil-mark the high and low spots.
8. Inspect and Prepare the Subfloor
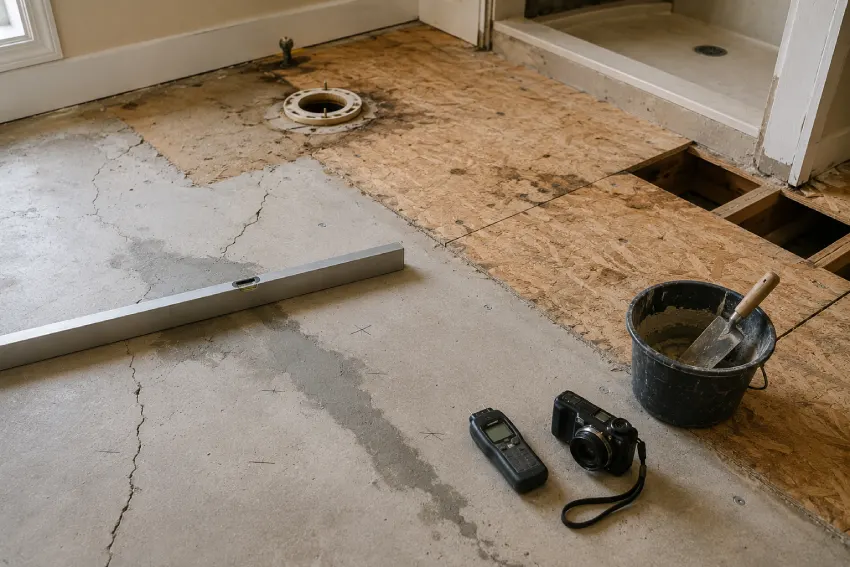
This is the point where you find out what you’re actually working with, so do it before ordering flooring.
- Concrete: look for cracks, spalling, and dished areas. Fine shrinkage cracks are normal. Wide, lipped, or actively moving cracks need proper repair. Patch with a cementitious repair mortar, prime as the manufacturer specifies, then use a self-leveling compound to bring the surface flat. Test the slab for moisture before laying wood or vinyl.
- Plywood or OSB: check for delamination, dark water staining, soft patches and any springiness underfoot. Screw the sheets down into the joists to kill squeaks. Replace damaged panels, and confirm the total thickness meets the requirements for whatever goes down next. Ceramic over timber needs a stiffer build-up than vinyl does.
- Bathrooms: pay particular attention to the area around the toilet flange, the shower curb and the junctions with walls, which is where hidden rot usually shows up.
Photograph everything before it gets covered. A picture of where the pipes and cables run is worth a lot the next time someone opens that floor.
How to Remove Floor Tiles With Mortar
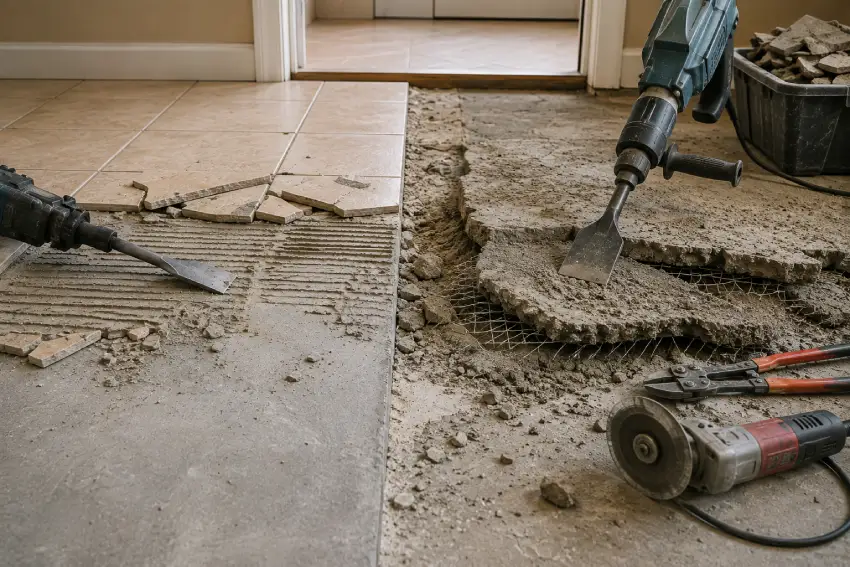
“Mortar” covers two very different installations, and confusing them leads people to hire the wrong tool.
Thin-Set Mortar
Thin-set mortar is the modern standard. A Cement-based adhesive troweled a few millimeters thick. Removing floor tiles with thin-set means breaking the bond line, so your chisel wants to travel along the interface between tile and substrate. The tile and the mortar come away together in flakes, and whatever stays behind gets scraped or ground off afterward.
Traditional Mortar Bed
A traditional mortar bed is a different thing. It’s a thick layer of sand and cement, often reinforced with wire mesh and sometimes laid over a felt or plastic slip sheet. You aren’t removing tile from a floor here; you’re removing a floor from a floor. Drive a demolition hammer with a spade chisel into the bed rather than tapping at the tile surface. Break it into sections roughly the size of a seat cushion, then cut the mesh with an angle grinder or bolt cutters and lift each section out. Where a slip sheet was used, whole sections often release cleanly from the slab underneath.
Two things to plan for
- The debris weight will surprise you, so order a larger skip than you think you need.
- Pulling out a mortar bed can drop the finished floor level by an inch or more.
Check how that affects doorway transitions, appliance heights, and the door undercut before you start swinging.
How to Remove Tile Floor From Concrete
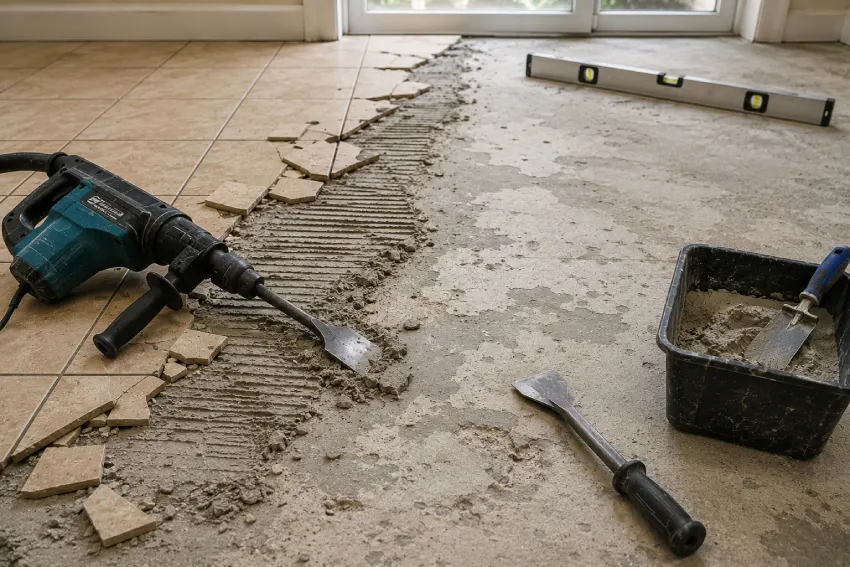
Concrete is the most forgiving substrate because it tolerates aggressive tools. It’s also where people get the biggest speed gain from a rotary hammer.
- Expect minor surface loss: Some thin-set may pull away a thin layer of concrete. This is normal when the bond is strong.
- Start at an open edge: Place the chisel almost flat against the slab and begin where the thin-set has an exposed edge.
- Use controlled pressure: Let the chisel slide forward under the mortar instead of hitting it aggressively.
- Work in sections: Move across the room in lanes, keeping loose thin-set ahead of you and the cleared floor behind.
- Use a wide flat chisel: After removing the tiles, switch to a wider chisel to scrape away the remaining thin-set.
- Patch minor damage: Once the thin-set is removed, repair small areas where concrete has come away.
- Level the surface: Apply a suitable leveling compound to create a smooth surface before installing the new flooring.
- Be careful with embedded systems: Post-tensioned slabs can contain steel cables, while some slabs contain hydronic heating pipes. Avoid deep chiseling if either may be present.
- Check before going deeper: If you suspect cables or pipes, keep the chisel shallow and check construction drawings or have the slab scanned before continuing.
Also Check Our Guide On: How to Clean the Concrete Floor
How to Remove Tile Floor From a Bathroom
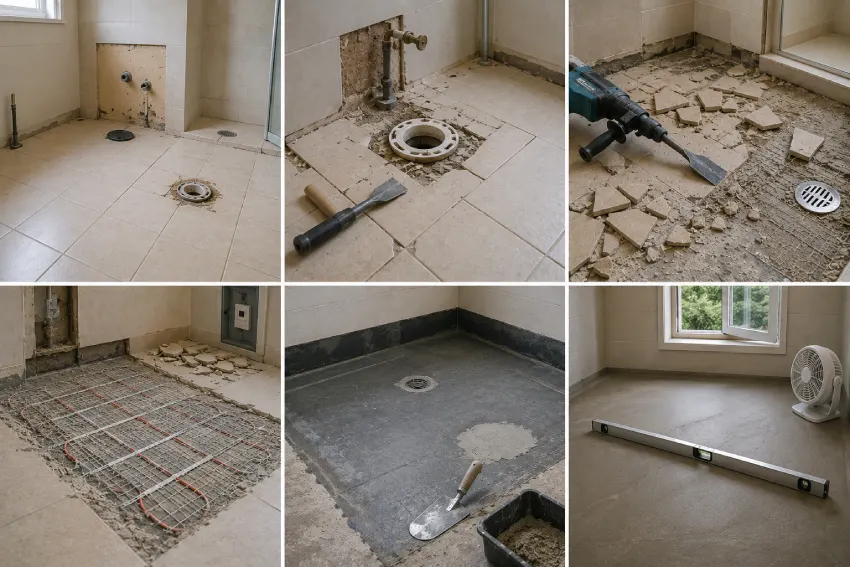
If you think the bathroom is usually small, the tile removal will be easy. So, you are wrong. Almost all the difficulty sits around the edges and the fixtures.
- Remove the toilet, vanity, pedestal, and shower screen track where possible before removing the tiles.
- Plug the open drain to prevent dust and debris from entering the pipe.
- Cut through all silicone joints before applying force to the tiles.
- Start removal from the exposed edges created around the removed fixtures.
- Use hand tools near the toilet flange and exposed pipework to avoid damaging them.
- Chisel away from pipes and fittings rather than towards them.
- Turn off the circuit breaker if the bathroom has an electric floor-heating system.
- Expect the heating mat to be damaged when removing tiles directly over it.
- Check the waterproofing membrane after removing the tiles and repair or replace it if breached.
- Restore the correct floor slope toward the drain before installing new tiles.
- Run the extractor fan and open a window to improve ventilation during dusty work.
- Take regular breaks outside the bathroom to avoid prolonged exposure to dust.
How to Remove Tile Floor From a Wood Subfloor
Removing tile from a wood subfloor requires more care than removing it from concrete. You have two options: remove the tile and underlayment together, or remove the tile while keeping the plywood intact. Choose the method based on how the floor was installed and whether the underlayment needs to be saved.
Remove Tile and Underlayment Together
If the tile is firmly bonded to a separate underlayment layer, removing both at once is often the quickest approach. Set a circular saw blade just below the underlayment thickness, using an offcut to set the depth accurately. Cut the floor into strips about 600 mm wide, then slide a flat bar beneath each strip and lift it with the tile attached. Remove or snap the screws as you go.
Before cutting, check the joist bays, ceiling below, and floor area for hidden pipes, electrical cables, and other services. Cut parallel to the joists where practical. Do not use this method if the tile is bonded directly to the structural subfloor.
Remove Tile Without Damaging the Wood
If you want to save the plywood, use hand tools and work with the chisel almost parallel to the floor. A wide chisel spreads the force and reduces the chance of gouging the veneer. Once the first row is removed, use a long-handled floor scraper to lift remaining material.
For mastic adhesive, soften small areas with a heat gun before scraping. Thin-set is harder to remove cleanly, so avoid chasing every ridge if it means damaging the plywood. Knock down high spots and use a wood-compatible patching or leveling compound where needed.
Watch the plywood layers as you work. If the second veneer layer becomes exposed, stop and reassess. Thin, water-damaged, or badly deteriorated underlayment may be better replaced than painstakingly preserved.
How to Remove Floor Tiles Without Breaking Them
Saving tiles without breaking them is very hard. It is only worth the effort if the tiles are expensive, historic, no longer sold, or if you only need to fix a few. Set expectations first: tiles over a mortar bed, over a membrane, or over mastic come up reasonably well. While tiles set with modern thin-set directly on concrete mostly break no matter how careful you are.
The single biggest factor is grout. Remove it completely from every joint around the tiles you want, right down to the substrate. You can use a grout saw or an oscillating tool with a carbide grout blade. Grout ties tiles to their neighbors, and any left in a corner will crack the tile the moment you apply leverage.
Then free one edge and work patiently. Slide a stiff, wide putty knife under a corner and tap it forward with light hammer taps rather than pushing hard. As it goes in, work around all four sides. Apply pressure at several points instead of levering hard at one, which is what snaps tiles across the middle. Swap to a thin pry bar once you have room, always keeping something wide under the bar so the load spreads. A few minutes per tile is a normal pace.
Clean the backs by soaking them in water and chipping the mortar off with a scraper once it’s softened, and stack them face to face with cardboard between. Sort as you work, expect to lose a percentage, and don’t plan a layout that depends on recovering every single one.
How to Remove Tile Floor With a Machine
Machine removal makes sense on large, open concrete areas where hand chiseling would take days. On a single bathroom, it’s a waste of money and a lot of stairs.
- Floor stripper: a heavy walk-behind or ride-on unit with an angled blade at the front. The machine’s own weight drives the blade under the tile and breaks the bond as it rolls forward. Fastest option by a wide margin on open slabs.
- Powered floor scraper: a lighter, vibrating-blade machine that lifts tile, vinyl and adhesive residue. Easier to transport and better suited to domestic rooms.
- Breaker with a floor attachment: a heavy demolition hammer fitted with a wide floor tool, which is essentially a rotary hammer scaled up and is the practical choice for thick mortar beds.
The technique is simple but not obvious. Set the blade shallow to begin with, and keep the machine moving forward at a steady walking pace. Let the weight do the breaking. Forcing the blade down drives it into the slab and stalls the machine. Overlap each pass, and change or sharpen blades as soon as they start riding over tile instead of under it, because a dull blade will convince you the machine is faulty.
Before Using Any Machine:
- Check the machine weight against your access route; avoid stairs with ride-on machines.
- Confirm the power supply, especially if the machine needs transformer power.
- Plan for noise and dust during operation.
- Have someone shovel and clear debris behind the machine.
- Expect to finish edges, corners, and perimeters by hand.
- Never use a heavy stripper on a suspended timber floor, as it can damage the plywood.
Can You Change Floor Tiles Without Removing Them?
Often, yes. Covering existing tile is a fair approach when the old floor is firmly bonded, flat, crack-free and free of moisture problems. The question is never really “can it be done” but “can this particular floor take it?”.
- New tile over old tile: possible with a suitable primer or bonding agent. Abrade glossy glazes, prime, and replace any hollow-sounding tiles first so you’re not building on a failure.
- Uncoupling or backer membrane: laid over the existing floor, this isolates the new tile from movement and cracks in the old one and is the more reliable route.
- Floating floor: click-together LVT, SPC or laminate floats over the top with an underlay, provided the grout joints are shallow. Deep or wide joints need filling first, or they telegraph through.
- Self-leveling compound: prime the tile, pour a leveling compound over it and you have a fresh flat base for sheet vinyl or glue-down LVT.
- Tile paint or epoxy coating: you can use flooring paint for a cosmetic upgrade for the tiles. Preparation determines whether it lasts a year or five, and it won’t fix an uneven surface.
The limits are mostly about height and condition. Every layer you add eats into door clearance, appliance space under counters, and threshold heights. In a bathroom, the relationship between the floor and the toilet flange or shower threshold. Loose or cracked tiles rule the approach out entirely. Because whatever you lay on top will fail exactly where the tile beneath it does. A useful test: only cover a floor you’d be reasonably happy to keep as it is.
Safety Precautions Before Removing Tile Flooring
Check some safety precautions below for removing the tile flooring.
- Control silica dust: Wear a properly fitted respirator, use wet methods or dust extraction, and never dry-sweep fine mortar dust. Seal vents and doorways to prevent dust from spreading.
- Test suspect older materials: Some older vinyl tiles, flooring backings, and cutback adhesives may contain asbestos. If the flooring predates the 1980s or contains unidentified layers, have it professionally tested before disturbing it.
- Protect against sharp fragments: Wear safety glasses or goggles and cut-resistant gloves. Keep other people and pets away from the work area.
- Use hearing protection: Wear hearing protection when operating rotary or demolition hammers. Take regular breaks during prolonged use to reduce vibration exposure.
- Check for hidden services: Look for underfloor heating, plumbing, and electrical cables before chiseling. Switch off relevant electrical circuits and use hand tools where services may be present.
- Protect bathroom waterproofing: Avoid damaging the waterproofing membrane beneath bathroom tiles. If it is damaged, repair or replace it before installing new flooring.
- Remove debris safely: Clear broken tile as you work, use manageable loads, and plan how debris will be removed from the building.
Common Mistakes to Avoid While Removing the Tiles
Below are some common mistakes that most of the people make while removing the floor tiles. Make sure to avoid them for flawless results:
- Swinging harder instead of adjusting the chisel angle, which tires you out and chews up the substrate
- Skipping dust containment and spending the following week cleaning the rest of the house
- Putting a demolition hammer on a plywood floor and turning a repairable subfloor into a replacement
- Leaving thin-set ridges behind and expecting leveling compound to hide them
- Starting work without checking for underfloor heating, cables or pipes
- Ignoring the height budget until the new floor is down and the door won’t close
- Underestimating debris and either overfilling sacks or booking a skip that’s too small
- Chasing tile salvage on an installation where the breakage rate makes it pointless
- Grinding or sanding unidentified adhesive in an older property instead of having it tested
- Tackling a whole house in one session and losing three days to a wrecked back
What to Do After Removing the Tile Floor
Clean the surface properly, then measure it against the flatness tolerance your new flooring manufacturer specifies. Every product states one, and it varies enough that guessing isn’t useful. Patch, level and prime in whatever order the compound manufacturer requires, and test concrete slabs for moisture before laying wood or vinyl over them.
In wet areas, reinstate the waterproofing before anything else goes down, and get it done to the standard that applies where you live. Then let the new flooring acclimatize in the room for the period the manufacturer recommends. It can usually take a couple of days and is the cheapest insurance available against cupping and gaps.
Reinstall fixtures with fresh seals rather than the old ones. A toilet needs a new wax ring or pan collar every time it’s lifted, and every silicone junction gets cut out and redone. Refit or replace the baseboards last, remembering that a thinner new floor may leave a gap at the bottom that needs a shoe molding. Finally, dispose of the rubble properly, since many waste facilities want ceramic and mortar separated from general construction waste.
When Should You Hire a Professional?
Bring someone in when the risk isn’t really about effort. Suspected asbestos in tiles or adhesive always goes to a licensed contractor, without exception. Post-tensioned slabs, underfloor heating you want to keep, and large traditional mortar beds all fall into the same category. In these situations, a mistake costs far more than the labor you saved.
Bathrooms are worth a second thought too. If the floor needs new waterproofing, many regions require that work to be carried out and certified by a licensed trade. A failure shows up as damage to the room below rather than a visible defect. Structural problems you uncover mid-job, such as rotten joists or a failing subfloor, are also a natural handover point.
There’s a practical side as well. Multi-story debris removal, a hard deadline, or a floor larger than you can realistically finish over a couple of weekends are all good reasons to hand it over. When you get quotes, check whether removal, disposal, and floor preparation are included or listed separately, because those three lines are where estimates most often differ.
Final Thoughts
Removing a tile floor is a labor-intensive project where technique and proper preparation matter far more than brute force. Taking time to identify your subfloor, set up effective dust containment, and wear proper safety gear will save you from costly repairs and clean-up headaches later. While DIY demolition can certainly cut project costs, always respect the limitations of your substrate. If you run into structural rot, intricate waterproofing requirements, or suspected hazardous materials like asbestos, bringing in a licensed flooring professional is the safest choice. A cleanly prepped subfloor is the ultimate foundation for a successful new installation.
Frequently Asked Questions
The easiest floor is one that’s already letting go. Tap around with a screwdriver handle, start wherever the tile sounds hollow, and work outward from there. Beyond that, the single biggest improvement over a hammer and cold chisel is a rotary hammer with a wide tile chisel, which turns a weekend on a concrete slab into an afternoon. Keep it shallow, work from an open edge and clear debris often. On a timber floor, the easiest route is usually cutting out the tile and its underlayment together and fitting new underlayment.
Most people can manage a normal-sized room. It’s slow, dusty and noisy rather than technically skilled, and the requirements are proper PPE, a way to contain dust, somewhere to put heavy debris and the physical capacity for hours of kneeling and hammering. Hand it to a professional if you suspect asbestos, if there’s underfloor heating you want to preserve, if the slab may be post-tensioned, or if the bathroom will need certified waterproofing afterward.
Some marking is normal and expected. On concrete, the mortar bond is often stronger than the top layer of the slab, so you’ll leave shallow divots, and those get patched and leveled as a matter of course. On plywood, the risk is more real, because chiseling tears the face veneer and can delaminate the sheet, which is exactly why many installers remove the underlayment along with the tile instead of fighting for a clean surface. Structural damage is uncommon; cosmetic damage is routine and fixable.
If the existing tiles are firmly bonded, flat and crack-free, you have several workable options: lay new tile over the old using a suitable primer or an uncoupling membrane, float a click-together LVT or laminate over an underlay, skim the floor with self-leveling compound and glue down vinyl, or use a tile paint system for a purely cosmetic refresh. Check the height budget before choosing, since doors, appliance clearances, thresholds and toilet flange heights all limit how much you can add.


